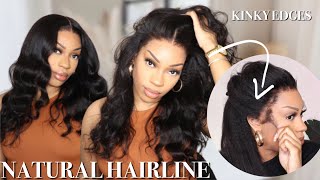
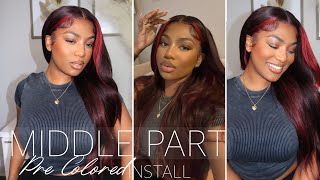
Cheap Amazon Synthetic Wig Turned Professional!
- Posted on 09 October, 2022
- T Part Wig
- By Anonymous
I hope you enjoy these hacks I use to turn my cheap $30 synthetic wigs into a fabulous beauty statement!
Allmylinks.com/emilyrosetv
Suv, hello and welcome, or welcome back to my channel. If you are new here, my name is Emily or you can call me. Emily Rose TV, and today we are going to be going we're. Today we are going to be miraculously changing a cheap synthetic Amazon wig that I got for maybe 30 dollars and we're going to try to make it look professional and make it look nice and sleek and give it a little makeover. As you see a lot of these wigs from Amazon that are cheap and synthetic, they do not look realistic at all um. They are cute, but they need a little bit of TLC. If you ask me, but it is so cool to have different wigs and to be able to transform your look and just be a different person or be a different style. So I really appreciate some of the other tips and hacks that I've learned from other YouTubers, like maybe you've seen before. But all of this is a very minimal effort, very DIY, because I don't really wear wigs enough to spend a lot of money on them and, as you can see my little setup here, I just have a styrofoam head. All the styrofoam heads have a hole in the bottom, so I just had this old tripod stand. As you can see, I just have an old tripod and stand that I don't use anymore, that I just simply put it on there. No issues, no glue, no tape. No nothing like that, so everything is very cheap, but I also don't have the lace front on there. It came with the lace front. However, I took it off already before I realized hey. I should probably do some work to this, so please keep on your lace front. Otherwise, it might be a little bit trickier, but we're gon na try to get through this on the lace front, whenever you have this on the mannequin go ahead and just take some pins, some sewing pins or clothespins and secure your mannequin. So I don't have the lace front, so I'm gon na have to just use the cap. So as you see, this is a little bit unrealistic. This hairline, it is a little bit too thick, there's no baby hairs or anything. So a little hack that you can do first, for the part, is to not part it in the middle. This is directly in the middle. However, it is better to part it a little bit off center, just because our faces are not like, usually always or never, they're like never symmetrical, so don't just make it look better to be a little bit off-centered. No, I might not be perfect, but it's not a bad thing if it's not perfect, because there's just a lot of hair here and my hairline so not always perfect see it's not gon na stay super well right now, because the part is in the middle. This one wasn't just really willy-nilly this one had a part, so this one might be a little trickier to get the part. Okay, just really tingly. So after this we're gon na brush it all right, it's a little better. So now we're gon na brush it and it is best not to use plastic brush it's better to use a more natural brush, something with they make bristles like this is like this or a wooden brush, because plastic will just make it more frizzy, because this is A plastic wig, so I have to brush it out very soft and slow and with a nice natural brush. So this hair is way too thick for sure we're gon na have to thin it. I do not have thinning Scissors because again, I'm not a professional. However, I do have some thinning a thinning razor for a dog, so I will be using that I'll show you what it looks like in a second got. Ta finish brushing this again. It doesn't have to be perfect because we are going to cut a lot of the ends off because I'm in here this long is unrealistic and it's going to get rid of a lot of the thickness and the messiness and bulkiness of it. Let'S fast forward past the brushing so and next we are going to take our steamer and steam it down a little bit. This was just like thirty dollars on Amazon, because this is plastic. You will basically melt the wig and you can help form it and shape it to be more human-like. Do you want to get your hair, your wig as flat as possible? That way, whenever you do put it on and you do have hair underneath the wig and it won't be as noticeable foreign looks, a much flatter all right. This is pretty flat to me. So make sure you do the other layers as well just a little bit underneath, let me get even flatter. I got them underneath, but the other side, so we are going to keep doing this until it looks basically straight. I want to try to get all the curls out as much as possible that way: it'll look as flat as possible, so now we're going to take the razor or the hair thinner or whatever you have and try to get rid of some of this hair, because It'S way too thick take a minute, so first we're going to take a section of hair around the face, because the hair on the face is never this long. So it's just like an inch and a half and we're going to push it out. Well, it's gon na be cut off, probably so take your razor. This is a razor like this and you're going to just go down this way so we're gon na we started to basically when we started here. We want to start more at the chin, but I'm just kind of going along as we go one time you can also get some wig detangler, which I don't have. You can also make your own, but I totally forgot so and do the other side. Okay and do the same thing brush it out and be able to start a little higher this time, because my face is a little shorter. It'S around the face so and again we'll take it here and you start. I might actually be easier to use the scissors, but it's kind of gives it a damaged, look families. Oh, I just didn't damage, but foreign should not have worn cotton pans, foreign cute. Actually, I can't even tell to figure the difference yet. I don't really take a lot of hair, but this one has a lot of hair and my hair foreign foreign. It'S gon na look on the face. I just went through and cut with the scissors a few times just in a diagonal line on both sides. So now what I want to do is thin out her hair a little bit. So what I'm going to do is just take it layer by layer and just go through with the razor and do the same chop in a diagonal just to make it have a little bit more layers and make it a little bit more full of texture. Foreign. Now I'm just going to brush the heck out of it, because there are quite a few Tangles after using the razor and moving it around so much, then I want to focus on making it a little bit thinner, mirror in the middle and the bottom. So we're just going to take our scissors and cut some off the bottom foreign and again I just cut out an angle right here. I don't really know how long I want to get so cutting at an angle helps you be able to see where you would like to have it foreign foreign. It looks already there's not really hardly any tingles so much easier to handle and so much easier to brush and to manage it. Just doesn't it doesn't just keep getting tangled up so now we're going to take with all his hair on the floor. My feet: we're gon na take like a centimeter of the hairline on obviously on both sides and we're gon na brush your hands forward like a tiny about right there brush it forward, you can focus on the cut and you're going to want to get rid of. Basically, all of it, except like an inch, we're gon na keep it about an inch, and this is gon na, be your little baby, hairs foreign, take your scissors and cut it out, and that's too much baby here this one. I keep about an inch of that. Give It Up a little baby hairs. I can't really see them from here and again go to both sides - foreign, if you don't lay down all the way like this one, might have to take a steamer to that again, all right. So at this point you can, if you want to choose to curl it or straighten it more, you can. However, this is a pretty the light beachy wave that I don't mind having. However, if you do choose to use a straightener or curling iron, do not use it for a long time again. This is plastic, so just be careful with it and be very gentle and don't leave it on for long and make sure to try to keep it in one position that way it will stay, because that's how plastic works this is going to be. I think this is going to be the final. The final product looks pretty natural, just make sure to try to give it as much texture as possible. You can also, if it has too much shine, this one doesn't have too much shine if your synthetic Wick has too much shine, which a lot of times they do then make sure that you, you can use a dry shampoo, which is one of the best things To use for the shine, so you can use a dry shampoo for the shine and also, if there's a lot of places here that you can tell is like. If you really really really want to get picky, then you can put some eyeshadow here to make. It have a little bit of roots. It'S a brown eyeshadow blonde eyeshadow, whatever color your hair is. You can put that in the part that way it also looks for real, but we're not gon na do that, because this is just for fun and I'm not taking this one too seriously, and this is the final product I want to. Thank you guys so much for watching this video. I hope some of this or all of it helped if you have any more questions, if you have any more questions, please comment below and let me know if you like this video, I will have more videos on wigs, but I don't just do wigs. I have a lot of other types of videos that I do so. This is just one of those videos and I thank you so much for the support and for watching me and love to you guys, bye foreign foreign


Comments
Guillermo: 26:28