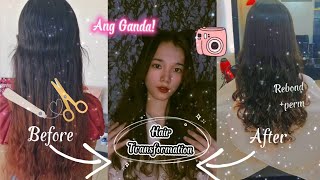
How To: Quick U-Part Wig Install
- Posted on 01 April, 2016
- T Part Wig
- By Anonymous
Hi loves! This install took me 17 minutes from start to finish before editing. I literally did this before heading to work! If you want a more detailed view let me know! Thanks for watching! xo
_ _ _ _ _ _ _ _ _ _ _ _ _ _ _ _ _ _ _ _ _ _ _ _ _
▷SHOP MY HAIR STORE
@HAIRBYYAIL
▷WANT TO SEND ME THINGS.. HERE'S MY P.O BOX
Anneayail
315 Empire Blvd. #250440
Brooklyn, NY 11225
▷FOLLOW ME!
INSTAGRAM ‣ https://instagram.com/Anneayail
SNAPCHAT ‣ @Anneayail
TWITTER ‣ http://www.twitter.com/Anneayail
Like My Facebook Page!
http://www.facebook.com/Anneayail
Have a Question or Need Advice? EMAIL : [email protected]
For Business Inquires ONLY Email: [email protected]
_ _ _ _ _ _ _ _ _ _ _ _ _ _ _ _ _ _ _ _ _ _ _ _ _
AWESOME Beat By: Noble Paige Patrick
instagram/facebook/youtube: @noblepaigepatrick
email:[email protected]
Hi guys it's me and in a bucket another video today, I'm going to show you how I genteel and stop my heart really quickly with minimal styling. This whole thing people try to edit equipment every 20 minutes. So if you want to see how I got this look in catch me seems like some go, so this is my unit. This is Filipino wavy hair arm, dainty, dream hair, so I'm just going to brush it out. I wash the wig and let it air dry, and this is what it looks like. Isn'T it pretty so right now? This is my braid pattern. The back is just in one big braid, because I know that I'm going to take this out shortly so yeah. So I'm just clipping out my heat damaged, leave out I'll, let you know about that in another video and I'm just going to flat iron. Like some of my edges, I didn't leave much hair out I caught as much in the word as I could only because my edges will be showing, though I didn't want to like, have too much out unnecessarily, so I'm just buying in that with a small flat Iron system touches there girl and not yourself. At the same time, I sprayed heat protectant before this. I believe it was like Chi flat iron spray, so I already use that so yeah next. What I'm going to do is I'm going to clip my wig in. I have a wig clips on my wigs so right now, I'm just showing you like what this clips are. I only use six clips on my wigs personally, because I don't like wigs. I don't like too many Clips so right now. I am just going to clip in the hair onto my ankle, brace, so I'm going to slide that in don't worry. If it takes you in just a little while to position it exactly how you want, sometimes I put it in take it out, put it in. Take it out just to make sure that it is high up as I want to, and that's why I use wig clips instead of homes, because I feel, like you, get better placement with the clips, but just have to be careful not to make your braids too. Tight that you don't lose any hair from the tension on this list, so I'm just snapping those in place because I, like the placement of that side and I'm just carrying the wig around to clip it in on the table, looks at my left side yeah. My left side always and just opening those clips up or making sure they're open and then I'm going to do the same thing. We just slide those onto the ankle brace and make sure that the weight is secure. If you want to use more clips, be my guest, this is just how I like to install my wrist personally, because again I don't even keep them in for long. Sometimes I may just even keep this in just for today, who knows ordinals. I need her. I'M just securing the lacing in the back at the straps and yeah. That'S basically gon na, be it for this wig I may play around with it a bit just to make sure that I get it at the correct tightness of my liking and yeah. So next is what I'm going to continue to do that for a while, just because yeah. So now, I'm just sliding in the clips on the side really quickly. I'M going to start brushing out my hair, making sure that it's comfortable on my head and I like the placement of the clips before I start blending. But do you see those ways? Let'S talk about those so right here, I'm just combing my leave out again. I already use my flat iron spray by Chi, so yeah don't think I'm not using any heat protectant. So I'm just going to go in and set on my leave out. My leave out is heat damaged, but it definitely is going back. You could tell by that back piece there. I have not firmed my hair in 12 weeks, so I'm 12 weeks posts. So I need a little extra love from the flat iron to get that straight. I'M just going to section it off and continue to do this. I'M going to use smaller sections so that I could do less passes and use less heat, but I'm going to end up doing two on each section. So then, I like to go on the side and I just blend with my flat iron leave out as I go along kind of Flatiron it where I want it to lay. So it's just easier. So that's where I'm fine earning this portion now to pull on this side and I'm just going to continue to do small sections. As I go around my head, it's just easier for me and again my step might is about is a bit heat damaged, but I did trim it and it definitely is going back. I may do another trim very soon after my relaxer so yeah as you can see, I don't have like a lot of leave out, but I'm just going to continue to Flatiron all around and just keep the shape of. You know how I'm going to eventually finish parting it. So you can see here, Flatiron and I'm gon na go out here, Flatiron, just making sure that it's laid and blended to the best of my ability. Again, I am twelve weeks post, so I don't expect inspire to work miracles and I do kind of do a middle part, but it's like an off-center little car because I don't think little parts. Look that great on me and right here: I'm just going to do this silk elements. This is edge control. I'M just going to use that on my edges, where my leave out is and then I'm going to pull the legs back. The minimal side of the edges and just brush that in how to make sure those edges get laid honey. And then I'm going to do that on the other side, just use sub-element straight edges. This is super super awesome. I love it even when I'm in desperate need of a relaxer as I am now it still works wonders for me, and I'm just going to use my cortex Flatiron just to put some random wand curls, because some of the closer, while the way they're looser in The front, that's probably from all the flat ironing I've done beforehand, but, as you can see, the hair takes to the curling wand is pretty well and I'm just randomly placing these wand curls just so that my hair has like a better shape. You know this is really just supposed to be minimal styling if you want to see a curling wand, tutorial or wand crow tutorial to see the comments down below. So I'm just repeating that, on the other side, just to give a few random Wankel. So my face sounds like some definition, since I don't have like any things I'm going to use in shell without trouble with that, then I'm just gon na a few more pieces and so that my hair looks like something I want this to be like over. The top it's just throw on your way blend and go kind of situation, and then I believe I am done. This is what my hair looks like and yes, this is three and a half bundles of Filipino wavy. Thanks for watching


Comments
NaeCole: This middle part upart can be shifted to a side part ?
Angelina TheNailTech: Those very few wand curls made a huge difference
Chigo Voller: lovely hair, where did you get it from?
קורל א: thenks you !!!
ALLUREXO: Can you make a video on how you make your wigs please
Simplykay: What texture is the hair ?
talia janae: so this can come off at anytime ? i cant go to school with my hairstyle somebody will yank it off
Jamlisa: Why flat iron the edges? You can't see them under the wig girl! Leave them edges alone
Andrzej Sniadowski: What is wrong with your natural hair?
Naani Dang: Turn your tv down
Eryn Landry: How long does this hair last you? Does it tangle quick?