Full Wig Install Side Swoop Ponytail + Fishtail Braid
- Posted on 12 October, 2022
- T Part Wig
- By Anonymous
Follow my hair ig
https://www.instagram.com/hairbynbbeau...
Lipgloss ig
https://www.instagram.com/nellyb.beaut...
Follow my tictok
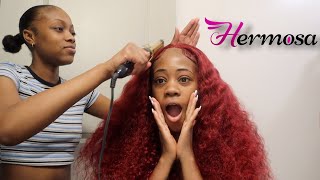
What is up you guys welcome back to the channel, so in today's video I'm going to show you guys how I installed this full wig. This was a side swoop and a messy fishtail super cute. So I went ahead and I did the ball cap off camera. I also applied makeup of her shade or closest to her skin tone um to the ball cap as well, and now I'm just putting the adhesive you want to apply thin layers and then build on top of that. You don't want to go in with too much glue at once and now I'm just taking the popsicle stick and I'm just smoothing it out. So, while I'm waiting for this side to dry clear, I'm going to go ahead and apply the adhesive on the opposite side, you want to make sure that it's dry clear before you go ahead and add your second layer, but not not completely dry drying, clear and Drying completely dries two different things, so you want to make sure it's still tacky if that makes sense, so I'm gon na smooth it out and just continue doing the same steps. I did this about four four times so again, I'm going to apply the adhesive on the other side. While I wait for this side to dry, clear um, I don't like to use a blow dryer to speed up the process, because I don't know I just kind of just let the adhesive do its thing. It dries pretty quickly anyways and I don't want to use a blow dryer because it can um dry too much, and then you still want your glue to be tacky. You want your lace to stick onto the adhesive, so I just let it air dry um. So now it's time to apply the wig. This is a reinstall. I think we did about four or five different hairstyles with this one wig and prior to that she's been had this, so I think this is probably going to be the last install because the lace was starting to rip and all that. So that's why we decided to do a side swoop, but yeah you guys so now, I'm just going to take the wig and I'm gon na pull it Forward over the adhesive and then I'm going to ask her to hold it down and yeah. I'M just gon na, let you guys watch me do my thing until I feel like I have um something else to say. Then I'm going to take my melt band and I'm going to keep that tied down for about five minutes and then I'm going to take it back off and this glue like it's on. It'S really really on, but to get an even stronger, stronger hold and in even better melt. I'M going to take my oven, adhesive spray, and this spray comes in three different colors red and I believe the other color is yellow and then there's black. So black is the strongest one, and I promise you like. Your lace is not going anywhere. It already wasn't going anywhere with the glue itself, but with the adhesive spray, the Black Bottle. I promise you it's not going anywhere after I spray the lace with the adhesive spray. I tie it down again for about five minutes and if I feel like the adhesive spray, um didn't dry enough. While the Melt band was on, I just put the blow dryer on a cool setting and I dry it foreign. So now I'm just parting out where her swoop is going to be and once I'm happy with the way it's laying and slaying, I'm going to section that area off with a jaw clip and then I'm going to move on to the sides and the back. Now you guys for a full wig install. You want to make sure that the front part of the lace is completely completely dried before you move on to the sides and the back, because you're going to be pulling the lace and you do not want the front to lift up so a full rig install, Usually like it's going to take some time because you have to work in sections and you got to make sure that each section is completely dried before you move on to the next section, if that makes sense, so it's going to take some time um. But I love doing a full wig installs. I just love the way it looks. I prefer a full wig over frontal ponytails. Just because, like you know, if you have natural hair, even if you straighten your hair or press it out, you can never really get it to match. The frontal like you, can never really get your natural hair to have the exact same texture as the frontal. So I really love doing full wig installs, although it takes some time, but you guys are gon na see towards the end of the video how nice and Sleek this is going to look with the baby hairs at the back. Oh, my goodness, so once that adhesive is dried, I'm pulling the lace forward over the adhesive. That'S why I said you guys have to make sure the front is on, and it's stuck because there's going to be a lot of pulling you guys and then I'm going to tie it down with my melts band and I'm repeating the exact same thing that I Did for the front I'm going to leave the Melt band on for about four minutes, then I'm going to take it back off, apply the adhesive spray tie it down again and then and um take it back off and then we're going to start styling. And here I'm just showing you guys how versatile the full wig is. You can literally do any style. You want, you can part it anywhere any direction like we did a lot of styles with this wig and I'm going to put in the video like the amount of styles, that we did, I'm going to put the video on the screen right now. All right, you guys, so I didn't want the ponytail to be too too low. I kind of wanted somewhat of a mid ponytail, so I parted out half of the hair and I'm going to spray some holding spray and blow dry that in place. If you guys watch my um ponytail videos, it's basically like the same the same steps so once the bottom half is dried in place, I'm going to take the top half and bring it to meet the bottom, half just kind of put everything all together um. I want to make sure everywhere is nice and smooth, so I'm going to take my hot comb and just kind of flatten it more as if it needs to be even any flatter, like I'm just addicted to using the hot comb. So I just I don't know, I'm just obsessed with flat units flat installs flat ponytails. Just everything needs to be flat, so I'm just smoothing it out um with the hot comb, and once I'm happy with that, I'm going to take my rubber band and just tie everything all together. Just like so, and now, I'm gon na go in with the foaming mousse. The only brand that I use you guys is the Latta body. I love lots of body forming mousse and I'm just gon na put it all throughout the ponytail. You know just to make it nice and smooth and then I'm gon na, let it dry. I didn't show that part on camera, but I kind of let it dry with the blow dryer and then I'm gon na go in with the got to be freeze, spray and smooth it out. Some more remember you guys that said flat, installs, only flat, ponytails, only flat everything and neat everything, smooth everything. You guys see how smooth and shiny this is looking, so that I'm going to blow dry that in place and then I'm gon na go ahead and um cut the rubber band out. Um yeah, I don't know, I just find that for me it wasn't like it wasn't all coming together enough for me with the two pieces separated. So I just put everything all together and I'm gon na tie that and then I'm going to move on to her swoop. So once I'm finished hot combing that area and it's flat flat, I'm gon na take a small tooth comb and kind of like form the swoop in the direction that I want it to lay. So before you use any product or anything, you want to make sure you form the swoop how you want it to lay, then you apply your freeze, spray or whatever holding spray you use and then blow dry it in place. So I'm kind of just working in sections and I'll just let you guys um pretty much just watch this part so now that the top part of this swoop is dried completely. I'M just gon na use this pin right here, and this is going to hold um the swoop in place. So it doesn't move and I'm pretty much going to repeat the same thing smooth it out. Put some holding spray um blow dry that in place and then I'm going to tie everything all together. So once that's done, I'm going to take this styling tissue and I'm going to wrap it only around the top part of the ponytail. And this is going to prevent glue from getting on the hair itself, so I'm just going to wrap that around and then I'm going to seal it off with some hair glue black hair glue um. You guys will see that in a second right here and just seal it off just like that, and it's gon na stay on that I'm gon na blow dry it. I don't think I blow dried it on cam on camera, but I just blow dried it and pretty much. That'S how it looks just like that, so I'm gon na wrap the hair around just that um tissue okay. So now I'm just taking a little piece of hair out and this hair I'm gon na use it later to wrap around the tracks you guys will see later on, but now I am going to start the fishtail. So this is not a very, very detailed video. I will make another one, that's more detailed. I feel like the angle. Wasn'T that great, so I'll do a video dedicated to Oni fishtail, but basically, what I do is I split the hair in two parts and then the third part is going to be really really small, like a really small piece and what I'm doing is just weaving. The small piece in and out in and out in and out, but the small piece you're going to take it from the back you're not going to take it from the top and, as you guys can see, I'm weaving it in and out in and out. So you want to make sure that piece always remains small, because if you take a bigger piece, it's going to end up looking like a regular braid. So you guys can pretty much see here the small piece right here, I'm going to bring It Forward. So, as you can see, although the angle is not the best, I'm going to take that small piece and remember you're, going to take the small piece from the back and you're going to bring it forward through the bigger piece and then over the other side. So you want to make sure that that small piece remains small or else it's just going to end up looking like um a regular braid, but I'm just really just weaving it in and out in and out in and out through the um. The small pieces going in and out through the two bigger pieces, if that makes sense, but I will do another. Video die dedicated only two fishtails and I'm going to do it very detailed. There'S two different types of fish tails. There'S like a neat one and a messy one, this video is a messy one and I'm going to show you guys the neat one as well. You use option regular braiding hair for the neat braid, but, as you guys can see, this is how it's looking so far super nice and I'm just gon na. Let you guys watch the rest. So once I get to the bottom, I just take a rubber band and close it off and to make it more messy. I'M just gon na pull the two sides out and the Messier you want it, the more you're going to pull out so she wanted it really really messy. So I'm just like pulling it through and it looks so good you guys. I really really. I think I actually like the messy um fishtail over the neat one, but I will be dropping two tutorials on that soon. So once she's happy with it. Looking like this, I'm going to take that little piece that I left out in the beginning and I'm just gon na wrap it around the track. Um and then I'm going to seal it off with a hair, glue and adhesive spray or got to be sprayed. And I am super happy we decided or I decided to go for the mid Pony like you see how it's just sitting up top there. It'S not too low. It'S so cute, you guys so I'm just gon na curl, her baby hairs at the back underneath, and that is pretty much it for this video. You guys don't forget to like comment, subscribe share this video and I will see you guys in the next one
Comments
Jakira Mou: Luv luv the wispiesssss