Detailed Frontal Wig Install Ft. Allove Hair | Perfect Bald Cap Method
- Posted on 12 October, 2022
- T Part Wig
- By Anonymous
Thanks for watching !
Follow me on ALL social platforms @ Brezelly for more tutorials & uploads.
IG https://www.instagram.com/brezelly/?hl...
TT https://www.tiktok.com/@brezelly
Wig Details
https://www.allovehair.com/collections...
LIKE, COMMENT, & SUBSCRIBE
EMAIL : [email protected]
#allovehairreview #allovehair #frontalwiginstall #hdlacewig #deepcurlyhair #wiginfluencer #wiginstallation #wiginstall #lacemelt #frontalunits #frontalwig #hairstylist #wigtutorials #wiginstallation #brezelly #boldhold #baldcapmethod #begginerfriendly
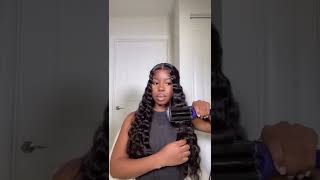
Hey besties welcome back to my Channel today, I'm going to be showing you all how I slayed this frontal wig and saw on a client. So after you do your braid down, you want to take some got to be gel and some got to be sprayed. You just want to push those edges back, so you can have a clear foundation for your installation when applying the cap, I like to put mines a little far down, because it just helps make the cap thinner and cut your ears out. So you can also have a flat base once you're applying the glue onto the cap. This was my first time using boho active and I actually liked it. It works just like ghost bomb, but it also feels like it has a better grip than goes fine. So I just applied two to three layers on the cap, sometimes really just two and I do very thin layers and let each layer drive and turn clear before I do the next layer, hello, stranger by the way after I do my layers. This is me just going back in and getting the glue with any blank spots I might have missed, because I do not want the cap to have a huge gap. I, like my cap to be perfectly round, and then I go in with some even lace spray, because the Black Bottle is the best bottle, and I just use that just for that extra protection, that extra grip kind of like how we used to do the got To be on our cap, instead of the glue during this step, make sure you're using your finger to make sure that no spray gets on the outside perimeter of the glue, because that can mess up the shape of the cap. Installation after you do that you want to make sure you're blow drying the cap to the point where it's super dry, because you don't want a soggy cap. Doing your install for her makeup. I use the shade 360. I believe that's mocha and Maybelline Fit Me and I'm just going to put that all around the cap foreign now during my cap cutting I like to use a scissor in the beginning, but then I go off into a blade now. The only reason why I use a blade is because I just like the sharper cut it gives me, I really don't like eyebrow razors, but I would not recommend using this if you're not professional with blades, because the minute this hits the finger, the skin, the forehead. It bleeds it's a very sharp Persona, blade foreign foreign, so after I'm done with the cap, install I'll go around and I just clean it up, and I also use some 99 alcohol when I'm cleaning up - and I clean that on the outside of the cap - and I do not touch the cap at all, but I'm just doing this to make sure any excess glue is removed. So now I'm going in with more glue for the actual wig and style and I'm just doing little dots and I'm smoothing those with the end of the eyebrow razor and make sure whatever you're, using to smooth everything out. Just make sure it's clean. And you want to go it's the same thing with the cap. You just want to go in with thin layers turn clear thin layers turn clear for the wig install. I usually do about four to five layers: making money Savage game with the cocaine running couch. So this install is a little different between all my other installs, because I actually prepped the wig. Before I did the install on by prepping, I mean laying off the baby hairs already parting it and everything - and I said if you do know how to prep a wig 10 out of 10, definitely prep it before your install and if you do just make sure You'Re, applying the wig middle part first and then pull those sides down I'm going in with some black, even lace spray again just for an extra grip. So this next step is actually my favorite part of my wig installs, so you're parting, the hair, applying the wax tip and then applying the pressing comb. The reason why you're doing this is just to make sure that your base is really flat, so it can give that scalp illusion. You just want to make sure it's super flat like around your part, even if you're doing a side part, especially with curly hair. You want to go in and really apply this person comb to the point where they feel it is your baby baby foreign foreign broken up. You know the feelings deep inside foreign in my head. You should explain so after I get that flat. As can be, I take the lace band off and now I'm going in with some makeup on the um part that I've plucked very deeply just to make that look more natural and then, after that, I'm going to start cutting the lace. So certain laces are usually kind of thick, I'm not using eyebrow razor for that once again, I'm using a Persona blade and but I'm being very, very careful, but I'm also cutting into sections, especially when you already pre style, the wig and everything you want to cut Your lace into sections - and you just want to move the edges out the way really quickly. Oh yeah yeah. Sometimes we laugh sometimes to react ing with somebody crazy these and the money's hard to make. So I bet they only face right now when he tell us baby. I don't know foreign foreign. What you can so, after all of the lace, is glued down and cut off. You want to go back into those little tiny areas and get the parts that you may have missed the parts that may have come up or anything like that. You just want to get those glued down just to make sure the whole wig is all on the same page. Foreign foreign got a lot of enemies, foreign, so after that I'm gon na go in and start plucking the edges. Now, if you know me personally or if you watch any of my tutorials or you follow my Instagram, you know that the edges every time are the hardest part for me. Now, this time around, I did the edges 10 out of 10 way better. The only thing is, I did not get good recordings of me doing the edges because I was so focused, so the videos that you see for me doing the edges are the good shots. If you don't wan na come or calm down, see me doing good, they started clothes if any already hair stylist that might just be watching it just to watch it. Please leave some criticism on how to cut the edges when you're prepping for baby hairs, please so I'll curl the edges up and a while ago somebody recommended that I use Spritz and foam for the edges and, I say 10 out of 10 two products. I definitely recommend now you don't want to use a lot of foam. You just want to use a little bit of foam when the Sprints get too rough for everybody. That'S new here I am a beginner hair stylist like so y'all are watching these videos and I'm literally learning and teaching myself these wigging saws. As I go, I still can't count on how many hands how many wigsaws I did, because I haven't even did more than 10, but I know for a fact: I'm getting so much better. Every single day control s yeah, you know I. I keep on running down Generations, not gon na, be in vain. Why you got ta, go why you got ta go I just I just wan na know, so I put some strips on their hair just for about 10 minutes only 10 minutes, because I don't like my edges to get too flat. I still don't. I still like that fluffy full look of the edges to have, but I do want the curls to lock in so. That is why I use the strips. I love installing curly wig just for the simple fact that after the styling and the installing you're done, you could take some water depending on how curly or wet the client wants that hair. Some foam leave-in conditioner, if you might - and you are done here - is the Finish just look. Thank you all so much for watching like comment subscribe. Follow me on our social platform. Leave me some constructive criticism. Thank you all. So much bye love you besties!
Comments
tamia rogan: