Full Lace Wig Hack!!No Glue Needed For Curly Baby Hairs! Curly Nape Tutorial & Styles! Afsisterwig
- Posted on 12 October, 2022
- T Part Wig
- By Anonymous
▼▼▼HAIR DETAILS & COUPON CODE▼▼▼
➡️ Wig in the video: https://bit.ly/3ezcuP9
Coupon Code: BEIGE to save money.
Melting Band ( no free gifts): https://bit.ly/39XeqyV
Swiss Lace Full Lace Wig Collection: https://bit.ly/3A7U00K
Delicate Hairline Skin Melt Wig Collection: https://bit.ly/2WQ7Hjy
Share looks on facebook, instagram , youtube and tag @ # afsisterwig, customers will get 15 dollar for next order.
Afsisterwig’s *NEW* Delicate Hairline Skin Melt Lace Wig
♥ All hand tied hairline, clean, delicate and natural, giving real SCALP vibe!
♥ No extra plucking needed, totally beginner friendly!
♥ Upgraded real skin melt swiss lace well blended with different skin tone!
The Skin Melt Wig is totally beginner-friendly, in the past three months, we have been making our best efforts to adding more density options, perfecting the plucking the hairline, adding the removable elastic band and optimizing the bleach technique to provide the perfect products.
INVISIBLE SWISS LACE: We upgrade our lace into Raschel net and bobbinet made of polyamide.The reason why we choose high-end swiss lace is that even with much higher price, it can be more invisible and undetectable especially when melting with glue. No matter what skin color you have, this skin melt lace will definitely match.
Wig SKU: AF0127
Hair length: 18"
Hair density: 150%
Cap size: Medium 22.5
Cap construction: FULL Lace
Contact Us:
➞ website: https://afsisterwig.com/
➞Email: [email protected]
Follow US:
➞Instagram: afsisterwig
➞Youtube: https://goo.gl/fvBMPA
-------------------------------------------------
Hey loves! ♥ Become a Beige-ian by SUBSCRIBING here ▼
https://www.youtube.com/user/Mahoghany...
NEW VIDEOS POSTED EVERY WEEK!
TURN ON POST NOTIFICATIONS
**I do not own the rights to any of the background music being played in this video. The background music is for entertainment purposes only. Here's the music playlist, check out the amazing Artists below ▼
1.) Donald XL Robertson - Black Tint (BeatTape Mix) - https://thmatc.co/?l=4C535D1D
2.) Mark Generous - Let Me Drive - https://thmatc.co/?l=DB12878F
3.) Mark Generous - Gas Town - https://thmatc.co/?l=058B3DF6
Thanks for Watching!
Contact me: ▼
https://beigemedia.wixsite.com/beigeoj...
L E T S B E F R I E N D S: ▼
INSTAGRAM: BEIGE OJAI
TIKTOK: BEIGE OJAI
TWITTER: BEIGE OJAI
FACEBOOK: BEIGE OJAI
SNAPCHAT: BEIGE OJAI
BEIGE OJAI
P.O. BOX 520
LANHAM, MARYLAND 20703
#360lacewiginstall#DIY360lacewiginstall#curlynapebabyhairtutorial
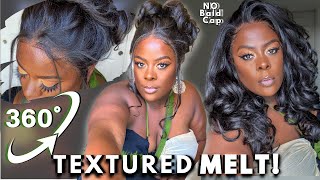
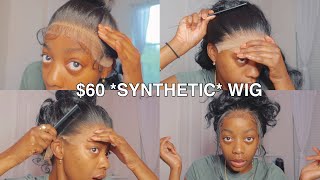
Thank you, hey guys, welcome back to my channel. My name is beige. If you're new here welcome, don't forget to give this video a huge thumbs up and comment down below before you leave. Today'S video is going to be a tutorial on this wig sent to me from AF sister wig I'll have all of their information the promo codes and direct links Down Below in the description box. The link that I received is 18 inches. The Cap Construction is a full lace. Wig and the texture is Curly if you are a beginner, a full lace. Wig cap construction basically consists of a 360 lace, frontal and a stretch net in the middle, which is an elastic material that has knots ventilated into it, because full lace wigs feature full knots throughout the entire wig cap. You are able to part it in any direction from the crown all the way back to the nape. So literally, you can do any type of hairstyle on this wig. The Cap Construction features a skin melt, Swiss lace, 360, four Combs and an adjustable strap AF sister wig has recently restocked all of their full lace, wig options. So here's how the wig looks straight out of the package and placed straight onto my mannequin head as you can see, you can part this wig anywhere. However, I do wish that that elastic material on the wig was more of a scalp color, because it's coming off more of a grayish dark color and my scalp is light brown. So I already see that that may not look as natural once the wig is installed. I do want to take away some of these extra knots at the bottom, because I noticed that the knots in the back and along the sides of the wig have not been bleached. So I'm just going to pluck some of the hairs from it just so that it could look a little bit more natural without going through the process of bleaching the knots entirely. You will also notice that there is an adjustable strap in the back of the wig, where the nape area is and because that's an adjustable, strap right. There you're going to be able to see the adjustable strap behind the lace, because it's there and laces virtually see-through to make the wig look a lot more natural. I definitely suggest highly suggest bleaching the knots in the back and also removing that adjustable, strap in the back and also plucking the back heavily so that it could look just as good as the front of the wig. It will take a lot of time for you to do these adjustments and customizations, but it'll look way better after you do it trust me, okay, so no matter how much you pluck. It does look better that I have plucked some of the hairs, but no matter how much you pluck. If you do not remove that adjustable, strap you're still going to be able to see it, and it's not going to look that natural. But we're going to just ignore that fact and we're going to move straight on to tinting the lace. Hopefully tensing. The entire wig cap will help the scalp look a little bit more lighter than it is, and that will help the wig look a lot more natural too. So I have two different colors of lace. Tint. The first color is the color of my Foundation, I'll be spraying that along the hairline of this 360 lace, frontal and then the lighter color is the color of my scalp. I will be spraying that on the inner portion of the entire wig, I'm going to start by just doing it to the front of the wig where the frontal portion is and then I'm going to flip the wig around and I'm going to do. The exact same thing on the back of the wig and because the elastic material on this wig is darker than my complexion. I'M hoping that this lighter lace tint is going to help it lighten up a little bit um. But yes, I'm going to do two different layers of each color of lace, tint and then I'm going to blow dry in between each layer. Thank you. So now that I have finished tinting the entire wig cap construction, I'm just going to cut off that extra lace in the back, because I do want to add some baby hairs back there. Typically, when I'm doing baby hairs in the back of my wigs, I do do a zigzag motion and that's going to help the back of the wig look a lot more natural because no one has like perfectly symmetrical baby hairs in the back. So I'm just going to take random pieces of hair and then I'm going to grab an eyebrow razor and start shaving that hair down. Of course, no one's hair is perfectly symmetrical in the back. So I do try to cut them in different lengths, but overall they're around the same length, and then I also make sure that I use an eyebrow razor, because I don't want a very blunt cut at the end. I want it to be very natural, looking and you know sheer and thin at the ends of it after that, I'm just going to spray the back hair with some water and then I'm going to apply a little bit of gel to the hair and then I'll Be using the blue, colored perm rods and that's going to help these curls pop. Thank you, okay. So now that I am finished with the back of the head, I am just going to start sectioning off the rest of the hair and I'm going to take my detangling comb, I'm going to detangle the section and then I'm going to spray it with water and Then I'll be using a styling mousse. This is like a curling styling type of mousse and I'm using this instead of gel, because I feel like when I use the mousse on curly hair. It gives it more flexibility. It'S not really weighed down by heavy gel and I have more versatility in terms of styling and it just looks a lot more natural, so I prefer to use the styling mousse or the curling mousse when I have like big curly hair. So I did also want to mention that tinting that elastic on the wig cap did definitely lighten the scalp. As you can see, it's a huge huge, huge difference once it is tinted than it was when I first took it out of the package. Foreign - and here is an up close of how the hairline looks - the hairline is virtually flawless. I love how natural the density is. I didn't have to do any extra plucking to it and I did love the fact that the knots in the front have been bleached for us already, and I really really really do love the curl pattern on this wig. Alright. So now it is time to cut this extra lace off, I'm grabbing a pair of zigzag scissors and I'm carefully following the natural curvature of this hairline, getting close to the hairline, but not cutting into the hairline but right in front of the hairline. I'M just going to take my time and cut off this extra lace. Okay! So now it's time to prep for install I'm going to grab some alcohol and clean off my forehead next I'll, be grabbing scalp protector from Walker tape and applying that to my scalp grabbing. The wig and this Wonder, lace bond by Eben New York, I'm just going to hold the wig to the side so that I can have a very clear view of the under portion of the wig. I am grabbing that spray adhesive and I'm going to spray a very light layer of that around the edge of the frontal portion of the wig, and then I'm going to blow dry for a few seconds. So now I'm just going to grab the wig place it on my head in its proper placement and then I'm just going to put my head scarf on for a few minutes. You did notice that I did not add any adhesive to the back portion of the wig, and that is because you do not have to add adhesive to the back portion of the wig, especially because I have baby hairs that I cut into the wig. And I curled so, although the back won't be glued down, the baby hairs will still give the illusion that it is a natural hairline and that it is glued down. So that is a trick, a secret you guys, if you wanted to try it, it definitely works. So 15 minutes have passed and now I'm just going to remove my head scarf and figure out. If I want to add baby hairs or not, the wig cap is a little too small for my head. So, as you can see, my hairline is showing through on the sides. So that means that I'm going to have to have some heavy baby hairs along the sides of the wig. So I'm going to do that off camera and then I'm going to remove these uh perm rods in the back and try to do a few styles for you guys, oh, which hairstyle is your favorite. Let'S chat Down Below in the comment section I'll have all of the information, the promo codes and direct links to the wigworn in this video down below in the description box. So don't forget to check down below before you leave if you're new here hit that subscribe button give this video a thumbs up and let's chat everything about this wig Down Below in the comments, if you're not new here and you are a returning subscriber give me An emoji or a comment or something down below so that I know you stopped by and I can't wait to see you all in my next video bye, guys.


Comments
Beige Ojai: **The wig worn in this video is for sale, email if interested: [email protected]
Donna Neal: ❤ I love it!!!
Oliviaxmlx Hayworth: Gorgeous ❤
Nikki's Domain: Nice wig but a lot of work to make it look natural. U always do an excellent job but for someone inexperienced I’m not sure…❤
Smoot29: U really didn't show us how to finesse the wig..... that's the part we wanted to see. It looks good tho!