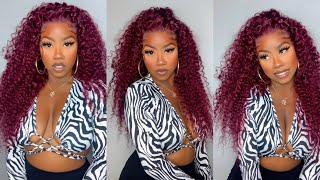
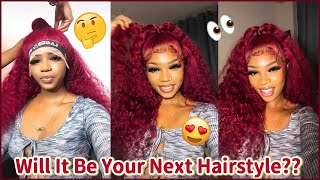
You Will Fall In Love With This Hair Color! Perfect Wig For Fall! 99J Burgundy Bob No Glue Skin Melt
- Posted on 11 October, 2022
- T Part Wig
- By Anonymous
WIG DETAILS:
➡️ Shop website: https://bit.ly/3LnXLmF
Instagram: https://bit.ly/3qxWC21
Facebook: https://bit.ly/3L6b0rX
YouTube: https://bit.ly/3eG7QyS
hashtag:#luvmehair #undetectablelace #bornnatural #mostnaturalwig #hdlace
----------------------------------------------------
Hey loves! ♥ Become a Beige-ian by SUBSCRIBING here ▼
https://www.youtube.com/user/Mahoghany...
NEW VIDEOS POSTED EVERY WEEK!
TURN ON POST NOTIFICATIONS
**I do not own the rights to any of the background music being played in this video. The background music is for entertainment purposes only. Here's the music playlist, check out the amazing Artists below ▼
1.) Mr. Chase - Good Deed (feat. Ichika) - https://thmatc.co/?l=0FFC0F3C
2.) VirgoZilla Beatz - Euphoria - https://thmatc.co/?l=C2130638
Thanks for Watching!
Contact me: ▼
https://beigemedia.wixsite.com/beigeoj...
L E T S B E F R I E N D S: ▼
INSTAGRAM: BEIGE OJAI
TIKTOK: BEIGE OJAI
TWITTER: BEIGE OJAI
FACEBOOK: BEIGE OJAI
SNAPCHAT: BEIGE OJAI
BEIGE OJAI
P.O. BOX 520
LANHAM, MARYLAND 20703
#99jHDLaceWig#99Jlacefrontbob#Fall2022hairstyle
No, no hey guys welcome back to my channel. My name is beige. If you're new here welcome, don't forget to give this video a huge thumbs up and comment down below before you leave. Today'S video is going to be a tutorial on this wig sent to me from Love Me hair. I will have all of their information the promo codes and direct links to the wigwarn in this video down below in the description box. So the wig that I received is 12 inches. The color is 99j burgundy and the Cap Construction is a tea part. Closure wig, the Cap, Construction features three Combs an adjustable, strap and an elastic band. The Teapot lace, closure portion of this wig features a middle part and three inches of parting space. So the first thing that I'm going to do is thin out the hairline a little bit more so that it could look a little bit more natural I'll, be doing the beige method of zigzag, plucking and parting to do that. So, with this wig being a tea part closure Cap Construction, there are tracks surrounding the left and right sides of the part. So there is but so much space that you have to pluck extra hairs from the hairline. But the good thing about this Cap Construction is that you can wear this wig completely glueless. You do not have to glue it down, use any type of adhesive at all and it will virtually stay down on your head and it's also more affordable too than a full lace, wig or a full lace front, wig foreign. So now that I am satisfied with the density of the hairline, I am just going to grab my tweezers and tweeze away some extra knots surrounding The Parting space, because I feel like The Parting space was not that wide. In my opinion - and I just want it to look more seamless - so I'm just going to take my time and get rid of some of those extra knots, because I just took my time using my tweezers to pluck out the perfect parting space. I'M just going to make sure that I pin the hair in place so that when I turn the wig inside out to tint the lace, I am not losing that parting space at all so grabbing two different colors of lace. Tint. I have the color of my Foundation, which I'll be spraying along the edge or hairline of the wig and then I'll be grabbing. The color of my scalp, which is the lighter color and I'll, be spraying that, on the actual parting space of the wig cap construction, I'm doing two different layers of each color of lace, tint and blow drying in between each layer, foreign. Although the curls are beautiful straight out of the package, I do want to go more for a beach wavy. Look so I'm just going to grab my baby bliss Pro curling iron, as well as this Biosilk: silk infusion, hair serum I'm applying that Biosilk, silk, infusion, hair serums directly to the hair, and then I'm going to section off the hair and then in sections. I'M going to begin to wave the hair with my curling iron, so with beach waves, I'm basically going to curl it in One Direction and then the next section of hair that I curl will be curled in the opposite direction. And then the next section of hair will be curled in the other direction, so basically, I'm doing like left right left right, left right. If that makes sense, I know it's so much easier to show you guys than it is to explain so please keep watching foreign. So now that I am at the front of the head, I'm just going to grab this hair wax stick from caracare and I'm just going to use my pressing comb to smooth those hairs in place. Foreign personality. I'M just going to grab a piece of hair on the left and right side of the part and I'm just going to do a braid, a very loose braid. And then I got a little fancy and I did add this cross decal that I picked up from the beauty supply store that I am obsessed with. So I'm just going to do the loose braid and then I'm going to grab a rubber band. I'M going to rubber band it and then I'm going to do the same thing to the opposite side of the head, making sure that the braids line up and they are symmetrical and braided down to the same length, of course. And then I'm just going to grab that decal and basically place it over the rubber band foreign, foreign, okay. So now it's time to cut away that extra lace, I'm just going to grab a pair of scissors and slice the extra lace down the center. Then I'm going to grab a pair of zigzag Scissors because the Melt on a wig that has been cut with zigzag scissors y'all. That melt is just like nothing else. You'Ve ever seen - and I stand by that - so I'm just going to use those zigzag scissors and carefully cut along the hairline and now it is time to prep my skin for install. So I'm just going to grab some alcohol clean off my forehead and then I'm going to grab scalp protector from Walker tape, apply that to my scalp. So next I'm just going to grab Wonder lace bond from Eben New York and I'm just going to hold the wig to the side so that I can have a clear view of the inner portion of the lace. I'M going to spray a very thin layer to the edge of the lace and then blow dry for a few seconds. This wig is glueless. You can wear glueless, so you do not have to use any adhesive at all. So now I'm just going to place the wig on my head in the proper placement put my head scarf on for about 10 to 15 minutes to allow that lace to to melt and set, and here we are removing my head scarf. This is the finished. Look. Thank you so much you guys for watching. If you have any questions, don't forget to leave them down below in the comment section. If you are new here, give this video a thumbs up and don't forget to subscribe down below. I will have all of the information. The promo codes and direct links Down Below in the description box to this wig to the company to everything you need to know about the hair that is on my head right now. Y'All, so don't forget to check down below before you leave, and I can't wait to see you all in my next video bye, guys, foreign

Comments
Beige Ojai: **The wig worn in this video is for sale, email if interested: [email protected]
BAHBEE MILONAKIS: Beige!!!
bunny logan: Gonna be honest. Luvme wigs are either a hit/ miss. It’s cute. Is your lace tint custom?