The New Daily Everyday Wig?! All About T-Part Wigs! No Glue, No Gel Install! Let'S Work Ft Nefl
- Posted on 20 March, 2021
- T Part Wig
- By Anonymous
Over $100 use my special coupon to save $20: Beige20
** C L I C K F O R M O R E I N F O **
❥❥❥❥❥❥❥❥❥❥❥❥❥❥❥❥❥❥❥❥❥❥❥❥❥❥❥❥❥❥❥❥
Direct link to the wig: http://bit.ly/3dQnLZ0
Direct link to the Neflyonwigs Website: http://bit.ly/2CfxRia
SKU:T03
Length: 20inch
Density: 150% density
Stay connected with neflyonwigs Instagram: @neflyonwigs_com
Facebook: Neflyonwigs
Youtube: Neflyonwigs
Any Questions Please contact with [email protected]
❥❥❥❥❥❥❥❥❥❥❥❥❥❥❥❥❥❥❥❥❥❥❥❥❥❥❥❥❥❥❥❥
Thank you Neflyonwigs for sponsoring this video!
------------------------------------------
Hey loves! ♥ Become a Beige-ian by SUBSCRIBING here ▼
https://www.youtube.com/user/Mahoghany...
-----------------------------------------
NEW VIDEOS POSTED EVERY WEEK!
TURN ON POST NOTIFICATIONS
Looking for BOMB hair? Check out the NEW ITEMS on my site! ▼
http://www.thebeigecollection.com/
**I do not own the rights to any of the background music being played in this video. The background music is for entertainment purposes only. Here's the music playlist, check out the amazing Artists below ▼
1.) Chinsaku - Reflections - https://thmatc.co/?l=4B7E79FB
2.) Chinsaku - Midnight - https://thmatc.co/?l=387F7DFA
Thanks for Watching!
Contact me: ▼
https://beigemedia.wixsite.com/beigeoj...
L E T S B E F R I E N D S: ▼
INSTAGRAM: BEIGE OJAI
TWITTER: BEIGE OJAI
FACEBOOK: BEIGE OJAI
SNAPCHAT: BEIGE OJAI
BEIGE OJAI
P.O. BOX 520
LANHAM, MARYLAND 20703
#AffordableDailywig#BestWigForBeginners#EASYNoGlueWigInstall
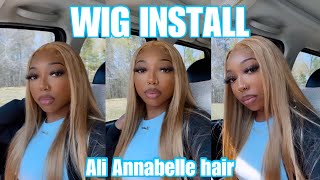
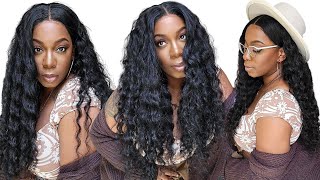
Hey guys welcome back to my channel. My name is beige. If you are new here, welcome, don't forget to give this video a thumbs up and comment down below before you leave. Today'S video is going to be a tutorial on this wig that was sent to me from nephilion, wigs i'll have all of their information the promo codes and direct links down below in the description box. The wig that i received is a 13x6 teapart wig. It'S 20 inches, the color is ombre brown and the hair texture is body wave. The cap construction includes four combs and an adjustable strap. A tea part. Wig gets its name from the cap construction. It is shaped, like the letter t, a capital t, so there is a standard middle part and then there is lace surrounding the hairline or edge of the wig. So for a close-up of the hairline, the knots are not bleached and the hairline is not plucked. I am not going to bleach the knots, but i am going to pluck some hairs from the hairline just to make it look a little bit better i'll, be doing the beige method of zigzag, plucking and parting for this step because of the cap construction with this Wig being a lace edge wig, you can pluck only butt so much from the hairline and then there's tracks directly behind it. So i'm going to do as much as i can now that i've thinned out that hairline, some i'm going to move on to tensing the lace i'll be doing two layers of each lace tint. The first spray that i'm spraying right now is the color of my foundation. I'M spraying that along the hair line of this wig and then for the parting space i'll be using a lighter colored lace, tint and that's going to be the color of my scalp. So the next step is to remove this extra lace i'll, be cutting it in half just to work in sections, because it's easier for me using a pair of scissors, i'm just going to take my time, cutting along the hairline, not cutting the knots but getting close To the knots as i can to remove that extra lace for install okay, so today i have my natural hair out: it is flat ironed and typically when my hair is flat ironed, i do not wear wigs, so this is going to be a challenge for me. Trying to figure out how i am going to wear my natural hair underneath this wig good thing is that it is a teapart wig. So i don't have to worry about using got to be on my flat ironed hair because i'm not ready to wash it yet. So the first thing that i am going to do is, i guess, put my hair in a wrap and use bobby pins to pin down the wrap and then i'm going to put a wig cap on. So, of course, i like the fact that, when my hair is flat ironed, it's so straight, i don't have to worry about cornrowing it. I don't have to worry about it, um, not laying down flat underneath my wigs okay. So now that i have on my wig cap, i am going to grab this wig grip, and this is basically going to stop the wig from moving so that i don't have to use any glue tape or gel on it at all. What makes this perfect is that this particular style of wig grip is in a t, shape, which is the same thing as the wig, which is also in a t-shape. So it's it's a perfect match so right now, i'm just going to match up the tea parts. This is the middle of the lace, the stem of the tea, i'm gon na put that on top of that and then just put the combs in so of course. Naturally, the first thing that i'm gon na do is grab a brush and just brush through this hair. Just to see what type of shape these curls are giving me honey, but um yeah, then i am going to define the part by just grabbing my comb and just parting it or re-parting it. Okay, there's the part. Okay. There is the part that we've been looking for y'all here it is using. This type of brush is perfect for these types of curls. As you can see, it's giving me vintage waves, so i'm just going to grab my scissors. Unfortunately, i don't have my hair cutting scissors here with me, as you can see, i'm in a different location and this location doesn't have hair cut and scissors. So we're just going to use these scissors right here, don't be afraid to cut now with these scissors. I don't know how good of a cut i can get, but we gon na try all right. Let me push this wig box, then flatten down the top brush through it again add some baby hairs and we might be working with something y'all. I don't know if you know this, or maybe you have tried this or maybe you do this, but when you do baby hairs and you gel it down, you put your head scarf on. It sticks down to your head, like you glued your wig down or that you gel the whole thing down. So i am going to do that and that's going to kind of take your eye off the fact that this wig is not laying down flat completely, and i think that that will give me the option or versatility to also wear it. Out of my face like this, which i feel like looks a lot better, i am going to lightly go over this with a flat iron in the front just to give me like swoops in the front and i'll come back and show you guys the style that I came up with so a few benefits of tea part. Wigs is the fact that they are more affordable than a full lace, wig or a lace front wig. So a t-part wig cap construction is also called a lace edge wig. So it's not technically a lace, front wig and it's not a frontal and you do not have to glue tape or gel it down. Although you do have the option of doing that, because it does have lace surrounding the hairline portion of it, but because it is a lace edge, you don't have that much room to pluck. There will be like some tracks behind the hairline and depending on which hairstyles you're wearing it may not give you the most natural look, because it's not hd, it's not pre-plucked. The knots are not bleached and it's not a frontal wig. However, it is virgin hair. It is styled for you, it is really easy for beginners, it is everyday wear worthy. It is a step above a synthetic wig which would only give you a few wears as opposed to this one. You can literally wear it every day and it's virgin hair. You can cut it diet, bleach it everything that you would normally do to a virgin hair wig. You just do not have the versatility of a frontal and, of course, because this is virgin hair, you can re-curl it. You can flat iron it. You can press it out. You can do anything that you would normally do to your virgin hair wigs to this one, of course, you can add highlights which i think would look really cute on this wig. So i did end up playing around with the hair. A little bit i did flat iron through it just to make it a bit more straight, so that the curls won't be as tight and perfect. I do want to take advantage of the length of this wig because it is 20 inches and with the curls being so tight, it looks more of a 14 or 16 inch length. I want you to be able to see the length in a more elongated wave. So that was the reasoning behind me using my flat iron to lightly go over these curls to get them to stretch i'll, have all of the information to this wig down below in the description box. So don't forget to check down below if you're new. Here, don't forget to hit that subscribe button down below and leave a comment down below so that i can know that you stopped by, and i can't wait to see you all in my next video bye, guys, [ Applause ] try to educate the heart, hey! I

Comments
Certainly Cee Caldwell: Hi Beige the wig is gorgeous. I love the color and the curl pattern. There are a lot of beautiful t-part wigs. But I prefer the lace it gives me more options to part the wig in any direction. Beige continue to keep bringing it to us. I love and enjoy your channel.❤️❤️❤️❤️❤️
purple sugar: Thanks for explaining the difference between the type of wings.
Suki Bratz:
Amber Feng: great
BrownBeatss: VERY PRETTY. LOVE IT
VINNY GOGNITTI: My god she's beautiful wow i want her
Kimberly Kyles: Always ❤️❤️❤️
Impress Divinity: T part omg I'm getting so tired of the obvious rebranding of what been existed o remember when these kinds of wigs were called "whole lace" or lace 'parting/part' wig. I guess T part does for better but once again nothing new smh
Kimberly Kyles: Beige Cute an color