Make A T-Part Wig With Me | Beginner Friendly
- Posted on 31 March, 2021
- T Part Wig
- By Anonymous
Watch me make my first wig ever!!!
Insta: @natural.allure
Business Email: [email protected]
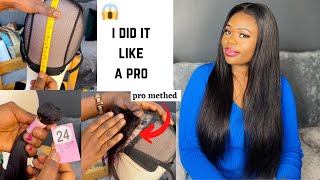
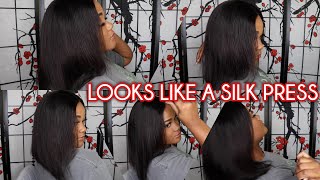
Hey guys so i'm so excited because today i am making a wig for the first time ever. So let's just get into this video, so i have my mesh done cap. I got this from my beauty supply store. So this is where the top of my wig cap is going to go. What i'm going to do is: pin my wig cap right at this mark right here. This is where my wig cap should start and just go ahead and put a pin right in the middle of it. So these tape measurements are here to help me put my custom measurements onto the wig. I already took my measurements and um, so my front to nape measurement is 14 inches, so my 14 inch mark is right there. So i'm just going to pull this down to the 14 inch mark. I want to actually stretch mine down to about 14 and a half just to have some extra space, so my name area is about four inches. I'M adding an inch to pretty much all my measurements. The circumference of my head is 21 and a half um, but wigs that are 21 and a half are way too small for me, so i got a 23 inch wig head um and i get the largest wig cap size. So i'm going to add an inch to all of my measurements, so my french nate was 14 inches, but i stretched down to about 15 and my name area is about 4 inches, but i'm going to stretch it out to 5 inches. So i'm gon na go from here to here. So now we have the nape stretched down to the 15 inch mark and stretched across five inches wide. So we have our dump cap on okay, so i'm just now realizing that i did the temple to temple measurement backwards. Um it shouldn't be right here should be back there, so i will have to go ahead and fix that i'll fix it. When i get the saran wrap tomorrow, okay, so this is the closure that i have it's a tea party closure when i was in the beauty supply store. Looking for my closure um, i didn't realize the lady gave me a tea party closer until i got home. This is a synthetic frontal and my bundles are synthetic. I just wanted to practice with synthetic first instead of like really expensive, bundles in case i messed up. Okay, so you're supposed to pull down the closure a little bit in front. I don't have to try to guess where it is. I'M just gon na pull my about right there and i'm gon na pin that down all right. So this is some thread that i got a while ago when i ordered a wig, so i'm assuming it's wig making thread. So i went ahead and i pinned down my little part and you can see that it's like it's just lace like it's. Not it's not like, doubled or like stronger here, it's just lace, so i'm worried that is going to um not be able to hold up. I got these curved needles. I just got them today when i ordered this wig head. So i'm just going to create a knot in my thread by taking so i have my um. I have my needle at the middle of this piece of thread, so i have it threaded and then i have the two ends of the thread. I have the two ends of the thread right here. I'M just taking these two ends. I'M gon na wrap it around my needle one. Two three times grab those pieces that i just wrapped around and pull them down all the way down to the other end of the string, and it creates a knot. I decided that i'm going to sew right here, where there's just more a more durable material rather than right here, where it's just lace. Okay, so my wig cap starts here, so i'm just gon na start right there as well, making sure that i put it through this part right here, but also through my wig cap, one eternity later. Oh, my gosh. It took me forever to sew this down. Last night, but i finally did it literally took so long um i had to cut, i had to cut the lace that was around the perimeter of it because it was just in the way. So i had to cut that off, but i finally got to sew down. So the next thing i'm going to do is get my base ready to go ahead and sew on the bundles all right. So next i'll just be using my sharpie and i'm going to be using a tape measure because i'm extra to just go ahead and draw the lines um for where i want to lay my bundles and i'm going to have them all an inch apart. All right. So here is how i outlined it um, i think i messed up in here because, like they usually have like a line here and then some straight lines across, but i just follow my thing all around so hopefully it looks fine and i make sure i have A track going um like right up against the little t part. So now i'm going to double weft two of my three bundles. So here are the two bundles that i have um. These are my two longest lanes and um. I got these from the beauty. Supply store too just some synthetic bundles to practice with and we're gon na double with these. So this is my longest one. This one is 16 inches. I believe so. Here'S how my first one turned out. It turned out pretty good. I just laid them on top of each other. There are some gaps in some spaces, but i i don't think it really matters um. So i'm just going to repeat this to the next bundle and um like there is like a gap um, but it's so sewed. It'S just not directly on top of each other, but i got it back together, but i'm just going to repeat this with the under, with the other bundle all right. Now, i'm ready to sew the first bundle onto my wig cap. I went ahead and i cut off the mesh cap that was covering the lace. I had some of my plastic bags stuck on here, so i had to cut that out, but it didn't mess it up or anything and there's a lot going on with my wig cap, i drew some other lines to try to fix what i messed up. I'M just gon na um figure it out once i get to this area um, so yeah, i'm just gon na start from the bottom sewing on my bundles. So so this is my first one sewn on and i'm just going to repeat that to all the other ones and i'm going to make sure to cut off the little piece of string. The piece of thread that's on the end, all right guys. So i am sewing on my last bundle, i'm so excited and don't forget to bag tag or backstitch before at the front of every so and at the end of every so and here it is showing you that i got it as close to the closure. As i could and yeah, this is my finished wig all right guys. So this is it i'm so excited i'm just taking out my braid for my closure and we can see what the wig finally looks like. So i'm just brushing out the hair and guys look at the wig. I made this the first wig i've ever made and it looks so good like it looks so good, i'm so proud of myself. It wasn't too hard. The process probably took a total of six to eight hours, with most of that time being taken up from sewing down that tea part, but look at her she's, so beautiful. I love it. Thank you so much for watching guys if you liked the video give it a thumbs up. If you have something to say, leave a comment down below and if you want to see more from me subscribe to my channel thanks for watching bye, you


Comments
Javier Summers: Keep up the good work. Good luck with growing your channel. Have you ever heard of Promosm??? If I was you I’d use it to help grow your channel!!