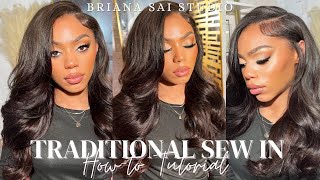
Queen Of All Kinky Curly Hair! Natural Looking 13X4 Lace Frontal Wig Install Ft. Nadula Hair
- Posted on 06 January, 2023
- T Part Wig
- By Anonymous
●▬▬▬▬▬▬▬▬▬ ◆ #NadulaHair ◆▬▬▬▬▬▬▬▬●
★ $20 OFF for $199 Code: Nadula20
★ $10 OFF for $99 Code: YTBGIFT
❤All the hair can be paid in 4 installments
——————————————————————
☛Video Hair Direct link: https://st.nadula.com/eac7r
Hair Info: Affordable 13x4 kinky curly edges Lace Frontal Wig 24inches
https://www.nadula.com/ ➤ Top Sale wigs: https://st.nadula.com/eac7u
New Protective Style V-Part Wig: https://bit.ly/3p5yOkS
Nadula HOT Selling Affordable Lace Frontal Wigs: https://st.nadula.com/eac7v
New Arrival Fashionable Wigs: https://st.nadula.com/eac81
Top-selling bundles with closure& frontal: https://st.nadula.com/eac82
Perfect install tutorial of Kinky Curly Vpart wig: https://bit.ly/3QldiF1
Nadula Customer Service Email: [email protected]
Aliexpress Nadula Hair Website: https://bit.ly/33oOx83
Aliexpress Nadula Hot Sale Wig: http://bit.ly/3068Mlt
Amazon Nadula Hair: https://amzn.to/38ttXlC
#Nadula #Nadulahair #Nadulawig#nadulaHDlace
☛Youtube: https://www.youtube.com/c/NadulaHair
☛Tiktok: https://www.tiktok.com/@nadula.com
☛Instagram: https://www.instagram.com/nadulahair/
☛Facebook: https://www.facebook.com/groups/nadula...
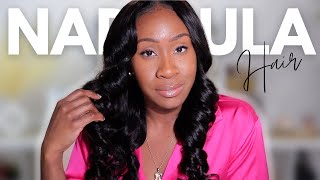
Foreign reviewing today is from nadula their information is below in the pack. They sent me this really really cute um cream robe, this nice silk robe. I got these uh stocking caps, which is a super thin stocking caps, love those, and I also got a pair or actually two of these little headbands. They sent me another stocking cap as well as some lashes and also this little brush here. If I can figure out how to get it open, hey, this is cute right and the wig that I'm installing today is this Kinky Curly lace, front wig with the pre-cut baby hair. So if you struggle with baby hairs, this wig is for you, as you can see, the baby hairs are already Curly. It'S super cute um. This is their transparent lace as well um, even though I did bleach the knot, but you can see with the construction of the wig looks like here with the elastic band as well as the Combs, and you can see right through that lace. So, let's get into the video, oh so jumping right into the video I'm using my got to be free spray to comb. My edges back in the front just so it lays flat. I have a lot of flyaways and this really helps I'm just going to use a comb and my Edge brush to come straight back and then I'm going to blow dry it to kind of like seal it in place. Just so that when I put on my stocking cap, it lays a lot flatter foreign caps. You need to go ahead and run to the store and get some. These are the super thin stocking caps. This one actually came with the wig. I love when wigs in these kind of caps, because the other ones be too thick. These are very thin and sheer, and it makes your application look more natural. So now I'm just putting it on and I'm just going to go ahead and cut out the ear holes of the cap, I'm cutting behind my ear just so it can lay flatter in front of my ear, learn that trick from Tick Tock and then I'm just Going through what my got to be free spray, spray spraying, it all along my hairline and rubbing it in with my finger and then I'm going to blow dry it just to lay down the cap. I did one layer of this just so it wouldn't be like too too thick. Sometimes the product can build up. If you do too many layers, and now I'm just going through and cutting out like a hole, um right above where the thicker part of the cap is, as you can see right here, and I'm just going to roll this part back um behind my hairline. This helps the cap stay tighter um and you don't have to deal with. You know like cutting off that excess cap in the back or just having that little flap like this, just to make sure everything stays flat and in place. I forgot to show it, but this wig glue that I'm using is from wig dealer, I'm just putting a little bit across the top of my hairline right here and rubbing it and rubbing it in place. What do you call it like blending it? I don't know. Smoothing it out there we go um, smoothing it out just to help lay down the front of the wig cap. So it's like super super flat. I'M using like a little little bit like a really small amount as much as I can, because using a lot again causes a lot of product, buildup learning something new every day, um and now I'm just gon na blow dry. It and like use my comb to help smooth it, so I've been using this lace tint here I got this funny beauty supply store, but I've been using this for, like my past few installs and honestly, I could say it's been making a difference, even though I Bleach my knots like this just helps get that, like more, you know like skin color scalp. Looking look on my lace, I like using this for my lace, a lot better than um than makeup, but I will use makeup for the stocking cap itself only because, like the material of the two different things are different here, the makeup I'm using is black opal. I got this from Walmart and I'm using like a flat Kabuki brush. I guess that's what you call it or a flat top brush and I'm just going to rub it along my cap. I should have probably did it a little bit thinner like towards the front of the cap, so I wouldn't have so much product build up. I kind of regret doing that um. So if you do this make sure you go in with like a light hand, you don't need too much now, I'm just sliding the wig on my head and adjusting it just to make sure it fits. You know. Snug um, this wig, as you saw, does have combs like in the back and on the sides, but I only use the comb in the back. I don't use the comb on the sides, but before I start styling the wig, I did want to show you how the edges of the hair look as you can see like they come pre-cut and they come curly like the same texture as the hair itself, and I actually really like this at first I was like I'm not. I thought I didn't think I was going to actually use these baby hairs, but I actually did wind up using them and it came out really cute. I really like this and I think it makes the style look more natural, especially like if you have a harder time, styling edges like I do um. This really helps so I'm going through again with the same wig dealer glue. But now I'm going to get ready to lay down my lace, I'm starting with applying applying the glue across the center of my forehead, and this is because I have a weird hairline, as you can see like my edges - come out kind of far like on each Side of my head right here, so I'm just going to start by putting the glue in the middle first and then I'm going to apply some glue on the sides. I'M skipping the little patch of where my hair is in the past. I don't know. I guess I like just wasn't familiar, but in the past I actually used to put glue like right where my hair was, and I was wondering why my installs weren't coming out coming out that good. And it's because I was putting glue on my hair like a doodoo head dummy but um, putting the glue on my actual skin and just skipping. These patches helps. So if you have a similar hem line to mine - and you have this issue just skip that area and put it only where the skin is like, as you can see, I have very long sideburns as well, and I make sure to skip that - and I use This spray, now, when I lay down my wigs you'll, see a little bit later to help lay down the wig in those areas. Now I'm using the Wonder, lace Bond and I'm going to spray it behind my hairline, where those edges are like. I was saying earlier because of my weird hairline. This helps give my wigs extra security. So in those places like where I didn't put glue like where my sideburns are and um like behind, where my edges I'm going to put this spray and it helps it lay down flat - and I don't have to worry about like seeing that thick residue from the Glue and getting that stuck in my hair and then once my once, the spray has dried behind my hairline, I'm going to spray the same spray in front of my hairline um, just giving it again this extra layer of security. Most people won't need to do this. Probably again, but my hairline is weird um, and I just like this because I feel, like my wigs last longer like it stays looking fresh for more days like longer before the glue and everything starts lifting. So that's why I personally do this and then again also like my weird hairline, so yeah. So this is the part that scares me. It'S always cutting off this lace, because every time I cut off my lace, it come off looking real crazy. I do not know how those girls in those videos will be cutting off their lace and it just be looking like skin. I don't know, maybe because we have different hairlines or whatever I don't know child, but it always comes out looking real crazy at first and then I go through and fix it later. But I just want to like want to like my lace, one time and just have it coming out. Looking I don't know like perfect, like y'all know what I'm talking about y'all seen them videos, I'm not the one. I try. I do what I can um, I'm just gon na blame it on my hairline for now, but if you have any tips for this, I don't know leave it in the comments section below sharing is caring, okay, child. Now that all that is said and done - and I have cut off my lace, it's now time to lay down my edges like I said, the edges are already pre-cut, as you can see here, they're already short um, so I'm just going to take my little Edge Brush and kind of like swoop them just to kind of like um, get a feel for how I want them to look and then I'm going to lay them. Then I'm going to curl them again with my little my little mini flat iron thing um and then I'm gon na lay them down. I did actually wind up cutting them again. You'Ll see that in a little bit, but besides that, I really didn't have to do too much to my edges, foreign foreign set in place. I'M going to go through and Define My Curls, I'm just going through with some water and I'm using this cream of nature. Um curling cream uh, it's supposed to like hydrate your hair and help Define your curls, which I really like this. I actually use this on my natural hair, but I guess I'll use it on this wig as well. It really helps and then I'm going through with a paddle brush or a Denman brush. I think that's what it's called and brushing everything through to Define My Curls foreign so really quickly. I wanted to show you what this hair looked like down before I styled it. Half up half down uh when it comes to curly hair. I always get kind of awkward because I never know really how to style it like. Should I do a flip over or should I should? I do a middle part? I really personally don't like middle parts with curly hair. It just looks weird to me I, but for some reason the the side part flip over thing wasn't working with this either. So that's really why I decided to do it half up half down. That'S just me personally, if you like middle parts and side parts and all that were curly hair by all means, go ahead and do it. But I just wanted to you know to let you see and get an idea of what it looks like. But now we finna throw this guy up. I just like showing off the hairline, I think in the front, and I think I personally look better with my hair pulled back instead of having all the hair in my face um. So that is why I styled it. Like this, thank you, that's it you guys this style is complete. Overall, I'm really satisfied with the finished product. I really love how the curls look typically like sometimes I'll struggle with curly hair with like getting them defined, but I feel like I was really able to like Define these curls and it looks super cute and once it dries it'll be really pretty as well. I really really love this hair texture, this kinky curly hair texture. You can see what it looks like up close here and the pre-cut baby hairs came in clutch so, like I said, all the information for this hair will be in the description box below adios till next time.


Comments
Nadula Hair: Sooo beautiful!!! Thank you for sharing Nadula hair