Long Layers & Big Soft 90'S Curls Ft Myfirstwig V Part Wig With Lace
- Posted on 28 November, 2022
- T Part Wig
- By Anonymous
#wiginstall #wigtutorial
__________________________________________________________
Shop The V Part Wig with Lace:
https://www.myfirstwig.com/v-part-wig-...
Black Friday Sale ☆ $20 OFF for V Part Wigs, CODE: VPART
√ 2022 Innovation - V Part Wig with Lace
√ 100% Protect Edges
√ More Realistic
Hair: Flora - Human Hair Yaki Straight V Part Wig - VPS003
Cap Construction: V Part Wig with Lace
Length: 20 inches
Hair Texture: Yaki
----------
More V Part Wigs: https://www.myfirstwig.com/vpart-wigs-...
* Protective Styles For Wig Beginners *
Website Link: https://www.myfirstwig.com
Instagram: https://www.instagram.com/myfirstwig_c...
Facebook: https://www.facebook.com/myfirstwig
P R O D U C T S U S E D
C O N N E C T W I T H M E:
My Website
Hair Appointment Booking
https://wynnejean.com/pages/hairtour
Instagram @WynneJean
https://www.instagram.com/wynnejean/
Facebook @WynneJean
https://m.facebook.com/WynneJean/?ref...
Twitter @WynneJeann
https://twitter.com/WynneJeann?s=09
For business inquiries [email protected]
F A Q:
Ethnicity: African American
Height: 5'7
Age: 23
Measurements: Bust 36'' Waist 26'' Hip 38''
Shoe Size: 8
F A V C A M E R A G E A R:
Camera - https://amzn.to/2NJcPPs
Camera remote - https://amzn.to/2CDAsm2
SD card - https://amzn.to/2Qim76w
Umbrella lights - https://amzn.to/351lJxv
Soft Box Lights - https://amzn.to/2O9zzXF
Full size ring light - https://amzn.to/2XcmDo4
Traveling ring light - https://amzn.to/2XaDLdQ
Traveling Tabletop Ring Light - https://amzn.to/2NJbisG
Lighting & Backdrop Kit - https://amzn.to/2OgmTP4
Backdrop - https://amzn.to/2CHxA7W
Mic - https://amzn.to/2KlQrcJ
*This video may include affiliate links / paid promotional content & product placements. However, all opinions are my own*
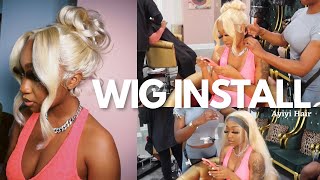
Um, hey Labs, welcome to my channel. My name is Winnie Dean. If you're new here and if you're returning, then hey girl, how you doing I'm ready to switch my hair up. I know it's only been 24 hours, but I'm ready so we're gon na do. Okay, I'm currently wearing a u-part. This video should already be out if you guys are interested hairstyle, but I'm ready to switch it up. I honestly want to try a style similar to this, but just with a little bit more texture, which brings me to the gorgeous wig of today's video. If you're familiar with my channel, you know I've been kind of living for the light, Yaki texture, it's taking me back to my Milky Way old tray days and even though the hair quality used to be a little questionable, the texture Blended beautifully and it held a Curl a lot better, so I want to try like a long layered sexy kind of vibe this here evening with his hair. So the wig that we're going to use today is from my first wig. I love my first wig. The hair quality lace. Quality Cap Construction is always fire, and I just love these little baggies of the week that the wigs come in together. So I actually have two of them here and I want to show you guys something because they actually have a new Cap Construction available for their view card. So this is their original Cap Construction, as you can see around the part, there's actually like a track. So it's actually a lefty part, and then you have your combs on the inside it Clips around the part comb in the back and an adjustable band. So as far as that, cap on the inside Bang um is so secure. This is kind of like a bra strap and you can really really tighten it. So when I tell you this baby is on your head might as well be a sew in girl. You can get into a whole tussle, but the new version honey actually has lace around the part. So I'm going to hit you really close in so you can see. There'S no track to cover it's like a lace kind of ventilated part. So you need a lot less hair to cover your tracks and I'm really excited about that because of the wig I'm wearing right now is actually the youth part and is given too much sleep out for you girl, okay, so I'm excited to go ahead and put A little bit more of my hair up with this V part and try out their new cap constructions. Now the wig came with the usual suspects uh. We have some wig caps. They sent some Combs and Clips in this cute little baggie. They send a really good Clips too they're like the uh. I can't think of what you call them, but these clips don't play and my favorite rat tail comb with the metal in they also sent me some edge control, one of their detangling brushes. I really love these brushes for curly hair. You can actually adjust how wide the bristles are from each other, which is really really cool, so I probably get a lot of use out of this one. I end up with the curly B part, but for now we're gon na put her to the side and all of my first Wigs Wigs come with these cute little pink wig stands so they also carry a lot of hair products specifically for wigs and inches, and They sent me a couple of their conditioner packets love these now, usually, when I wear a wig fresh under the bag. I like to wash it first, but with my first wig, the wigs come literally ready to go, so I don't really get a glue out of it, so I'm gon na save those for a little bit later. So now that we've introduced the hair detail, let's go ahead and get into the tools that we're going to need to finish our hairstyle okay. So for this hairstyle we're going to need a paddle brush of some sort, rattle comb, razor comb and Edge brush. Some sort of bristle brush only one I could find is my round brush. So girls don't make it work some edge control, I'm actually using the one that my first wig sent me. It'S kind of fire and antifreeze serum and heat protectant, I'm using the John Frieda frizzings. It'S a oldie but goodie some hairspray, I'm using the olive oil super home with the castor oil lifted stuff. It'S really good for Lace, Wigs as well, and then for my heat tools, I'm going to go ahead and use my fabulous one inch flat iron and my chi round brush I'm obsessed with this thing right now. I know y'all probably sick, of seeing it, but this is literally like my number one hot tool right now got her outside of my hot comb. That'S just a classy, I mean not gon na get disrespectful, but I really do love this product. I got my little iced coffee today, I'm not gon na be sipping. My yak, if you saw my last video, you get the joke, but girl yeah me like a little uh, iced coffee, honey and let's go ahead and get into it. So before we start the new wig, I have to take this wig off and y'all better, not judge my with braids I'm gon na do Square in your eyes. I don't want to hear it, don't you be judging me but girl? It is a jungle under here. Literally, it's kind of Royal all right. This is the hair that I had left out from my last wig, and these are my wig braids if you could still call a braid through Every Which Way. Okay. So I don't think I'm gon na need this much leave out for this wig, so I'm actually gon na just take some of it out. So since it's like a rectangle, I'm gon na part from this corner to the other corner and it'll create more of a v which should fit the wig a lot better. I'M trying to like try it only to make sure that it fits with the part before I actually adjust my braids okay, so I played with it until I have a rough idea of the hair that I'm Gon na Leave Out. So now we can actually go in and like tweak the braids to make it lay like you know, for a couple of days. So right now it's kind of rigged up in here. But let me just do a little spin, so you guys can see. I also have a lot of room to tighten it up in the back. I have a big head, so I have to kind of start off loose and then I'll tighten as I go, but I have quite a bit of room to tighten it up. So let's go ahead and get it situated on our head, so we can get to the fun part, which is the styling. So I have a little bit of hair on either side of the part, since I'm leaving out a little bit less hair with today's V part, then I needed to leave out with my view, part that I had in before. So, instead of actually plaiting the hair, I'm gon na braid, the hair kind of you know instead of braiding the hair to the scalp, I'm actually just braiding the hair in a single braid, so that the wig can lay super flat. Next, to my part, for you Parts I like to have an anchor, I look crazy right now and for you Parts I like to have an anchor braid right by the part, because they typically have combs instead of Clips, but with Clips I don't want to clip Them into my braids because it can get a little bit bulky, so I like to keep these installs as flat around the part as possible. So we don't have to worry about all of that. If you have hair, that's thinner than mine, you really don't have to worry about doing all of this. You can literally just put your hair in a ponytail in the back and flip it up. My hair is long and thick, so I tend to have to like finesse a little bit more. If you don't have this problem feel free to skip to the next step, where I show you guys how I actually install the hair, but I try to keep this part in for my girls with the same issues. Just so you know you don't feel like you can't do Styles, because your hair is a little bit more intimidating, so I'm parting out a little bit a smooth and then the rest of this is getting braided up. Just like the other side, I only typically wear my V part wigs for a day and then I'll take them out at night. So if you're looking for a little bit more of a permanent option, comment down below and I can show you guys how you can actually wear a V part wig for a month without having to take it off but y'all know I be switching my hair up. So that is not what we plan on doing today, okay, so this is what I leave out and everything else is out of the way I'm gon na put this little adjustable, strap on the tightest setting and I'm also tightening the adjustable straps in the back. So, as you can see, the adjustable strap for the back, I put them in the center. This adjustable strap is on the tightest setting and before I start clipping anything I'm just kind of placing it on my head to get it positioned right because you don't want to have it. You know clipped in the wrong place and once I kind of have an idea of how I want it positioned, then we can start clipping Stitch happy birthday now, once the tips are in place, I'm going in and securing the comb because I pushed the wig off Center, the back comb is actually over here and that's the reason why I didn't want to place the Combs before I placed the clips, because I feel, like the clips, have a predetermined place, the comb kind of just secure. Whatever you want, you will do foreign. I am so excited to cut this hair because I feel like once you cut straight hair. The style really comes to life, so I don't want to cut too much length, I'm literally just cutting off the very bottom healthy. Look. This just looks a little like you know like it's giving. I just got my ends: clipped I got super healthy, natural, long hair and because it's tilted I'm actually having to cut a little bit more on this side, but I like to have you know you know a heavy long. So this is the base cut. I want the layers to be based on the length of my natural hair, so when I pull all the hair up, I want my shortest layer to be up here. So it's going to be really long layers for the most part and to start it off. You want to go ahead and part from the top of my head to my ear and I'm combing that hair straight up with my natural hair. Then my natural hair stops here. So I'm going to cut straight across and when it falls, it should give us perfect layers. So I'm going to just follow that process all the way around my head and I'm parting out just above the ear, I'm not cutting anything below my ear. So I kind of only want the layers to be up top foreign. You can kind of see how the layers are falling so far, okay, so the cut is finished and there's some nice light layers on there in there, mostly on this side. So now I want to go ahead and the part flat iron my leave out and then we can do the actual blowout portion I kind of want, like a curved part. I think those are so pretty, but I'm trying to see if I can finesse one with this V part, because I really don't have much leave out. Okay, that's curved! It'S giving what I needed to give foreign I'm obsessed with the part the cut everything is laying really cute so far. So now I'm gon na go ahead and give the hair a rough flat iron just to get some of that texture out. So it can be really silky once I round brush it all right, so I've straightened everything is nice and silky to get into the texture, but I really want the hair to lay so I'm going to go ahead and press out my roots, I'm using a little Bit of the my first wig Fly Away: tamer. Okay, now everything is literally laying perfectly okay, so you do some baby hairs and stop here, but I want that body. This is before the round brush blow out. There'S layers in it. You can't really see them, except for like right here in the front where it's face framing. Let me show you guys back okay, so, let's get into the blowout, I'm gon na go ahead and do it section by section just like we did the flat ironing and I'm Not Really Gon na, bore you guys with explaining the process, because if you have a Tick tock, you have seen the tutorials, but I do want to show you guys how you can get the same. Look using your wigs, and this is my first time doing the V part. So I'm really excited to see how it turns out. That'S true. They wish they had it together. So the round brush wasn't giving me the look that I was going for um. It gave me like a slight Bend, but not what I wanted. So instead, I'm gon na go in with my one and a quarter, inch curling iron and try and get those same like big body curls, but I feel like it would have worked better if I was doing the uh, the blowout on damp hair. So maybe next time I'll have to do the blowout on my wig head while the hair is damp, but I do not want to get my natural hair wet. So I refuse to Wet The Weave because I want to like I've already put so much heat on my hair, to make it blend no ma'am. I am not about to do it again, so I'm gon na go ahead and use my curling iron, and hopefully it gives me the look that I'm going for perfect, perfect, perfect, perfect. Okay, I got a nervous for a second, but we are on the right track. I wish I had some like rollers to keep it in place, so hopefully the curls stay curl a lot better when you curl bigger sections, so this shouldn't take too long either she's so fast. So this is the finished look. It is big and bouncy, and so pretty I curled the hair in opposite directions and that's how you get this big sexy flipped out Vibe. If I would have curled everything going all back, it would have kind of all merged together into one curl. So switching the directions really helped. I got the look that I was going for. I really really like it. If you have shorter hair, you can start your layers a lot higher and you can get even more like a bounce and body, but I've been loving. This long look, let me show y'all the back. The texture on this hair is holding the curls beautifully. I love that they, like slightly dropped just enough to kind of look like we didn't try. You know we did. It'S definitely been a cup. I hope that you guys really enjoyed today's video like this video. If you liked this, please help your girl. I would really really appreciate it and I will see you guys in my next video. I love you guys bye babes. Let me show you how to do today.
Comments
Brittiny Taylor: This is perfecttttt, I’m going to try it !
EssenceofOma: Would love to see a video on how you wear your vparts for a month
Bombshell Beauty: As someone who is big on yaki texture (both light yaki and kinky straight). This texture is beautiful. Its the perfect inbetween. I was on the hunt for light yaki texture or a coarse yaki that would not be as textured as a kinky straight but not too straight or silky. Not too many companies carry the texture in the form of a vpart - only tape ins,clipins, or i tips. i did tons of research and settled on i like hair and i was super disappointed. i basically received a silky straight unit that had the slightest bit of texture. You couldnt see the texture but you can feel it. I wish your review was out at that time. I definitely would have opted for this. I will give this one a try. im so tired of wasting money and being disatisfied and unhappy. BTW im 36 and im so shocked to see that you are 23 being as you do a lot of 90's inspired looks. I love that about you. Keep it up
NICOLE WILLIAMS: When you put the v part on the side do you have issues with the ear tabs? If not, how do you manage that?
A.: Lovely hair. Has anyone tried the silk version of this hair? Seems like a lot of straightening to get the yaki texture all styled up. Does it need a lot straightening as the yaki texture?
MelissaRegine: I loveee how long did shipping take?
Junior Chaves o Picasso de Yahushua: 0:04 U look so pretty
Jennifer M. Epitie: Density of the unit dear?
Daniella Gambrah: