The Perfect Natural Curly Wig For Beginners | My First Wig
- Posted on 22 October, 2018
- T Part Wig
- By Anonymous
| Myfirstwig HALLOWEEN SALE |
Coupon code: HALLOWEEN to get $15 off + free wig kit!
The wig I received is from:
https://www.myfirstwig.com/denise-impr...
$$$240 !!
Hair product : DENISE – IMPROVED MALAYSIAN SHORT CURLY LACE FRONT WIG - LFC003
-Hair Color - Natural Hair Color
-Hair Length - 14 Inch
-Hair Texture - Silky
-Lace Color - Medium Brown
-Cap Size - size-2
-Wig Cap Color - Brown
- Hairline - Pre-plucked Hairline
-Cap Construction - Lace Front Wig
See more wig for beginners and tutorial tips: www.Myfirstwig.com
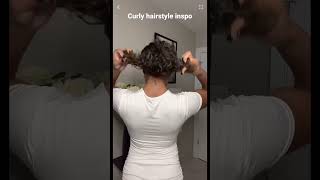
Hey guys in today's video, I'm gon na be reviewing a week from my first week to have quality wigs for beginners, and I love that they give you so much stuff, like literally everything that you're gon na need for making your wig. This is their instruction pamphlet and they tell you step by step, how to apply your wig and everything like that, and then they also give you the tools that you need to apply the way to get big bobby pins. You get a rat tail comb. You get these big quality Clips, you're getting elastic band. If you need one and then you also get a wig cap, and I like that mine was in my skin tone and you get a pic and you also get your wig. It comes inside of this nice. Big bag and be use it to store your wig, so I'm just opening up the bag, and I'm gon na take out the wig that I got so I can show you guys the construction of it. The front of it is lace, so it's lace in the front and then it's whipped it hair in the back, and I love the how the lace is it actually like the tin of it and everything actually matches my skin tone, which is perfect. I don't have to bleach it for anything, so the lace is nice and it's soft. It has three Clips has 200 front and one in the back. I actually went ahead and washed the wig off camera and I'm gon na use. My Camille Rose leave-in conditioner, I'm gon na apply that all throughout the hair, while it's nice and soaking wet making sure that the leave in conditioner gets on all of the strands and then I'm gon na separate it into half and I'm gon na work with one Half section first and then I'm gon na work with the other section afterward. I always start at the bottom. Just to make sure that I mean it just makes it easier for me, so I can see better as I work from the bottom to the top and the butter that I'm using is the Camille Rose almond shades, Whiston butter. I applied the butter to the section of hair that I'm working in and then I separate it into even smaller sections i detangle and then I twist the hair down and twirl it around the ends again, I'm upon the almond-shaped with some butter. What I did to this picture already I'd to tangled it with my wide tooth comb and then I'm twisting it down and I'm twirling it around the ends on my fingers. So I can have a nice curl there's all my and I received after washing hair and detangling and styling it, so it's very minimal shedding. So this is just look up closely guys can see how well the lace matches with my skin tone, and I went ahead and tightened the adjustable strap as tight as possible. I didn't add the elastic band. It was tight enough with the adjustable strap, so I'm just putting my wig in place, I'm applying my clips, the one on the back and then the two on the side, so it gon na be nice and secure and to lay my wig down, I'm gon na Be adding my cuts to be free split spray, so I just sprayed that on the lace and then I press it down a little bit at a time it kind of works as like a some type of balloon situation. You just have to spray it. Just a little bit, you have to hold it down and wait for it to dry and then to help. Try it even faster. I pulled out my blow dryer and I tried it with cool. I don't do it with the heat, because, if you do it with heat, it's gon na like make it melt in it's not gon na look good so make sure when you'll do it with the blow dryer, you do it on cool setting and you just keep Doing that, until whenever you pull up the lace, it doesn't pull up it like it sticks, that's what you want us to do now, I'm just taking down my twist honestly, you don't even have to do a twist out. I noticed that after I stopped my hair. I could have just like wet it and apply some product to it, because it was very, very curly even before the twist, so the hair naturally has a beautiful curl, so you don't even have to do it twist out to enhance it. I'M just saying it. You know if you want to save time, but if you prefer to do a twist out like I did, then it still looks really really good. So this is what the hair looks like once all of the twists crack out. It'S so big and pretty, and I decided to kind of do a little a little twist in the front of it. So I'm fine, my rs mousse and I'm doing it cuz it kind of helps the like my roots blend more so they could look a bit more natural. It kind of gives it like this wet natural coming out of scalp. Look. I can't really explain it, but it looks good, so I'm doing this very, very loose twist in the front and then I'm gon na pin it down I'm using the pins that come inside of the box, those really really big, chúmbala pins and I'm just styling the Hair and making sure that everything hangs right, I'm separating a little bit more so that you can all flow together this week is super super beautiful. I love the curl pattern of it. It looks really really natural like it's coming out of my scalp. You see at the front, it is so pretty like it's amazing. I would definitely recommend this week for beginners. It looks really really good and you can see that I really didn't have to do that much. So if you're new to wigs then pick away from my first week, because you don't have to do that much and you can feel confident about your wig looking good. So the results of this wig is amazing. It just looks so natural, so real, like the hair, is literally coming out of my scalp. I absolutely love it. I love the cut of the wig. I don't know if you guys cannotice, but it's a little shorter in the back and then, as you get to the front, the sides get a little bit longer. So it has a beautiful cut and I don't have to cut it or do anything to it like that. The wig is 14 inches. The cap size that I got was a cap size to my lace. Color was a medium brown and I have all of the other information about the wig down below in the description box. So if you guys enjoyed this video and you like this week, I definitely recommend you guys check out the my first week website and as always, I love you guys and I'll see you guys next time, bye,


Comments
Natesha: Am new to wigs and I wud pick this! TFS sis beautiful presentation and finish work
BACKTOBLACKLOVE: God dammit man. I been saying for yrs that i aint bout that wig life, but the older I get, the less i wanna do my hair. Its healthy, but for it to grow the fastest i have to leave it alone. So i really been looking into more protective styles that dont involve braiding. Everytime i braid, my hair sheds like crazy. So now i am rethinking beginner wigs. I feel like a hypocrite but u sold me. Lol thanks girl
Dorasgard3n: Beautiful ... what was the retail price? And how did you style your hair underneath? Also how long did you wear the wig?
Victorious: Which do you like the best. This one or the “proud of your coils unit”?
mangopeel: I always wondered what happened to the u part wigs this company used to sell. No one sells u parts anymore
Naturally Focus: Nice, think i will try this company mainly because i will not have to so much. Love the hair
Crazy T: Irma told me to subscribe to your page and I love it!!!
Lioness Azari'Yah Yahsharalah: Pretty
Augusta Kany: ❤
GODGRACE: Please send me the link to order this wig, I really like it, thanks f sharein
Keylowlow 🌍: I want to buy this wig but before I spend $240 I want to know how is it holding up after several months? Tia
Livin Life With La: Yaaaaaaa Queen
Bbile: Beginning song?
maia washington: Reports to website and orders wig
Ms. Inelus: Hey girl
Shan: Notification gang gang