Detailed 3D 13X6 Full Lace Front Wig Install +Claw Clip Half Up Half Down Ft.Afsisterwig
- Posted on 11 January, 2023
- T Part Wig
- By Anonymous
Heey y’all in today’s video I will be showing you how I install my frontal wig step by step sent to me by Afsisterwig hope you enjoy thank you for watching this video don’t forget to like comment subscribe and share THANK YOU FOR 170k❤️ On the Road to 200k
AMAZON STORE FRONT : https://www.amazon.com/shop/tymarrahgi...
▼▼▼HAIR DETAILS & COUPON CODE▼▼▼
Wig in the Video: https://bit.ly/3U9hpFv
Coupon Code: TG to save money.
Melting Band ( no free gifts): https://bit.ly/39XeqyV
Swiss Lace Full Lace Wig Collection: https://bit.ly/3A7U00K
Delicate Hairline Skin Melt Wig Collection: https://bit.ly/2WQ7Hjy
Share looks on facebook, instagram , youtube and tag @ # afsisterwig, customers will get 15 dollar for next order.
Afsisterwig’s *NEW* Delicate Hairline Skin Melt Lace Wig
♥ All hand tied hairline, clean, delicate and natural, giving real SCALP vibe!
♥ No extra plucking needed, totally beginner friendly!
♥ Upgraded real skin melt swiss lace well blended with different skin tone!
The Skin Melt Wig is totally beginner-friendly, in the past three months, we have been making our best efforts to adding more density options, perfecting the plucking the hairline, adding the removable elastic band and optimizing the bleach technique to provide the perfect products.
INVISIBLE SWISS LACE: We upgrade our lace into Raschel net and bobbinet made of polyamide.The reason why we choose high-end swiss lace is that even with much higher price, it can be more invisible and undetectable especially when melting with glue. No matter what skin color you have, this skin melt lace will definitely match.
Wig SKU: AF0085
Hair length: 20"
Hair density: 150%
Cap size: Medium 22.5
Cap construction: 3D 13x6 FULL Lace Front
Contact Us:
➞ website: https://afsisterwig.com/
➞Email: [email protected]
Follow US:
➞Instagram: afsisterwig
➞Youtube: https://goo.gl/fvBMPA
MORE INFO
AGE : 21
HEIGHT :5’1
CAMERA : SONY ZV1 & SONY ZVE10
EDITING : FCP
SOCIAL MEDIA
Instagram: @Ty.marrah
Tiktok: Tymarrahgi
Business email: [email protected]
#selfcare #wiginstall #beginners
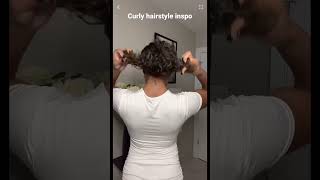
Foreign babies, so we are jumping into these cute hairstyle with the wig provided by Anne's sisters. Now I really really love this wig and I was very excited to do a fun hairstyle with this baby because of The Parting space. Now, if you guys are watching my videos, y'all know every time I get a wig that has a lot of parting space. I like to really take advantage of it, but I'm just showing you guys what came inside the box and I'm showing you guys these knots, because they're a little smaller than most wigs and the smaller knots are the more it's going to look like scalp and the More, your wig is just gon na look like really good, so shout out to this company for actually having really small knots, because that plays a big role. So now we're just getting to the bleaching. Now, I'm using the Shimmer Lights bleaching powder. This is the first time I've ever used it, so I just wanted to show you guys what came inside. Normally, you know bw2, but now I'm doing the Shimmer Lights because it's already toned. So you have to worry about going over with to your Shimmer light. Shampoo. Also, I've seen the girls on Tick Tock, using blue hair dye with the regular white bleach to give this effect as well. I feel like I would try that, but I wanted to try to see if it really does tone - and this was a really really good bleach - I'm not mad at it. It works really good, but what I'm doing here is just scooping out three things of of the powder and I'm mixing it with a 20 volume developer and this for this specific bleaching powder by Shimmer Lights. It says you can only use um their developer or the Wella charm. So that's what they said on there, but I feel, like you, can kind of use any. I kind of mixed the 40 volume and the 20 together but, like I don't really know if that really helped, but you want to get it to the consistency where it does not come off the brush and once you have your good consistency, we're going to start Applying it onto our knots now, you don't want to be too heavy-handed with this, because you can over bleach your knots and in the event that you do over bleach them. You can always fix it, but it's just better to just do it right. The first time, foreign, so now that I have everything covered all of the knots are covered in the bleach. I'M just going to go ahead and let this sit so normally I probably let it sit for 15-20 minutes and then we are proceeding to wash it out. Now, if I'm just being lazy y'all, I literally wash the bleach out like rinse the hair off and start this install. But I was like I'm gon na stop being lazy for real and I'm really finna like really really do what I have to do. So I'm just washing it out getting the hair coated because we are going to go in with a conditioner. Now I didn't do a shampoo. I just did a conditioner because I just felt like that was better because I don't know I just wanted to just do a conditioner and not do shampoo. So I just went in with my Tresemme shampoo after I've got all the bleach out, so I'm just making sure there's no bleach nowhere making sure I'm getting in between and inside of the unit, because you know little bleach, specks and stuffy inside. So I'm just making sure everything is clear before we go ahead and add our conditioner, and even if you didn't get everything when you do this, like it's gon na make sure everything is out. So, by the time you wash the hair, you know if you want to do shampoo, that's fine, but if you're just doing conditioner like me after you wash this conditioner out, there is going to be completely no traces of the bleach. So if you guys don't get all the bleach out, like you, have little specks or something inside your wig like you're, about to wash it again. So that's cool. But if you're trying to be lazy and just wash the bleach out and just go straight into your install, you better make sure all that bleach is gone. Thank you. Thank you, foreign. Now we're just jumping into this ball cap. I just stretch all my bob cuts out before I put them on my head and I normally don't do this little eye thing. I don't do it at all, but I wanted to just do it this time. I don't know this is my last time ever doing this, because I look like a bank robber like it looks crazy, but I'm just taking my eBay, New York, spray and spraying on my hairline. I know I used to use like lace glue to get my cap down, but I kind of don't like how harsh that is on my hair, because the whole idea of the cap is to protect your hair. So, like I don't want we're already putting glue on the cap when we do the install, so I rather only put glue that way and just use this way because it works as long as you like. Have your cap position right on your head, just using the even spray is going to give you that, look that you need and then you're gon na go in with lace glue anyway. So I really just feel like it's no need to put lace glue on your cap to get your ball cap method, but I'm just going in with my arcade by kiss um. You guys can see this in the product section. You can click the tab. You see like a little Tab and it'll have the product so I'll have the RK by kiss right here and also you guys can check out my Amazon storefront for all the Necessities that you need for your wigging style. But after we put that makeup on, I went in with my alcohol and put my skin protector on by Erica J and now we're getting started to this install. So, first and foremost, what you want to do is shake this wig to your head. Now I love wigs that are like kind of big not like bigger, like not like it's too big for my head, but, like the lace section, is so wide to the point where I have to like really customize it and that's how I know it's going to Get like a perfect fit when I do customize it and I'm using the Erica J glue today and the watermelon scent, and I'm just going ahead and starting my layers and after I apply my layers on, I don't blow dry it. I let it air dry, and this is how you're supposed to use this glue in particular. Now, if you're using any other glue, sometimes you can't blow dry it, but I feel like letting the air dry is the best. Now, when it comes to laying down my units, I like to just lay it down with a comb. Sometimes I pressed it with my hand you're not supposed to really do that, but I just be doing it anyway and I like to go in with my hot comb as well. For some reason I just like doing this and I'm just taking like a little silk. Like a like, a short silk scarf and wrapping it around my head - and I just like walk around the house and stuff like or I'll sit under the dryer, it's just depending on how I'm feeling some days, I might just walk around the house and just let It sit some days, I might stand in the dryer, but I would recommend to sit under dryer. If you are like you know, new to installs. You want to do your install you're, not a pro like you haven't, been doing this for a long time. Go ahead and sit under that dryer, but now you see me just cutting off the lace with my eyebrow razor and you can get a big pack of these off Amazon so check out my storefront. That'S where I get all of my razors from because it's a big pack and it saves me so much money, but now I'm just going in and getting some of the spots that I missed and, like I say in all my videos, you rather want to go Back and add glue than you adding too much, and I was going in on this late like I was trying to make sure that this looked really late. I was holding the hair in my mouth I just like to pluck. If I need to pluck I like to pluck on my head, because I didn't have too many instances where I messed up in bald spots and everything just for me, plucking on the mannequin head, so I feel like um, I can't handle the mannequin head plucking on My head is the best thing for me if I do pluck on the mannequin head, it's very minimal, because I just do not trust myself and I don't want to mess up no unit mess up a look that could possibly been real cute and now I have To go back while I just make up to fix it, but now this is after I just got all the hairline straight. How I want it and I'm showing you guys how much space is on these units, like it's so much space on this unit, like I just love it so much like I wish this is all the type units I could get like with so much space on It like we can do endless hairstyles with this, and the Melt is just so cute like I love it, and I did go back in. I had did this off of camera, I just tied it down one more time. I just sprayed my even spray on there and tied it down one more time. That'S the only thing I sprayed on there and then took it off and now we're starting The Styling, but we are doing this cute half up half down now, when I'm doing like inspo and stuff I've been trying to like find inspo pictures and then transform those Pictures into something else like put my little spice on it, so that's what I really been doing and that's what I did when it came to this hairstyle now. I know you guys been seeing a lot of the three-part ponytail type things with the Chopsticks in the hair. So at first that's what I was going for and then I turned it into something else like it kind of gave that, but it gave way more than I expected like it gave way more than what I was intending on doing and that's a really really good Thing but I'm just taking my hot comb and just getting those sections really really flat, and one tip that I really like that. I just started doing that. I found that it worked so good. The chi Iron Guard serum. I use that kind of like a wax. Stick and y'all when I tell y'all this gets my hair slick. It gets a slick. I'M gon na do a tick tock of all the stuff that I love using for my hair, because I didn't came up with so many little hacks that I like using that. Just helps me get everything really slick, but, as you guys can see, I was just parting doing those three parts and I had put my hair in a ponytail to get that middle part out the way. Why, like I shaped, but then I forgot that I had to take out the part in the front, so I took it out to do that. But the first thing I wanted to do was take out the bangs in the front, so it can already be separated. Yo, why did I just do that? I don't know why I just did it y'all, but we're just taking out the bangs in the front, so it could be separated, and I really love these names I feel like it was really cute, because it's not just the parted in the middle type bangs. It was part of kind of slanted and I feel like that was super cute. Thank you. So now I'm taking like a little bit of edge control and I'm spraying some holding spray and we're going to go ahead and get this first ponytail out the way. So I did it in three sections. I did the first ponytail in the middle first and then I did the side separately with rubber bands. So I did both sides separately. You guys are going to see - and I feel like that - just made it way better because trying to do all three together, which is not going to work, and if you do try to do it, it's going to be very stressful and it's just not gon na Work out the way you want it to because I tried and it wasn't working for real. So I was like you know what it makes more sense to do three parts like duh foreign, because when I tell you I use this like a wax stick. I use this way more than I use the wax stick and I feel like the cheese stuff. It heats up the hot comb too, which makes it very slick because, like you know, it's like the little hack where you spray, like the oil on the hot comb. So it can get like super hot. I feel like this just helps even more so the serum touching the hot comb just makes it slip down even more, and it makes the hot comb even hotter, but I'm just going in and plucking a little bit as we go, and I pulled out like a You see me do that part, that's how I did my ponytail, because you know it was but so much it was spaced on the unit. But like you know, it wasn't like a 360 unit, so I had to make sure that the way I did the ponytail no tracks or anything was going to be showing foreign. Thank you now y'all when it comes to after you've connected all of your ponytails. Now this is so simple: you literally I'm just taking my rubber band and then I'm going to just make a small little bun right here. This is a small blend, so first you want to make that small bun and then you want to go ahead and flip. Your hair over that small bun and take another rubber band and rubber band that to make two small buns. So it's a small bun wrapped over another small button. That'S all it is so we're wrapping that first part right here and just make sure that it's all together, like you, want it to be very secure, because this is like going to be your foundation for the cute messy top type. Look so you see the rubber band right here and I'm just trying to make sure everything is secure and I am taking my rubber band and making that second bun. So it's like a bun over a bun and then so. This is what you will have right here: keep it this, keep it this size, don't make it any bigger. You could make it smaller, but I just like it like this. So now I'm going in and teething teasing the hair and I would recommend spraying some holding spray on your hair a little bit and teething it. I said teething teasing it. I feel like that's just gon na make it look so much better and then, when you are Bobby pinning this and if you have the bobby pins that are more loose use. Those like the pins opposed to the really like secure bobby pins, because this is what you need like the pins for, so you can just stick it through. You don't need anything. That'S like too tight because the regular pins is going to give you like a good look. So don't use the very tight bobby pins like the ones. That'S so close together use the ones that have space in between them, but I'm just taking like some of the hair and Bobby pinning those parts that I teased out and that's going to give you that. Look! That'S literally how you do this y'all! I was confused too. The girl he's on Tick Tock was confusing me. I had to try to figure out on my own yeah, but this is how they're doing it. This is how the girls are achieving. This look and I just sprayed like the whole thing, with holding spray, just to make sure that I maintain the top look and now I'm just like doing the last little finishing touches. I wanted the bang to be a little shorter, so I'm cutting and then I did also cut a little bit of layers in the hair. Like I could I cut a little bit of layers in the hair, not even nothing too much just something that when I straighten it, the hair will flow, and I just passed through with my straightener a little bit just to get everything together and we are pretty Much done foreign you guys, so that is the end of this hairstyle. I feel like it came out really cute um. I was kind of scared about this top part, but I eventually figured it out and I feel like it just came out so cute y'all. Let'S just get into it, like you already know, I'm trying to step outside of my box. You know, do a whole bunch of cute styles, so yeah, but I really feel like I really really love this look like it just looks so cute like I love it. If you guys enjoyed this video, don't forget to give your girl a like comment and subscribe, and also for more information on this unit. Don'T forget to click the links in the description box down below and also don't forget, to hit that notification Bell. So you can see what I post. I love you guys. So much and I'll see you guys in the next video Stay Blessed yeah babies we out
Comments
Jae Insider: Always coming through with a great video ❤
Dera O: I got tired for you just watching you do all this but your hard work paid off for sure, this look is cuteeee
Karlisa: This is sooo cute
Jay Smith: hey girl! i love your videos where do you get your nose rings from? they’re too cute
BEAUTIFUL Queen: I’m trying they style ❤
gzachia: thanks for sharing!
Sammy Da Goat: Third Comment Bomb Lace Wig
Blvk Rosess: ❤️❤️❤️
PrettyB Dior: ❤️❤️❤️❤️❤️❤️❤️
Tiahanna Lawrence: First