Flawless *Step-By-Step* Lace Frontal Wig Install | Wig Install Tips I Wish I Knew Before
- Posted on 20 February, 2023
- T Part Wig
- By Anonymous
hair: https://sheslaysfirst.com/products/str...
products: https://shopwigdealer.com/?rfsn=715450...
Thank y’all so much for watching! Feel free to comment any content/videos you guys want to see from me down below! And remember, God is love. Whoever lives in love lives in God, and God in them. His love endures forever.
————————————————————
Let’s get to 40,000 subs !
——————————————————
Business Inquiries
Subject: YOUTUBE
——————————————————
Keep up with me:
️SHOP “She Slays First” Hair: sheslaysfirst.com
IG- janiaaliyah https://www.instagram.com/janiaaaliyah...
Tiktok: janiaaliyah
My Podcast: https://shepraysfirstpodcast.buzzsprou...
My Amazon Storefront: https://www.amazon.com/shop/janiaaaliy...
‘Wig Money’ Ebook: https://payhip.com/b/nMmO1
———————————————————
Subscriber Count (at the time of filming): 38,056
——————————————————————
FAQ about me:
Name: Jania
Age: 21
Birthday: December
Camera: Sony Alpha A 7iii/ Sony ZV-1
Editing Software: Final Cut Pro
————————————————————-
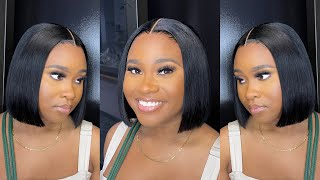
Forever beautiful people, it's your girl, Jania Leah and welcome, or welcome back to my channel so as y'all can see by the thumbnail and the title today, I am going to be doing a lace, wig, install and y'all. I personally feel like I have not actually put effort into installing a lace wig in so long because I kind of haven't been wearing too many frontals and whatnot, but for some odd reason today, I'm gon na be wearing the frontal, and so I'm gon na go Ahead and show you all the wig, the hair is from she slays first Hair Link down in the description box below, and this is the 24 inch straight lace front, wig, 13x4, and so as y'all can see. I went ahead and kind of already, you know, did some clucking as well as tinted delays and with that being said, we're gon na go ahead and get into this install. Let me take my wig off and put on my wig cap and I will be right back: okay, y'all, so first things. First, to lay this wig cap, I used the wig dealer, touch up bonding gel and I just put that all around my hairline and use the blow dryer to dry and with this gel you can feel like once it's dry, so it was no longer tacky, but It was literally dry as if I used one of like the holding sprays and whatnot and yeah so from there. I use my eyebrow razor tool and I just cut the wig cap and basically I tried not to lift too much but only cut up to where um it wasn't laid down. You'Ll come around. If I don't do too much and once it was laid completely down. Even though it wasn't given bald, I still went ahead and added makeup on it, because one thing that I've learned is that the wig cap doesn't necessarily have to give like ball cap for the install to still look good. So I just have to make sure at the least it kind of resembled my complexion, and that was what we was working with then, because I can be a perfectionist. Sometimes I want to see if I could improve a sweat cap, so I went through with the wig dealer, lace, glue and kind of laid it around the edges of the wig cap. Just you know kind of lay it down just a little more, and so I let that dry and kind of try to press the ends down with a comb using the little nozzle part. That'S on the um touch-up gel to see. If that would help, and as you all can see, this is how the wig cap ended up looking like towards the end, but that was fine because, like I said, we really don't need it to still have a seamless, wig install so from there. I went ahead and tried on my wig and y'all. I went ahead and plucked this wig and bleach the knots and tinted the wig before starting the video. So let's just admire my um plucking job because I feel like I did great, but on this step, what I went ahead and did is cut the lace ahead of time. And so I did this because usually the problem that I run into my wigging stalls is when I glue the hair down or glue the lace down and go back through and cut it after. I always have that ashy line of demarcation from where you cut your lace after the glue was on there, and so in order to prevent that, I thought it would be easier for me to kind of cut out. The outline of you know the wig ahead of time, and this this also helped me improve my glue placement as well, because I didn't have to place glue in places that may or may not need glue. So with that being said it I went ahead and cut the lace down ahead of time, y'all and I'm telling y'all. This was a game changer for me, because not only did I not have to worry about cutting the lace afterwards, all I had to do once. I put the glue on where needed to be was push it down into my hairline. So, as I stated previously come, the lace ahead of time definitely made this step a whole lot easier. So what y'all see me getting ready to do is I'm going through with the wig dealer lace glue and I'm just putting it over my hairline. Basically, the edges of the wig cap and it's important that you do it not on the wig cap but on the edges, because if you do it on the wig cap, I don't believe the wig will stick properly and that's how you kind of get lifting. Sometimes so, even if you feel like it's a little close to your forehead, make sure the glue is on the skin at least like a little bit and from there. I went back through with the applicator part of the bonding gel and I just used that to smooth that layer of blue out, because it's important that you have like a smooth, even layer of glue, because if you don't problems that I've run into is when I Go back through to lay the wig and comb the lace into the glue since the lace or since the layer of glue isn't smooth it'll, go through the lace and glue some of your hair down, and you don't want like a stuck looking wig. So yeah with that being said, make sure your glue layers are smooth and flat. Now this part of my wigging style really amazed me y'all, because literally all I had to do like I told y'all was place that wig and press it down with my finger, and so that's exactly what y'all see me doing here, not applying too much pressure, because The main thing I'm focused on is that I put the wig in the right place. You know I don't like wigs when it take up too much of like my forehead or it's too close to my eyebrows. So that was the main thing for me and once you have your wig in the correct place, you can go through with your pinky, your fingers press it down, and then also I like to go through my comb and kind of just comb and press. At the same time - and so this is supposed to make sure your edges aren't glued down to your wigs. So although they do look late because I hot comb them, I don't want them stuck to my lace, glue and don't worry about the parts that are lifting, because that's going to be the key to this install as y'all can see. I'M going in with my mini like little tiny scissors, cuticle Cutters and I'm literally, going through and cutting off every piece of lace that is not glued down. Now, if you run into an issue where you have like a huge piece of lace, that's not glued down! Maybe go through and touch it up, but when I tell y'all this technique right here, just cut it off, don't worry about it. Back in the day, I used to try to glue down every little piece. No, if it's not glued down at this point after where you place the glue strategically just go ahead and cut it off then. Lastly, for this install, I went through with the Wing dealer, um melting spray and so from there. What I did was, I literally just sprayed all the parts of my lace that were a little lighter and basically I just went around the whole lace on it. So I just went around the whole hairline spraying, but be careful one not to spray too much and two not to get too much on your skin, because you don't want, like that. Sticky, look on your skin and then having to go back with alcohol. So, as y'all can see, I'm kind of cleaning up just a little bit around there, but with the melting spray. What I did was I sprayed, and once I covered all the areas I wanted to cover, I went through with the blow dryer to ensure that it dried, as I was pressing it down, because one thing that I've kind of learned in trial and error is that You don't want to put the melting band on your hair while the melting spray is still wet, because once you take that band off your head, you're gon na have those little white glue marks of where the glue was drying and you didn't let it dry. So with that being said, I went ahead and I let this melting spray completely dry. Before I put my elastic band on my head, okay, foreign and from there, as the last thing was on my head, I just went ahead and kind of straightened it and styled it. But when I tell y'all watch this plastic band come off, I put. I just felt so accomplished y'all, and so really I feel like this wig was giving you know Jackie Anna no baby hairs. I really did want to do it, but I just wasn't used to the look. So I just kind of tricked myself into doing some baby hairs, but I really didn't need them at all. So yeah, I just did the little baby hairs and basically, what I did for those is, I kind of just parted out based on my hairline, where my hairline, like naturally like I guess, receded. So that way I could put the um baby hairs there and they look natural and not too close together. Another way you can do this is base it off of like the arch of your brows. So I like to do my baby hairs in line with my natural arch of my eyebrow, so you can see my baby hair is directly above that, nonetheless, to lay this down, I just sprayed some Sebastian hairspray on it, dried it and was in able to mold It and then from there I literally just put some mousse my melting bin, and I let that dry as well. So that way it doesn't have like a super hard look, but more of you know that little soft mousse look. But honestly, I did this hair spray. First, because I can't trust the moods with my lace y'all, because I didn't have too many incidents where the mousse makes the lace lift. So that's my method, that's what works for me, but hopefully this was able to help y'all out y'all get into it. Get into the lace y'all I personally feel like this was like my best install ever like this install was honestly so good that I was having a hard time kind of contemplating whether or not I wanted to do baby hairs, and I ended up doing baby hairs And I guess I like them, but man when I tell y'all that lace is Layla, I don't even oh, I love it and lastly, this is how it looks with the side part and best believe I will be keeping the side parts and then, as y'all can See to kind of help the lace look a little bit more invisible. I went ahead and cut some tiny, tiny baby hairs, so um yeah, but anyways y'all thank y'all, so so much for tuning, and I definitely think this was an amazing wig install and once again the hairs from she slayer's first hair down in the description box below And all of the Like Glue and products I used are from wig dealer, which you can probably find a link for that down below too, but anyways y'all thank y'all. So so much for tuning in you already know, click smash smash that subscribe button down below and I will see y'all on my next video foreign


Comments
kharyzma4u: It came out nice
Sapphy R: Great install…u are too gorgeous!
YoMami: Too pretty ❤
Young Beauty: We are a wig factory and look forward to working with you
Kani W: I know that’s right Jania- love your content sis
☆* luvvsophie ʚ。・ : love you girl, keep on posting!
Cecee Stanford: So pretty
Ericka S: Love. Your videos
Breia Monet: Yes ma’am
Young Beauty: ♥️♥️♥️
Smile: