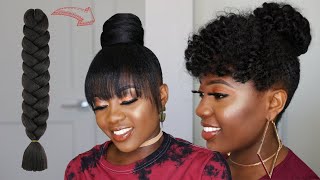
Diy Ponytail Crochet Wig Using Braiding Hair From Freetress Brazilian Braids Very Detailed Tutorial.
- Posted on 19 January, 2021
- T Part Wig
- By Anonymous
Freetress braid (Brazilian braid 20”)
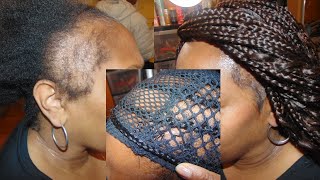
Deluxe weaving nets
Crochet hook
Periodt!!!!!!!!!!!
Guys please subscribe like and share...
I love y’all
❤️❤️❤️❤️❤️❤️❤️❤️❤️❤️❤️❤️❤️❤️❤️❤️❤️❤️❤️❤️❤️❤️❤️
I play too much
Hey beauties welcome back to my channel, so today's video i'll be using this deluxe weaving net to do my weaves and guys this net is a lifesaver. It comes in twos like this hard net and the other one is lights like it's something you can use to do your ponies and all that. So that's what i'm going to be using this particular one, and i am so excited about it. So guys, if you love this, video don't forget to like subscribe and leave a comment below so first of all, in order to get a perfect shape, i'm going to be using my tape to measure it. You can actually measure it out on your dummy head, but i'm gon na measure it on my bed and i'm gon na measure um a six inches, so i'm gon na go in with six. Every angle is gon na be six, but on this other side i'm going to make it all the way down, because i'm going to have to keep an end like you know, a tail for the pony, so i'll be able to wrap it around. But this top part is also going to be six inches. So that's what we're going to work with today and while i'm cutting this part, i have to make a tail also. So i don't like cut everything straight down. I just stop at this side and then make an l with it to give me the tail. So i can actually get the parts that i'm going to use to wrap the hair or add the extra braiding hair to this style, and, like i said earlier, you can do this same pattern on the head of your mannequin just place. It use your pencil to mark it out, so guys do not put the tail or the velcro at the left side. Okay, always make sure you pin it down at the right side of your mannequin head when you want to crochet whatever you want to crochet on. So you don't like miss the whole point or process of the velcro or the hand, okay, so that little piece is called the vehicle or the hand. So for today's tutorial i'm going to be using this product, which is called the freetress braid and on the brazilian braid 20 inch and i'm using the color 2 for today's tutorial so guys. I would not cut this hair into two, because i want this exact length. So i'm just gon na put it in just like that and for the crocheting i'm just gon na crochet normally. So if you want to crochet this do not start directly from the place you cut or where you cut it, and i'm going to show you why. I said this during the video, so keep watching i'll be using this opportunity to remind you to subscribe to my channel, please. If you haven't and like ask whatever question you want to ask me and i'll be always there to answer you guys. I promise so guys. I'M just going to be applying the um or installing the crochet hair. Just like this. I actually wanted to do it with them. I wanted to do this hair with an expression, hair ball. I wasn't just cut out for the whole stress the whole hot water. The whole um twisting and stuff like you know you have to put it on the straw or on the spiral rod. I wasn't cut off for that. I just wanted something. Just simple and this hairstyle took me guys. I promise you this hairstyle took me just 30 minutes like if i wasn't even videoing, i'm sure that everyone finished this hair as early as i think, even maybe 25 minutes it was that fast, guys, trust me, i just had to cut, and you know do all These things and just install the hair - and that was it there was no coiling. There was no nothing, and i literally wanted something that was going to last me longer than how the expression breeding hair would last, and one thing people would not tell you, is the braiding hair with the expression. Hair would definitely start shrinking, you know, but all of it all all the same. It'S still going to be cute, you know for the meanwhile, you do it's still gon na be cute, so guys now. The reason why i told you guys not to crochet at the beginning or at the end of your hair or on this net is because, when you want to when you're done, yeah, when you're done, crocheting you'd have to leave a space like what you're seeing right. Now you have to leave a space, so you can add your comb or brush or whatever you want to add on your strap. You know, maybe you have this string to add you just put this into two or just sew them together and add whatever you want to add, be it the comb or the eats the these strings. You know you can just put those together. That'S why it's always advisable for you not to crochet on the whole net, because you need the space to put in your comb and your strange or whatever you want to just use to hold your hair okay. So i just kept on filling up the spaces and making sure that the places i'm going to like this top part would be clean to be like very nice and presentable, and i literally love the fullness. I actually wanted this to be even fuller than this. I ended up using two packs, not really two packs. I think one and a half, but i literally wanted something even fuller than this right now, but i still love this and i i don't regret not. I don't regret buying this at all like it's cute. Just look at how it looks like now guys, that's what i'm talking about. Oh this is nice. So in order to do the velcro, i had to get one of the colors that i like and my attachment or expression. Here i use the same color for so it's going to match and i ended up adding more to this, but this is what i filmed okay, but at last i ended up adding more hair or expression hair to this their cone. So this is how you add it. You can start with by adding little bits. Okay, you don't really need to add as bulky as this, and i would advise you guys if you want to cut your own, make sure you cut it thicker than this okay, i don't know why. I'M saying it now in the video i am literally supposed to say it at the beginning, but yeah. If you get to this point, please cut your velcro thicker than this, so you'll be able to like wrap it around or you can even add. Okay. You can add, like a very light, um, a very light strap. You know just to make it thicker so when you're wrapping it around your hair after and the whole installation, it's going to be strong and this um extra braiding hair is going to come out. Fine. So that's just my mistake. That'S one of the flaws i did after filming this whole video and also guys don't use a short extra reading. Hair. Okay, don't use a short extra braiding hair use like a cot two or a quarter. Three. I used a cot four, which ended up being very short. So if you want to do yours always use like a coats three or a coat too so i'm gon na just add my oil just spray, the oil on my hair and so for the next stage. I'Ll be showing you guys how to apply or sew in your comb, how to tuck it down and also i'll, be showing you guys how i install this whole hair. I love this hair. Oh my god. I love it guys and trust me, i'm sure you would also love it too. So this is what it looks like inside out, and this is what it looks like outside. So i'm going to put this together down there like that and then sew it in so while sewing i'm going to add my comb, i'm going to add my comb, but you have to sew it like sew it around. First, then, you add your comb, okay, but you really don't practically need to sew it down. So for my comb, i'm going to be using this spring wig clip side combs. It comes in three guys, so it's very affordable. I think i got it for like one dollar or 99 cents, so it was really cheap for just three like for three, so i just place it in front. That'S on the same roll of where the velcro is, and i also place the other one at the bottom directly under this hair and sewing together. So you make sure you sew them around and i forgot to tell you guys, while you're doing the velcro just leave like three space or like a few inches of space, where you can use to run to like wrap your hair around. And then you use the hair you added to the velcro to just make it more beautiful. You can use this style for different hairstyles, even straight with wands okay. So that is what i did now. This is what it looks like. So i added the two: now i'm going to be taking down my hair, and this is what i look like so guys, if you want me to have or show you guys, a um, a video of how i made this hair, you can leave a comment in The comment section so i know you want me to do this hair to show you guys how i made this hair with my very, very short hair. So don't forget when you finish doing the whole wrapping on the hair. You always use your bobby pin to like pin it down to hold it for a longer period of time. Okay, so please, if you enjoyed this video, don't forget to subscribe to my channel. Please, like the video drop, a comment in the comment section below. If you want to see how i did these um braids on my head, how i did the whole pattern leave a comment in the comment section below i'll be glad to help or to film this whole process. It literally didn't take me so long to do this. I actually did the whole hair in just like that's the braid and this ponytail. I did everything just like two hours. I was done or yeah an hour and two hours, let's just say two hours: okay, yeah, but yeah guys it's a wrap and don't forget. Like i said to subscribe, i love you all i'll, be seeing you guys on my next video bye stay blessed, stay beautiful, stay! Happy! I love you. You

Comments
Michelle Chiku: Love this you did a really great job new subscriber here
Young stars entertainment recording studio: I always love watching your amazing video, because you takes a lot of time to explain very well for your viewers, thanks so much my dear
Young stars entertainment recording studio: Wow this is awesome, very simple and fast, nice job
Ife-chi Dora: I love the density Would love u to show us how u made the corn rows..it’s lovely
JOVITA_FORUM: Wow... This is beautiful. I really love it. Keep it up girl... You are really making an impact.
belle_graciaz: Wow I love love love the volume and this was so detailed
Young stars entertainment recording studio: So beautiful
Blessing James: Amazing
Florence Amaraegbu: Am new here, this is so detailed. Keep it up dear
nancy daniels: Lovely
Edwin Eunice: Beautiful
SAMUEL IDEDEVWO: I love this
THE DREAMER'S TV: Fantastic
Oblitei Benjamin: So cute
nancy daniels: Great
Young stars entertainment recording studio: I think I missed one of your video, I will watch it now to learn about that one too
Ogunsola Abass: ❤️❤️❤️❤️❤️❤️❤️