Finally!!! The Best Curly Lace Wig For Beginners! Klaiyi Hair
- Posted on 16 February, 2023
- T Part Wig
- By Anonymous
Get 28% off Use Special Code: MY28
●▬▬▬▬▬▬▬▬▬♛#KlaiyiHair♛ ▬▬▬▬▬▬▬▬▬●
Direct Hair Link:➤ https://st.klaiyihair.com/f9u19
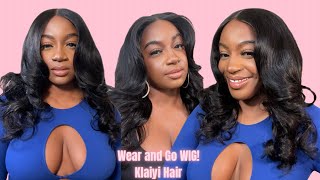
Hair Info:13*4 lace front wig, jerry curly, 24inch, 180% density, natural color
Official Website:➤ https://st.klaiyihair.com/f9u1c
Best Sellers:➤ https://st.klaiyihair.com/f9u1b
Affordable Natural Density Lace Wigs:➤https://st.klaiyihair.com/f9u1a
Aliexpress Klaiyi Hair Store:➤https://s.click.aliexpress.com/e/_opNA...
Amazon Klaiyi Hair Store:➤https://amzn.to/3OLRlhL
YouTube "Klaiyi Hair": http://bit.ly/2zpjQhu
TikTok"@klaiyi hair": https://www.tiktok.com/@klaiyihair
Instagram "@Klaiyihair_no1": https://www.instagram.com/klaiyihair_n...
Facebook "@NO1KLAIYIHAIR": https://www.facebook.com/NO1KLAIYIHAIR...
Contact for Wholesale: +8618337492297 Email: [email protected]
#klaiyiwig #lacefrontwig
-----------------------------------------------------------------------------
PRODUCTS MENTIONED:
Wig Head https://amzn.to/3KhGOvp
Wig Head Tripod https://amzn.to/3YT4I4u
Shampoo and Conditioner Duo https://amzn.to/3KduBIj
Mousse https://amzn.to/3I964kY
Mielle Rosemary Oil https://amzn.to/3YzKzAE
Adhesive https://amzn.to/3S6QJWC
Lace Tint https://amzn.to/40GNPM7
Lace Concealer https://amzn.to/3lqbT5S
Edge Control https://bedeckbeauty.com/products/edge...
Wax https://bedeckbeauty.com/products/wax-...
Electric Hot Comb https://bedeckbeauty.com/products/elec...
Melt Belt https://bedeckbeauty.com/products/melt...
Blow Dryer https://bedeckbeauty.com/products/blow...
Shop Bedeck Beauty: https://bedeckbeauty.com/
-----------------------------------------------------------------------------
Hey Girl Become a Love Bug ✨ by subscribing here: https://www.youtube.com/c/AshleyBedeck...
Email: [email protected]
Monthly Wig Sale: https://ashleybedeckhair.com/
My Amazon Store: https://www.amazon.com/shop/ashleybede...
Let's Stay Connected:
Instagram: @AshleyBedeck
TikTock: @Ashleybedeckofficial
Twitter: Ashley Bedeck
Facebook: Ashley Bedeck
My P.O. Box:
P.O. BOX 52103
Irvine, Ca 92619
COUPON CODES:
FETCH REWARDS:
Your Referral Code: QXQMDP
#ashleybedeck
-SMOOCHES
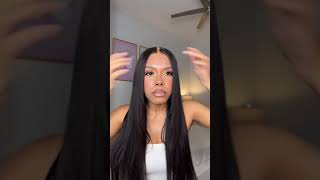
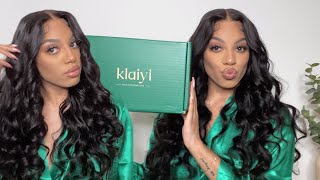
Hey guys welcome back to my channel, my name is Ashley P, dick and today we'll be doing a beginner friendly start to finish. Install this one comes courtesy of kawaii hair and they sent over this beautiful curly unit. I did take it to the sink and do a little co-wash to kind of make the curls pop and then you'll see me. Do the styling and prep process on the mannequin head. You guys already know if you really really really want your wig to look super professional. Do everything all the work that you can on the mannequin head before you Bond it down just heading both hands and both eyes and just being able to look over the wig and really really really you know style. It definitely is a plus and it definitely, in my opinion, just comes out a little bit better than when we install on our heads. Let me know what you guys think of this one I think she's absolutely gorgeous the curl definition. The install everything about her is absolutely chef's. Kiss 10 out of 10., so without further Ado, go ahead and subscribe if you haven't already and now, let's get into the video jumping right into it. This is what the wig looks like on straight out of the box. I was sitting here trying her on for size. I wanted to see what style I would do and ultimately I did decide to wash and condition her off camera. This is the curl pattern and what she looks like straight out of the box, and then this is what she looks like once you give her a nice wash and condition. I did use a Tresemme Duo, the moisture rich. I believe it's what it's called I'll, have it linked in the description box, but this is it after a good towel dry. I went ahead and placed it on my mannequin head and proceeded to customize. So today I did go in and lightly tweeze out there hairline. As you guys can see, it's already pre-plucked, so not much work was needed, but I definitely just wanted to go in and give it a special touch. I do love when I go ahead and prep my wigs on the mannequin head. This is how I get the most Flawless install. Sometimes I forget how amazing and what a huge difference it is to do these few steps before applying the wig. So I highly recommend you invest in one of these wig heads as well as a tripod and just make sure you just give your wigs a little TLC, especially if you're going to be spending a lot of time with your unit. So after I went ahead and tweezed out the hairline, I did pull forward a little bit of hair and I was just deciding if I wanted to do baby hair or not. I created a center part because we are going to do a bust down center part and then I just decided to make a lot of baby hair like around the entire perimeter and I just sectioned it off and just you know, squirted away. Now I want to work on the length of the hair. This is one of my favorite Parts when I prep a wig in advance. I love to go in with the moose Nairobi happens to be my favorite and I'm very generous. I like to apply a good amount and just really go in with the mousse paired with a Denman brush and really really make those curls pop. You can see how beautiful this curl pattern is the sheen, the texture. Everything is amazing. When you do the step, you guys did see what the wig looked like straight out of the box, and there was no issue with the curl, but this just makes it. You know Flawless so now that we've done that let's go ahead and make sure everything else is perfect. You guys know the dynamic duo is one of my favorite steps. Just in general, I use the wax stick paired with the electric hot comb, and I just go around the perimeter of the hairline, as well as the perimeter of The Parting, really making sure I stamp it out and make it as thin and just neat and just Flawless and just perfect as possible, this step really really makes the wig look like it's melted. Once we got that set, I went ahead and took all that baby hair. We separated, and I just trimmed it down super short, not necessarily carrying about like the length. All being uniform kind of want it to be a few different lengths, just to kind of give it a more Jagged look. First, I added some mousse just to kind of wet the hair, and then I went in with the edge control around the entire like base of the baby hair and as I did so, I kind of started to just kind of pull the hair start to um. Tame it in the directions that I wanted it to go, but I found pieces that were too long. I definitely went in and trimmed them and, as you guys can see, I don't want like perfect, swoops or curls. I don't want it to go in one uniform Direction. I kind of want all the hair To Go in different ways and pieces that I found were too thick. I kind of just sent some of the hair back into the rest of the units and I really love the way it came out. It wasn't too thin. It wasn't too thick. It gave very natural and you'll see what that looks like once. We install the wig. So this is what she looks like after she's kind of set for maybe about an hour. I kind of just left her on the wig head and just proceeded to do a few other things. I think I did my makeup and you know a couple of things for my kids, but now it's time to install so you guys know I have been pretty adamant about using the myel drops. These ones are so viral on Tick, Tock and just all over social media, and I believe it's like Rosemary mint. When I first got it. I was consistent and I was applying it like every single day that I filmed I did get sick. I know you guys kind of kind of hear it in my voice. I'M kind of recovering so excuse my voice, but I did take maybe about a week off and I'm back to it. But I do notice that between that and just taking my hair vitamins and my hairline definitely is filling in and coming back to like pre-baby pre. All of these days also, I did go ahead and just go ahead and tint the lace you guys can see how warm the lace looks. Now. I did use that makeup by Mario Foundation that I showed you guys on Tick Tock. It definitely was a perfect match, and this is what the hair looks like on. As I mentioned, I did go ahead and let it set for maybe about an hour. It still was damp. I would highly recommend waiting until the hair is completely dry to completely set now who got time for that today we got ta just get to it. You know so now: I'm just gon na go ahead and cut off the excess lace, pay attention to the hairline and that baby hair. If you thought that was too much, you guys can see, there really wasn't much at all. It'S a very, very natural, take on baby hair and, more so just an option to kind of help to conceal or camouflage that line of demarcation between the hairline and my actual skin. Now we're bonding down with the ebin you guys know this is my favorite. So far, I'm actually almost out of this bottle. I do think I have the black one in my drawer, but I will be ordering a few more just to kind of compare and contrast all of the different colors in this line. Now that we're all bounded down, you guys can see how beautiful the texture is, how Flawless the hairline and just the install and just the overall situation, is, I'm just going to set it off by adding a little bit of powder to the hairline as well as Concealer in The Parting absolutely gorgeous. If I did not mention this, one is 24 inches in length, 180 density, it's a curly, lace, wig and, of course the direct link is in the description box. Okay, love bugs, so we are done with this look. I have a new set up, so I'm going to go ahead and show you guys um all of the packaging before I get into the actual hair, so that so that I can put this stuff down. But this is the packaging here. You guys already know we're working with Kawaii today and they sent us goodies on goodies on goodies. So this is the box that we came in and, as you guys can see inside there are some goodies. This is the bag. The Wiggles in - and I like to keep this to remember what I have. This is a 24 inch, 13x4 transparent lace, wig and, as you guys can see. Obviously the texture is Curly. Also we have some tan wig caps. We can make these work with a little foundation and we also have a goodie bag in here. That has a um. I believe this is a bonnet, a foundation brush a melt belt as well as some lashes, so they definitely set you up also in the Box. They did give us a robe. We do have this robe already. We have a few of them, so I'm not going to open it, because this is for you guys and then also. This is what I am excited about. They gave us this little um. This is a makeup bag, so you open it up. Yes, now, as far as the hair goes, let me give you guys a little quick 360.. This is what The Parting looks like you didn't see in the video, but right before I came down here to film. This part, I did go ahead and just add that you know the Ruby kisses palette that I had the little Duo the concealer I did add a little bit here, just because it was a little bit um just too dull. For me, I added the concealer, or what did I use Foundation underneath, so it did have a nice tint to it and of course this isn't permanent, so it'll fade if it's too bright for you or you can take like a towel or something and just kind Of like rub it out now, as I mentioned, this is the hair. Here I love what we have accomplished. I love how full the wig is. I learned how to find the curls are. This is absolutely a beautiful one and then the length is perfect, like once it dries when it's soaking wet it does come a little bit longer. But of course you guys already know it's gon na you know not shrivel up, but what is it shrinkage? So this is what the hair looks like close up, and then this is what the hairline looks like now. You guys seen I did go ahead and just add some sparse baby hairs whenever I um style the wig on the mannequin head, and I like to do that just so that you guys see how this piece is just naturally hanging and there are some more throughout. But just throughout the you know, duration of you wearing the wig. The little pieces will naturally just kind of like fall and just be there. So it's like, I said, no baby hair look, but I have something going on there. I love the way this look. This cute little Target this cute little top came from Target. It has a nice little cutouts on the side. I have it in a size, medium and I'll. Have it in the description box as well. It does have like the shorts that match it, and then they also have a dress in the same print. Something really cute for spring and it's just kind of like you know a little mom Vibe. But I'm gon na go ahead and let you guys go you guys know, I love Kawaii um and I definitely would love it. If you check out the description box anyway out there you'll find lists and Links of everything we use. I have the mannequin head there. The mousse that we use all of the products are there and this was a heatless style. The only thing we used was the blow dryer. Well, I did she. I use the electric hot comb a little bit at the top, but I didn't go crazy, like I typically would so yeah. I hope you guys enjoyed this tutorial, be sure to check out Kawaii direct link to this wig and all the details are in the description box. Thank you guys so much for watching and as always I'll see you in the next one smooches

Comments
Gyna Paul: Yes, it’s absolutely gorgeous and very beautiful! Love, love, love it!!
Jackie Randolph: Hi Ashley this is a gorgeous wig it's amazing how you fix it.
Sherry Zetar: Gorgeous you are, thank you!
Vanessa Lawson: Love it!
Ali Jones: perfect
Sherry Zetar: When you hand sew your wigs is that thread the same as spurlock?
wmitchell1712: Gorgeous on you!
Montanna DeVane: Love the fullness
fran z: I bought my 1st curly hairwig very similar to the 1 in your video & I have no idea what I'm doing seriously.... do I have to pluck it like in the video?
Sara Tadika: Why when I pluck my wigs it's doesn't look like that
Hajji Powell: Wheres the wig sale??
ladetra paul: