Iupin Body Wave Closure Wig Install | Criss Cross Elastic Band Wig Tutorial
- Posted on 19 February, 2023
- T Part Wig
- By Anonymous
#amazonwig #amazonfinds #wiginstall
Hi and welcome (or welcome back) to my channel!
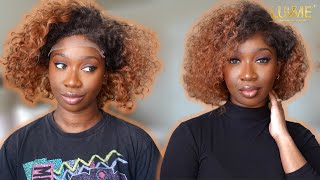
In this video I unbox and install a 18 inch ombre burgundy body wave wig from IUPin!
18 Inch Body Wave Wig: https://amzn.to/3XHrATI
SNTE Wax Stick: https://amzn.to/3YMOCcq
Style Factor Edge Booster: https://amzn.to/3hZzCrz
Ebin Lace Spray: https://amzn.to/3IghQLS
Ebin Lace Tint Mousse: https://amzn.to/3xAHcxC
Ebin Wig Knot Powder: https://amzn.to/3WHbpWO
*As an Amazon Associate, I may earn a commission from qualifying purchases made through the above links.
00:00 Intro
00:04 Unboxing
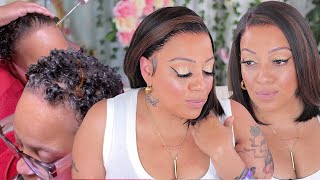
00:59 Criss Cross Elastic Band Styling Tutorial
07:23 Applying The Wig
08:53 Cutting The Lace
10:25 Styling Baby Hairs
13:56 Final Look 1
14:26 Final Look 2
14:35 Outro
Follow me on Instagram: https://instagram.com/tinaware
Visit my Amazon Storefront: https://www.amazon.com/shop/custom2fly...
For Business inquiries: [email protected]
#tinaware #hairtutorial #lacefrontwig #wiginstall #closureinstall #closurewigs #naturalhair #hairstyle #hairinfluencer #wigs #wig #wigreview
Hi and welcome, or welcome back to my YouTube channel in this video. I am installing this wig from I uppin. I believe, that's how you pronounce the name. It is a closure wig. So this is really good for those who are beginners to the wig world and who aren't quite ready or have the confidence yet to install a full frontal. This is how the wig looked right out of the box, and I decided to bleach the knots just because I wanted to try a different style. I was going to try the crisscross style, there's a reason why I didn't show how the final look looked prior to doing the unboxing and it's because I want to do a little bit of a explanation as I am showing The Styling. So let's go ahead so to start for the actual crisscross style. I went ahead and pre-parted it now. I know some people like to style their wigs after it is installed on their head. I prefer to do it on the mannequin head and I don't know if that's better or worse, but I am not that great at styling once it's on my head, so I went ahead and I parted it into four and because it's a closure. I also left a little bit of hair on the side just to cover the track that could be showing. So I parted it just a little bit smaller part of the actual four section, A little bit smaller, and then I left some baby hairs or what would be baby hairs in the front. Now don't make the same mistake I made and make sure that you have hairs along the entire hairline, because you don't know what you want to do with the baby hair. I kind of left a spot where the part the middle part is - and I should have taken some hair from there too, and actually had it going across the entire front of the hairline. But here we are so don't make the mistake same mistake I made and the crisscross style is fairly simple uh, you take your two rows and then you go in the opposite direction and you want to make sure that the squares that you're making are aligned, or Else, you're going to have some wobbly looking crisscross boxes, so you're gon na split it again going in the opposite direction. I hope that makes sense. I don't want to say vertical horizontal because it might confuse some people, but basically you split it until you get the the box shape for each row that you have and I went ahead and took out some more baby hairs and again that wasn't even enough and Basically, all you're going to do is you're just going to tie off each ones with an elastic to start and then once you tie it off with the elastic, you just go ahead and you do the same thing again. Another row I added just a little bit of um edge control gel whatever just so it looked neater in the front. You don't have to do that, but I want it to be neater and also I didn't want to have any flyaways or I didn't want any hairs getting into the box if that makes sense, because once it's kind of all gelled in it's a lot easier to See when other hairs try to sneak in when you're tying it off with the elastic, so yeah just go ahead and make a cross so um you'll see as the video continues. But once you have your one box, that's sectioned off. You will go in the opposite direction, so diagonal direction to the next box. That'S behind in front. However, you want to describe it and literally just cross it over and then tie that off and do the same with the opposite side. So I'm going to stop talking now and let the video explain because I'm sure it'll explain it a lot better. Then I can explain it through talking foreign, and this is the completed look. So I went for three columns boxes whatever you want to call it on either side, and then I went ahead with a wax: stick just to press down the rest of the hair, that's kind of the perimeter of the crisscross style and I didn't press it all. The way down, because I knew I was going to curl it, but just enough so that it's laying flat right next to the style and that just helps to make it look a little bit more cleaner. A little bit neater and also kind of make the hair. Look more natural, like it's actually growing from your scalp and now for the install so because this is a closure wig, it's a lot easier to install. So I have the cap on and I put the wig on. The wig was tight enough for me that I guess I could have left it glueless, but I kind of like the glue look finish. It just kind of lays a little bit flatter and neater and just looks more crisp. So I went ahead and used my adhesive spray and just spray a little bit of that and then tied it down to glue foreign for round two. Now I did forget to mention earlier that I actually did go ahead with this wig and bleached the knots, and then I used a tinting mousse, one that actually dyes the lace and use a little bit of that on the underneath of the lace. Just so it wasn't so white and that's why the lace in that flap is two-toned, because I don't need to dye the whole lace. Just the part that's going to be on my head, so I didn't die the part that was sticking out a little bit, but because that's going to get cut it kind of just some of the mousse just drip there. But at this point now I have gone ahead and used the adhesive and laid well not laid but adhered the lace and now it's time to cut, because it's a closure really easy to cut. Just got to worry about the very front which tends to be easier to cut and make look realistic, but maybe not um, then on the frontal, Because the actual front is where you want to look the most realistic, because even on a frontal, if you mess up The sides you can always cover it up, so I might have misspoke with that, but anyways. It'S not much space to work with so there's not as much pressure to as for as much cutting, but also what I noticed that with this closure - and I guess just with closure wigs in general, because there's tracks that, where the tracks do start, you might have To cut just a little bit because sometimes it does peek out, so I'm just going to keep that in mind when you're cutting the lace that you might have to cut a little bit of a track off just so. It'S not peeking through, especially if you're doing a style like this um yeah. So I was like oh gosh. There'S a piece sticking out there, especially if you're doing a style like this, where you're leaving just a little bit of hair on each side to cut the to cut the sorry to cover the track. And here I am sewing the baby hairs. And this is where things started to go a little left, because I definitely cut it too short. I am used to cutting it shorter when doing a frontal because um you know I kind of want it to look a little bit more natural, like it's just a little piece flowing into or flowing out of the wig. But with this because it's a closure, and just because it was styled um, I should have cut a little bit longer because I don't have as much space to work with, because closures are shorter, duh and also because I didn't have any hair where the part was Right in the very front, so that was also a problem and I'm thinking I shouldn't have used edge control for this one specifically because the hair it just it looked a lot more dramatic and I'm not the dramatic type. I should have just used mousse and had it look more like soft, like the soft baby hairs and then you'll see here that if it was longer, I would have been able to have more of this swoop so to speak. Um and I could have swooped it. A little bit up higher, I'm sure you guys know what I mean. I don't even have to I'm not even trying to explain I'm trying to explain a way. The mistake that I made and I should just own up to it. But yes, I didn't style the baby hairs, the way that it should have been styled for a style like this. It doesn't look the worst, but for me it just doesn't look very natural and um. It looks like it is a wig and for some wigs that works, but for me I didn't want it like that, so I just went ahead with the moves after and I think that just took things from bad to worse, because then I didn't have my gloves On and I ended up using too much of the mousse right along the hairline, so then you could actually see where the wig starts, and you know where my actual skin is and um yeah, and this is after that. I I didn't record anymore because at that point I just made the decision that I wasn't going to keep the crisscross style and then I was gon na take it out, because I was just so distraught, I'm like it just didn't look the way I wanted it To look - and I'm sure you can even see my face here - that I just look a little bit, you know dejected, but we move we move. So I didn't record too much more after this, because I'm the type that I'll go to like sleep all sad and then I'll wake up at like four or five a.m and be like no. I need to fix this and, of course, at four or five a.m. I just I I my face is not content filming proper. If there's not proper, my face doesn't look like my face. Isn'T ready to be filmed we'll just leave it at that, but you know what now that I think about it probably would make for good content. So I probably am going to start filming when I do wake up at those random times and decide. I want to fix it, so I'm gon na leave it here um and you guys can enjoy the rest of the video. What I will say is that when I did take out the elastic bands, it did give the hair a little bit of a natural bump, so I didn't have to do too much work to it after I just kind of pressed it out, and then I went Through with a wand and curled the hair, to give it some more defined, bigger, bouncy curls and I like the way that it turned out so enjoy the rest of the video. It'S me again, I'm back, and this is the final look. I just wanted to say. Thank you for watching, don't forget to like comment and subscribe.


Comments
Inspirational sxm: This is such a beautiful hairstyle ♥️ I will definitely try it on my natural hair.
Wavy Ay: I love the crisscross style you did
Nelnica & Family: Beautiful the color vibrant