Best Wig For Beginners! No Customization Needed | Detailed Install Tutorial | Wowafrican
- Posted on 10 May, 2022
- T Part Wig
- By Anonymous
The Body Wave HD lace wig is from https://www.wowafrican.com
►► : https://www.wowafrican.com/13x6in-thic...
-------------------------- --------------------------
13X6in Body Wave Human Virgin Wig[HW03]
Length: 20 inches - Density:150%
13X6 Deep Parting Space
★ Undetectable HD Lace
★ New Clean Hairline
★ Clean Bleached knots
★☆ Coupon code: Mani20 Discount: $20off 13x6 Wigs ☆ ★
★☆ Coupon code: Mani15 Discount: $15off for all Wigs ☆ ★
-------------------- --------------------
√ Suitable For All Skin Tones √ Invisible, Seamless & Undetectable
√ Reduces Friction to Natural Hair √ Better Lace Choice for Protective Style
------------ & ------------
WowAfrican Official website:https://www.wowafrican.com
Link to more HD lace 13X6 Wigs: https://www.wowafrican.com/13x6-wigs.h...
: https://www.instagram.com/wowafrican_o...
: https://www.facebook.com/wowafricanwig...
#wowafrican #hdlace #13x6wig #hdlacewig #qualitywig
My Socials let’s be friends! (literally) :)
IG: @kamanijeann
Twitter: @kamanijeann
TikTok: @manijean777
Snap: @manijean
Wig IG: @wigssoldbymani
Email me for business inquiries only [email protected]
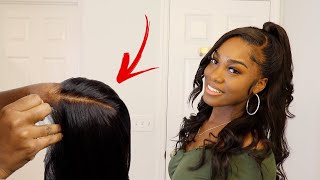
Hey everybody and welcome back to my channel, welcome if you are a new viewer so today what i have for you guys is this bomb install from wow african okay. This wig came already ready to wear no customization needed. So if you like to see how i installed this wig step by step, keep on watching so i'm starting off with fresh braids, okay, these are very, very fresh. I got about 20 of them, because this is one of the keys to a flat. Install is having a flat foundation, aka braids, to look back whatever i prefer braids so boom. That'S what i've got so now. I'M cutting around my ears with my scissors, my shears, to be exact and um yeah, getting that nice and lined up so that we can get started on this bald cap. So to mold the cap down, i'm using my black ebbin lace, spray holding spray which it's not holding sprays, actually lace spray, but nevertheless y'all know what the [ __ ], i meant to say, but um yeah. So i'm swimming that out around my hairline trying to keep it even in memorizing. What i want my hairline to look like i'm going off based off of that. You know what i'm saying not too far up not too far back but in the perfect place for the wig application. Now i'm going to blow dry that on a high cool setting and then go ahead and proceed to cut that off with these shears here and just simply glide it off just like that. Now i'm taking some ghost bond platinum glue or is it i don't know what it is? I don't know if it's ghostbun, xl or ghost spawn platinum right now, but they're pretty much the same, i'm using that on the ends of my cap, just because they don't always lay flat the first time i use the spray. So i go in with some glue and so yeah that is the completion of the cap melt down. So now i'm taking my rd150 ruby, kisses cream foundation and a makeup brush and i'm going to be simply. You know i'm saying patting that in to the cap using a good amount so that it can really give scalp. You know, i'm saying i want it to be tinted all the way. So here is the wig pre-plucked pre-bleached. This is exactly how it came. I did no customization to it. I did hot comment back on my wig head just so i can have a cleaner look before i installed it, which i do with all of my wigs but yeah. This is a hd, clear type lace. It comes with a strap in the back, which was very handy, came in handy omg, so yeah, that's the construction of the wig. Now, let's get into putting this wig on so after cutting off the ear tabs and before actually applying the wig with glue. I like to go around my hairline with a paper towel and a sephora rubbing alcohol and clean out mice and not clean it out, but clean off. My skin really well so that the glue can stick okay and so that you feel me it can last and it just will be an easier, smoother process, because it's no dirt or nothing like that. No oils built up interfering with the glue. So now i'm taking my ghost bond glue and i'm using the back of a razor because i ran out of popsicles. Popsicle sticks, oh my gosh. I cannot talk and every time i go to the hair store and try to give me some popsicle sticks. I forget. I freaking forget so yeah, i'm doing three layers of this glue. This is my last layer that i'm showing you guys and you just want to make sure you smooth it out really nicely and use a nice amount. When i say nice amount, i mean not too much and not too little just enough to smooth it around your whole entire hairline so that it can be like. So it can dry clear one and two, so it can dry fast. The way that we want it to you know what i'm saying you want to take all day. Now i'm blow drying this last layer on a cool high setting the same setting for the spray that we use for our body cap and then now it is time to melt this into our skin and press this glue down into the lace. So i'm basically just lining it up. I pulled the wig down now, i'm just placing it exactly where the glue is really looking into my mirror, trying to see where exactly i'm going to place this hairline, because you want it to go right where that glue is, and then i like to press it Down with my hand, and also my fingers just to make sure that it is really sticking and then taking a fine tooth comb in my blow, dryer on the same setting and basically just making sure that it is combed through like really about to melt. Once i put down this um put on the elastic band yeah, so now i'm putting on the elastic band, i showed you guys a clip close up there of what the lace looked like, because it was looking very much clean but yeah, and so now that that's Setting on there i'm just kind of passing time by because i like to let it sit for 10 minutes and i'm just hot combing the hairline, so it can look nice and clean. As you can see, it looks very clean pushed back natural all that now i am taking my comb here and creating my deep side part so yeah. This is kind of self-explanatory. If you're watching correctly, then i'm taking some icy fantasia heat, serum oil, type, [, __, ], yeah, it's heat, serum and i'm just placing that on top of the hair and then going back through with my hot comb to ensure that it is getting flat. And i'm going to do this a couple of times until it is super flat. The way that i like it, so the elastic band is off, and this is what the hairline is giving so thin so clean like i literally oh, i loved this wig, but um. Now i'm taking my razor here, my eyebrow razor and i'm going in a zigzag motion to cut off all of the excess lace that we do not need for this hairline. Okay, so yeah i'm going to repeat this on both sides and i don't always cut off all of the lace at first i like to go in a second time when it doesn't come off. You know uh all the way, just basically yeah when it doesn't come off all the way i go in with scissors to get all the extra stuff off all the extra lace which you guys will see. So now we need to apply a little bit more glue, as you can see a little bit, okay, just to make sure that all of the lace is laying down. Okay after we went done cutting. I noticed that it was pieces that weren't laid down flat. So this is what i'm going to do to make sure that all the laces melted yeah now for the baby hairs, i'm taking the comb side of them and um. As you guys know, all my videos are in real time. So this is how slow i'm moving. I'M really like mapping out how much that i want, and i knew that these baby hairs were going to be thin just because of the way that the company plucked this wig, which i was a fan of, might i add, but um yeah. So these are the baby hairs that i pulled out and i'm going to repeat all this all the way around, but i like to take my hot comb to make sure that the hairs are laying super flat. So i'm going to go back in with my elastic band and really relay them down, so once it's all done, they're going to be so flat like once i actually curl them. You know finish the baby hair process, they're going to look really flattened on my skin. Okay, hairlines look really natural when you actually hot comb, the hairline through and through. Okay, like you see how i'm really getting that little them little pieces of hair on that hairline yeah. That should be looking too natural, too good. Once it's all said and done, i love using my hot comb, okay, but yeah. That is the end of that. Now we got our elastic band back on and i'm going to get back to this part, i'm plucking it just so it can be a little bit more defined because this wig was originally in a middle part, but i switched it over to a side part. I took some more of that heat serum and i placed that over top of the hair and hot combing this hair again, because yeah it needs to be flat. Okay, i cannot stress this enough, like i really use my hot combs to me. So many times start doing my hair because i love a flat wig like when it looks like it's coming from my scalp, so yeah make sure you guys use your hot combs, okay, please, but now into styling this hair. I don't know [ __ ] about wine. Curls for real, like this is my i'm really starting to get into trying to curl my hair, because it just seems so hard to do, but practice makes perfect right. So as long as i keep practicing, it should be fine, but yeah y'all. This part is not really a tutorial. You guys are just watching me because i don't really know what i'm doing. I just know that i'm trying to wrap it tight around this one curl, which it is a half inch, i believe, yeah. It'S like a half inch and it's the tai chi brand, but um yeah. So i just went through section through section trying to keep the pieces. The same uh amount like length, not lengthwise, but width wise. You feel me the same amount of hair, but i'm just going through and repeating this all over all right now that those are done, i'm taking my razor now and i'm shaving off my baby hairs. I knew that i wanted them to be scooped into my hair. Well, as far as the ones, that's near my forehead, but yes, i'm curling them upwards with my flat iron here this is the kiss pro flat iron, i believe in half inch and it's the pencil flower. It'S called a pencil iron but yeah i like to curl those upwards, and then i like to curl my sideburns um under if that makes sense, but yeah this just gives it a different vibe. I don't know i like the way it swoops when it's curled under like this so yeah. Now i'm taking my got to be glue gel in the black version and the calm side of my edge brush and i'm just swooping those into the hairs, as you guys can see now this process took a lot longer than you guys are seeing, but who wants A long video of you guys, seeing how i do my baby hairs in a tutorial. I'M not we'll say that for another time but yeah it takes a minute to try to perfect. You know getting those hair souped into the um, getting the baby hair sweep into the actual hair on you know the week, but nevertheless, i'm really just trying to keep the curl of the baby hairs that we put in you fill me with the flat iron and Just keeping it with a c shape and then i'm fluffing them out a little bit really just playing with them until they are perfection in my eyes. So once that's done, i like to comb all that hair back just so it can look clean and put together. Then i repeat the same thing on this side here, which it was a little bit easier and quicker, just because i wasn't trying to swoop it all the way into the hair like it was where the part is on this side. So now i'm just hot combing. The rest of this hair together, like i said, making it look real clean, put together the final look vibes. So now, i'm cleaning up the part with this rd rd11 cream foundation in this small makeup brush. I don't know if it's like a pencil, i don't know what kind of brush this is called. I just want some makeup brush and it's tiny, but yeah that makes the part like really clean, and i love doing this with my parts, because it just looks so natural, like scalp. You know what i'm saying, because our scalps are not the same color as our skin, like once. We have a part if you know what i mean so yeah. Now i'm taking a wide tooth comb though, and i'm combing out these wand curls, i messed them up. Y'All cause i re-curled them right here, but they didn't y'all can't tell but anyways. This is the finished look. This is the end of the video i wish i could keep talking, but i can't i loved how this install came out. I hope you guys got something from this video make sure to check out the description box for more information on this hair and i'll see you guys in my next one

Comments
Mani Jean: Thanks y’all for 56k subscribers ❤️ love y’all
Abby Márie: nah you’re really my inspiration like dead ass, when it comes to installs i always ALWAYS watch you girl !!! you’re very inspiring frfr & you’re so beautiful girll. keep it up fr ❤️
Princess Yanni: I’m learning so much from you I’m buying stuff to install wig little by little bc I wanna start doing them on myself & on people as well
April Lawani: Me and all my homies love Kamani!!
Adrianne Culbertson: You did that. It looks really good.
Nyla Bandz: What glue do you recommend for heat ? like for the summer time
ryahpapya: love your videos , how do you know if you needa bleach the knots.
Ké'Lãn Jinsui: I swear you make this look like butter in a skillet
Mini DIOR: The hair is giving
official Megalook: you are very professional dear we are eager to have a collaboration with you
LifeOfLiyah: Where did you get the wig from
Naturally Trii: So when you put the wig on you pull it past the wig cap?
Takoahh Ameenah: where do you get your lashes from!
fabistar01: Where do you buy your wig cap ? And what color you choose ?
Kaoki Kaoki:
Mocha Chung: You need to come to ny and help a sister out with the baby hairs
sza: my capricorn sisssta , is this ur real hair cs it’s giving scalp
Babyswayyy: Purr.
The Daily Miah: Are you self taught?
ANOINTEDHAIRSOLUTIONS: Yaaaass