Beginner Friendly Customize & Install Deep Wave Wig || Curlyme Hair || Bleaching Knots + Plucking
- Posted on 01 February, 2022
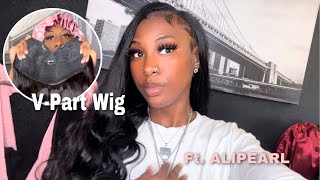
- T Part Wig
- By Anonymous
●▬▬▬▬▬●▬▬▬▬▬CURLYME HAIR▬▬▬▬▬●
☛☛ HAIR LINK in the video(BUY NOW PAY LATER) :
https://curlyme.com/collections/deep-w...
☛SALE is on,Buy now pay later, 4 or 6 Interest-Free payments➤ https://curlyme.com/
☛Use my special Coupon : "YOUTUBE" for all products extra 10% off !!!
Hair info : Mongolian deep wave
13x4 frontal wig in 30”
250% density
#deepwavewig #curlymehair #wiginstall
Follow us on Instagram to win free hair: https://www.instagram.com/curlyme_com/...
Business Email: [email protected]
PRODUCT LIST:
Hot Comb
Bleach & Developer
Tweezers
Matrix Brass Off Shampoo
Wig Glue
https://thehairdiagram.com/products/bo...
Curl Refresher
https://aussie.com/en-us/miracle-curls...
●▬▬▬▬▬||| Mini Review after wearing it for some time |||▬▬▬▬▬●
This hair does shed but I feel like all curly wigs shed
It gets a little dry so make sure you're adding moisture into it
This hair is high in density so it gets really fluffy
Overall, I rate it a 9/10 after wearing it for some time.
I hope you have the same great experience xoxo
My Other Socials + My Amazon Store
https://linktr.ee/tejamaechele
Shop products and tools I use
https://www.amazon.com/shop/afro.blv
I don't own any of the music in this video
Hey besties, welcome and welcome back to my channel today we have clearly new hair. This is the wig. It came with the usual scarf cap and lashes. This wig is a 30 inch, 13x4 250 density hd deep wave wig. Yes, take that all in they said the type of hair is mongolian, so here's the curl pattern and the color right out of the box, the knots were very small and the lace was literally invisible. Once you try ac lace, i feel like you, never want to go back to anything else. Here'S the inside construction of the wig four combs and a little resizing band in the back um. I wanted this wig black because i didn't like the random blonde pieces or the extremely light pieces in the wig. As you can see, so i used the watercolor method to get it all one, even black tone after i did that i went ahead and bleached the knots i'm using blonde me, 30 volume developer and the powdered lightener, the link to where i got these will be In the description so go ahead and check that out besties make sure you have a mixing bowl, your scoop and a brush or a different applicator. If you want so you can apply the bleach to the lace. Some people use a knife, so figure out what works best for you. Mixing ratio for these products specifically is one to one and a half, but for bleaching the knots you should use one to a half, meaning the one is the powder and the half is the developer. You don't want your mix to be too runny or else it'll seep through the knots and over bleach. Now i can easily eyeball this so measure it y'all and look at the manufacturer's instructions on the product that you're using all the information is going to be in the bag and, as you can see, it says 20 to 45 minutes develop time. I think this part is pretty self-explanatory, but just spread the bleach all over the lace. My apologies for not recording the shampoo process, but i use the matrix brass off blue shampoo, i'll insert a picture. Blue cancels out orange. Some people use shimmer lights, purple shampoo, but when you use purple shampoo, it's usually to cancel out yellow tones. Now, if shimmer lights is all you have then go ahead and use it just let it sit on the lace for a little bit when i was done with the application, i grabbed my foil and placed it on top and let it sit for about 20 to 45 minutes now for the plucking part, i grabbed my pink hot comb, which will be listed down in the description below and combed all the hair back, i'm doing this, so i can get a good look at the hairline before i start plucking the hair is pulled Back so now, i'm going to part out the area where it's more dense. You do this, so you can blend the back part with the front of the hairline. These are the type of tweezers i use and they will be listed down below now for the plucking. I plug one part a couple times and then i skip to at least like a pinky size over and i pluck another part and it looks like a little square. You see what i mean and then i skip another part, and i pluck that you're gon na want to plug skip a little space plug skip a little space along the whole hairline and once you're done with that, you're gon na go back in between those little Squares and plug in between those squares. I hope this is making sense now we're into the part where i said pluck in between those little squares that you made right here like plug in between that boom and then plug in between another little square. You made all this making sense like plug in between the big squares that you made as you're plucking. You are plucking and dragging the tweezers backwards as you're plucking. I hope that helps you don't be like me, y'all don't be like me, get a comb and comb out the hair that you plugged once you're done with that part you're gon na comb, all the hair back with the hot comb and start plucking the front part Of the hairline you're, literally using the same exact technique that you used before, making those big squares and then plucking in between those big squares. Let'S get into the install besties, i already cut the ear tabs. So now i'm going to take some alcohol and wipe the extra oils off to prepare for the glue the glue i use is bolt, hold active and we're going to use three layers. The link to this will be down below so check that out. When i use this glue, it gave me a hard time in the beginning and truthfully i'm still learning how to use it. But what helped me get through this process was letting the glue get completely clear before applying another layer also make sure that each layer of glue are thinly applied and yes use the cool setting on your blow dryer when you're drying the glue. I did add an extra layer on the ear tabs because they tend to come up when i was doing the glue, i did use a makeup brush. I don't know if y'all want to use that, i know some people use. Popsicle sticks so use whatever works. For you now i'm going to pull my lace to where the glue is placed and press on it for it to stick. You want to do this process slowly, because once you put the lace in that area, it's going to stay right there and when it's there, i use the cool setting once again to keep it in place. The part that seems unnecessary but is necessary, will have to be the elastic band, take the elastic band and let it sit tightly for about five to ten minutes. It really gets the lace and glue to set into one another once the five or ten minutes is up. However long you want to leave it, i get my little scissors and i do zig zag cuts along the lace line and look at it like it looks so good and if you do have lace that comes up from cutting it, you can go ahead and reapply. Some glue on the edges, a thin layer and then stick it down it'll be fine. I parted my hair and used the hot comb to pull the hair back. I struggled with baby hairs. I'M still learning how to do it. So i did it off camera and once i figure it out, i'ma come back and teach you guys. So this is how it looked. This is the wig i'm gon na use ozzy's miracle curl refresher yo. This is the hair i had combed it out. I like fluffy, hair, though it's really nice and full 10 out of 10 10 out of 10.. The products i used in it will be in the description. Also my makeup tutorial will be out. I did this face. It'S not necessarily a makeup tutorial, but yeah, but that's it for this video. I hope you guys enjoyed it, don't forget to like comment and subscribe until then. I will see you guys next time, bye,


Comments
fupa luchadora: This is gonna be my go to video for installs
The Diamond Princess: Just used your discount code. Thanks!!! I’m ready to look like a baddie
milan aurea: the way you explained plucking made so much sense!
RemBem: Thank u omg i been bleaching my knots wrong this entire time #lifesaver #wiglady #babyhair
Liza Live: So helpful I can’t wait to try
Darlala: Babe this is GORGEOUS however I'm going to need the makeup tutorial next
Lessika.: thanks for the tutorial bestie
Paris: How long did it take to ship to you? I think I missed that part
Sainabou: u did that!
Co co: Ordered the unit because ur review I’ll share my experience when I get it
lil eugh: Though you didn’t curl your hair in this video, when you usually curl it, do you the lowest setting or? Apologies if you’ve already said it in a previous video and I missed it ha
SAINT LILITH: so prettyyyyy
Tamika W: Where did the length stop and how tall are you? I know curly hair is usually shorter than straight hair.
Jᴀʟɪʟᴀʜ: Would you say you have a big head or small one, trying to figure out if I should get 13x4 or 13x6! I have a big head lol
Jayla: top tier
rachelle estinvil: hi! i’m a newbie to wigs, i’m wondering, why do you have to bleach these “knots”, and what are they?