How To: Deep Side Part Wig With A Closure | Tinashe Loose Deep Wave
- Posted on 13 November, 2018
- T Part Wig
- By Anonymous
Hair details: Brazilian loose deep 22 22 24 24 + 20 closure
Tinashe Official Store: https://www.tinashehair.com/
(Use coupon code “tinashe-5” for $5 off)
4 bundles with closure:
https://www.tinashehair.com/product/br...
3 bundles with closure:
https://www.tinashehair.com/product/br...
Tinashe Aliexpress Store:
https://tinashe.aliexpress.com/store/t...
4 bundles with closure: https://goo.gl/TwYc9r
3 bundles with closure: https://goo.gl/8UfYDh
Tinashe hair social media:
Youtube: https://www.youtube.com/c/tinashehair/...
Instagram: https://www.instagram.com/tinashehair/...
Facebook: https://www.facebook.com/tinashehair/
#howtomakeawig #deepsidepartwig #tinashehair
Want to see other detailed videos? LINKS ARE BELOW!!
how to take your head measurements
***************************************
how to customize your hairline
************************************
how to bleach your knots
********************************
How to tint the lace
******************************
how to make a lace frontal wig
********************************
**Looking to take some classes on hair extension techniques? Visit my website: www.letsglammore.com
Follow Me on Instagram: #letsglammore http://bit.ly/2eTut0W
Twitter: IGlammore
Snapchat: GlamMoreGirl
Facebook: https://bit.ly/2rhRQXw
Where can you purchase my hair?: https://bit.ly/2Id5Yf0
*************************************
If you are a company and would like to contact me, email me at : [email protected]
***********************************
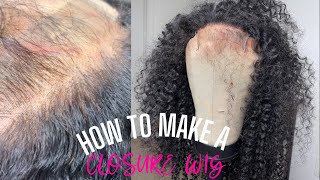
What'D he do glimmer gang. Welcome back. I have another hair review for you guys just in time for the holidays in case you're. Looking for an alternative, this is the Tinashe hair and i have four bundles, along with a regular lace, closure and imma show you guys what this hair looked like once it arrived. I really like their package. Jimin came in this custom, ziploc bag, so upon opening. Of course, I have my four bundles along with the lace closure, and you see, I did also get a free gift, which was a little compact mirror with their branded name. It also comes with haircare instructions. Here are what my bundles look like outside of packaging, and they are nice sized bundles, and this is a close-up shot of what the texture looks like, and I want to show you what the closure looks like and I'm a lay of one bundle beside the closure. Just to give you a side-by-side comparison of what the closure looks like in comparison to the bundles, sometimes they don't match. However, these do men jumping right into bleaching. My closure, I'm using the ion color brilliance bleach. I love this bleach, I'm also using the ProCare developer. For some reason, I forgot to turn it around in the background. So, of course, we all know how to make the solution. You want to mix the two together. This is 40 developer and makes it tool together to create a slight pick and yep at all these years, I'm still using a paintbrush to bleach the knots on my closures and front tools. So I'm gon na put this paste on top of the lace and I'm going to allow for it to sit on there for 45 to 55 minutes or according to the manufacturers instruction, and I am gon na show you guys exactly how I made this week. Just in case you're curious, this is the lace cap that I'm using to make my wig and I decided to go for a deep side. Part. I'M gon na be placing my closure on this side that I would like my part to be using two T pins. I'M gon na pin in both sides of the closure, making sure that I line the hairline up with my cap, and you also want to make sure that you have enough hair on either sides of where you would like. For your part to be, and then take. The remainder two t pins and pin in the back portions of your clothes - then I normally use to separate needles to sew down my closure using one needle per side. The remainder of this is pretty self-explanatory. I'M gon na use one of my needles to sew down the left side and then the opposite needle to sew down the right side. My goal, we're using two needles, is to sew one side, all the way back to the middle part of the closure and then once I start sewing down the opposite side. I'M gon na bring that needle also to the middle side of that part of the closure, and once I have completely sold down both sides, they meet towards the middle, and I take my shears and cut away the remaining three. Now that the closure is sewn down. I can start by attaching my first bundle here, which is the 24 inch bundle and because I have a really small peanut here, I'm actually doubling the width to make sure that I can see all four bundles in here. So if you guys have a small head like me, the way that you fit more hair is by doubling your webs. Now I am using the fold-over method. That means you never cut your webs. You just sew from left to right and once you get to the end, you fold the webs back over to the opposite side, and you continue sewing right here. I am on bundle number two and I also doubled this width. Because again, I want to make sure that I can fit all four bundles onto my unique bundles number. One and two have completely been sewn down. So this is what two bundles of 24 inches look like just in case you're wondering yes I'll. Also double wefted bundle. Number three and I'm gon na be pretty much using bundle number three to fill up the largest part of all of our heads, which is the crown section so to get rid of that like deep u-shaped, I normally start sewing in a straight line and when you Do this you'll start noticing that the bundles nail lay straight across instead of in that you shaped line for bundle number four. I did not double my wills, because you know it's at the top of our heads and don't want any lumps and bumps towards the top of our units. So I stole the last bundle down single with it and I do normally cut the very last well. For my unit, that's probably like the only piece that I could but continue sewing until the complete unit is finished and I did fit all of the hair onto this unit. This is what the unit looks like when it was completely done. I did use all four bundles again and once you take down the closure, you really get to see exactly how full the wig is. Next up is customizing the hair line, so I spritz it with water and we're using my tweezers, you guys my little secret is. I never cut the wig cap until I'm completely done with my unit, so I use the wig cap as a guideline. So every time I pull that closure of frontal forward. I can see that we kept right up underneath the weak and it tells me how much more hair I need to remove so because I know I want a side part. I went back and part of it, so I can remove even even more hair, where I will normally have like a temple air and once it's complete, then I cut the wig cap. So, yes, you guys y'all been excellent, but yes, I just never showed this part because I just thought it was self explanatory, okay guys. So this is what the hair looks like. This is all four bundles and yes, this is a lot of there. Okay, it feels heavy anyway, so I did shampoo and condition the hair, because if they have a smell to it, so I had the shampoo and conditioner which are always shampooed and conditioned my hair anyway. So I shampooed and conditioned the hair, and I want to show you guys what the hair looks. Like sorry, y'all my camera kept going out of focus. I don't think you can handle all this glow. Jesus been sprinkling on me lately and I want you to see what the hair looks like before I do anything to it. Okay, this is four bundles. 222. I'M sorry you guys! I see here all day, so this is two bundles of 24 inches along with two bundles of 22 inches and I have a 20 inch regular size 3 by 4 closure. I still have the lace lip on the closure, so you guys can see. This is a regular sized closure and I made it into a side part and also to show you guys what the closure looks like in comparison to the hair. If you notice the way you start down, probably about 3 inches from the roots which is okay, I think you could get away with wearing the England after state - maybe not as many bundles. However, but you can still rock this in an extra state, but what I'm gon na be doing is actually using my curling wand, my 81 step fire. One does ask me, which kind of on curling one I use. I got I've had this for about three years. So y'all know I have to be a little extra and put my little glam stand on it, so I'm going to be one curling. The closure portion of my hair, just like a blend a little bit more in with this texture here towards the bottom. So i'ma go in and cut my legs and y'all. I have a new light, so if this super bright I can't tell until I start editing that's when you can really see the outcome of the video, but I have a little lighting in here. That'S why I'm so bright same camera, just a new light, so I'm just removing my ways. I never cut my legs all the way to the hairline. I leave like a little bit of legs in front of the hairline, for whatever reason that seems to work. For me, and it make it look natural, so I do normally leave a little just a little bit of lace. I don't cut all the way to the hairline and y'all know I like to wear baby hair, so it don't matter if I cut it to the airline baby hairs on the orange get sick. So there is my closure there. I'M pretty sure you guys can proxy that halo white line across my closure, and just like always I'm going to be using my design essentials own wrapping move, because a lot of you guys have export detailed video on how I laid my 5x5 closures. I decided to do that part separately for another video, so I'm just gon na go straight into the review for this hair. Do you guys see what I mean you don't really need to use a long curler in order to wear this texture. The way it is. You could definitely get away just wearing it in its natural state. I haven't done anything to this hair itself or shampoo condition, and I am going to be adding some um serum, but that's it. You really don't need the further one, but I'm going to be using my sapphire 801 curling line and I'm just going to put a little bit more waves up in this area here. This is the natural state of the hair prior to me, adding any heat. So you can see that you really don't need the curling wine just in case you forgot. This is for bundles. I have two bundles of 22 inches along with two bundles of 24 inches, and I have a regular-sized lace closure in the front. It'S either a 3 by 4 or a 4 by 4, but you guys can see exactly how full the hair is. Um. The hair is really soft. There was a smell, but I thought shampooed and conditioned it, but smell did go away, but yeah yeah. This is a lot of hair, especially for the length of the hair okay. So I fiction out the very top part, and I'm just going to do so - take it all the way down to the closure, as you can see, because I want the ways to start up much higher than what they do, and you only need the council about Tea and second so this is it so this is pretty much it you guys after I put in the curling wand curls, I haven't actually worn the hair to give a whole bunch of pros and cons concerning the hair. I will say I do not think that you need four bundles of hair, and this is two bundles of 24 to 20. Two and a regular size 20 inch closure. I think this is a lot of hair and I have a small head, so my circumference is 20 a little bit over 21 and 21 inches. So if you think this is a lot of hair before in my head, if your head is smaller than mine, it'll, probably like even more hair - and I would say even if you have a 22 inch 22 and a half inch circumference people ask me this: you Guys, that's long, let you know if you have like a 22 22 and a half inch circumference. I still don't think that you need four bundles unless you just like big hair, so yeah um, I like the hair. I don't have any cons right now to say about the hair. I love the closure. I did have to go back and put the hairline, but I've been doing it for so long who cares, go and pluck the hairline if you wanted to look natural and bleached just fine, so yeah you guys coming down below. Let me know what you think about the hair itself if there are links down below to the company's website and details concerning the hair before everybody's doing rocking with me for a minute what it do and for those of you guys who are new to my channel. Welcome to the glam film, you are family, we're all family over here you dig and I'll see you guys in the next video


Comments
antoinique_xo: Loved this video!! And girlllll, God really did give you a beautiful glow !!!
Dee Versatility: You know you did that! Beautiful Glam!!
Piggie Bonita: This is so pretty
sisanda mrali: GIRL!! funny you should create this vid for us, me and a friend were literally talking about ACHIEVING this look, on a closure. HANK YOU FOR NEVER FAILING A SISTER!!
tenice0526: This hair is gorgeous you slayed that unit glam
Abby Aguilar: Yass show us all the details on how you put this on!!!!!!!! So glad you made this video.
Jayne fernandez: Flawless as usual. Always looking Beautiful
Jus Chrystylez: Yasss Love you Glam!!!❤️ Blessing to you babe!!!
Exquisite Bliss: Beautiful!
Jakita Nichole: You gave that hair life. Awesome!!!!!!!
BadGyalGiGi: I'm so glad you said the circumference of your head cause I was sho finna ask lol Mine is 23in, I gotta big ass head! Lol but still most times 3 bundles and a closure/frontal is good for me! Thanks Glam!
Nichole P: Love love love it!! Please make a upart
Guerlyne Bel: Thanks beautiful queenthe hair is gorgeous...
barbara slater: Them hands can do anything on some hair! Beautiful job!
ThatsSoLea: That hair ❤️❤️❤️ ok I know you're a scorpio. Forgive me for not knowing the correct day but happy birthday Glam!!
Beautiful Vaughn: Best side part video
Shekera John: I love how bouncy and thick the hair is!!! I don't think I need 4 bundles maybe 3 bundles & closure would be enough since I have a small head lol.
SKBD69: What it do Glam ?! Beautiful hair! My question is why use a paint brush to bleach your closure? I’m just curious before I buy one too
Ebony Williams: Loveeeeee this video. Where can I purchase the wand?
Crystal Mitchell: glam this is some pretty hair. I love that it is full, but it must not be raw indian hair because you stated that it had a smell. thank you for the link. I am not complaining. Glam whatever happened to ms.lula's link on ali express?
Tammie Preston: ❤️
mydestiny84: What it do Glam. I'm sicka YouTube for not giving me my notifications or notifying me of a " new upload" on a video I watched yesterday. They trippin. Really nice job on the makeup
jaydabarbie: wait what did you cut out
Shemica Richards: Beautiful
Marie The Alchemist: So, I heart you. That is all.
KASH HAUSE: Hey my glam. What it do!
Kersha Beaver: Nice
chaniya grandberry: why do you bleach your closure does it give it a more natural look ?
Trans4mation: Do you have a top 5 aliexpress hair video?
Toni Smith: What it do!?!?! Your are so pretty. I got some hair before that had a frito chip smell ( before I got my Burmese from you). I could not get that smell out. It lingered for ever. But anywho, do you sew through the elastic on that particular cap? That cap looks thinner as my hair is kinda thick, that looks so much more breathable. You are a gifted woman. That smile is gorgeous.
Alyssa Jennings: closure looks more natural than frontal that's why i always buy closure not frontal. can't wait to try this hair to achieve the side part look!!!
gwen27405: #teampeanut
Kayla C: Why did you have the lines on the cap going eat to ear instead of up an down usually the way I do my cap is the lines are at the front of my head the the end of the line that v looking sharp on the cap is on the back of my head
Kimiah Cargill: Hello I'm new here I love the hair but I don't understand why you had to curl wanded it looks the same after you curled it but it is very nice too much hair though
Ronesha Coleman: Don’t buy!!