Watch Me Slay My Custom Wig For A Flawless Instal| Step By Step| Ft. Dyhair777| Updated Routine
- Posted on 19 December, 2017
- T Part Wig
- By Anonymous
♥Handmade products I sell, please visit
“On the road to healthier hair”
“Natural Hair & Beauty Care”
I used Ghost Bond XL adhesive from Amazon $19
https://www.amazon.com/Ghost-Bond-XL-A...
❤️ Link to previous video on how I glue down my frontals/ wigs
❤️https://youtu.be/1qSvSaygISo
❤️https://www.youtube.com/watch?v=gWehHt...
❤️https://youtu.be/rbEKgSFcYfs
WATCH ME SLAY MY CUSTOM WIG FOR A FLAWLESS INSTAL| STEP BY STEP| FT. DYHAIR777| UPDATED ROUTINE
Hair Info: Brazilian straight in the lengths 18,18,20 with 18" frontal!
Link to the hair: http://bit.ly/1LwGcwK
Frontal:http://bit.ly/2aaVHvm
$10 Off,Code: 71488 (Order $50,it works)
Hair Color: Natural black
♥_________________________________
Keep Up with Dyhair777 to know the sale or new arrivals firstly:
YouTub@Dyhair777 http://bit.ly/1NmAbVi
Instagram @ DyHair777 http://instagram.com/dyhair777
Facebook@ DyHair777https://www.facebook.com/dyhair777
----------
christmas giveaway,the prize is for 1 winner*180 density lace front wig 16inches,and 4 winner*$15 coupon.Just need to follwing @dyhair777 on Facebook and like our christmas big sale post and tag 3 friends,comment below your plan for christmas.The winners would be announced on 22st,Dec.2017
Link to previous video on how I glue down my frontals/ wigs
https://www.youtube.com/watch?v=gWehHt...
♥ GO CHECK OUT MY NIECE CHANNEL FOR THE LATEST HEAT SNEAKER COLLECTION
♥♥♥♥♥♥♥♥♥♥♥♥♥♥♥♥♥♥♥♥♥♥♥
♥Business inquires only- [email protected]
♥I do not sell wigs!
♥I do not make wigs!
❤️If you would like to purchase Whipped Hair Butter visit www.simplycloudnine.com
Social Media:
♥ Insta: https://www.instagram.com/beautywithty...
♥ FaceBook: https://www.facebook.com/tyreka.terry...
L I K E | S H A R E | S U B S C R I B E
Category
Howto & Style
License
Standard YouTube License
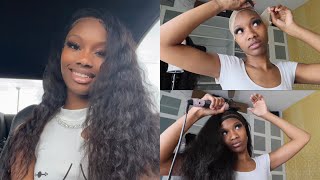
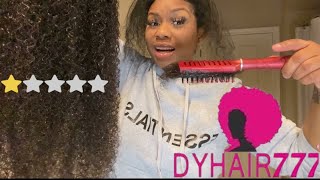
Hi guys welcome back to video time. Today'S video is gon na, be all about how I lay my frontal. So this is my updated routine on how I lay my frontal snail. Okay, so really quick, this hares by dy 7-7. Here I have in the lease 18, 18 and 20 inches in and also a 18 inch frontal. So this is how the hair is looking and again. This is their Brazilian straight hair and it's real pretty, and these are also the lashes that was sent with D 177 here so just keep on watching. So you can see my updating routine on how I lay my photos: okay yo. So this is the hair that I was sent by dy 7-7 hair, and they also come with this really nice brochure to your care instructions and these really cute lashes, as well as the frontal that has been pre plucked and again, this front mm 18 inches and The bundles look really good. They are personalized with the inch of the hair on it, which I love alright. So here I'm just gon na go ahead and section off the hair. I do want to prep my hair before I glue it on my hair, so I can make sure that it's nice and flat - and I am using the hot comb - basically the back of the comb - to flatten out the hair. Of course, you can use water or mousse and tie down with a scarf, but if you wanted to lay flat and stay flat as best that you use a hot comb here, I'm going to be straightening the hair, and this is how I straightening my hair. I use a brush and follow through with the flat iron, and this is a cortex flat iron. I got from TJ Maxx a few years back and then each section that I flat out, I take the hot comb and use the back of it to make it even flatter. So that's all I'm doing here just following through with the brush and then black iron. It with well, you know, straightening with the hot comb, that hot comb is your best friend when it comes to your front, toe sunny, so yeah, I'm just doing that step all the way across the top of the frontal, creating a middle part, so that I can Have a nice sleek flat install so here I'm just brushing the hair out of the way and going ahead and going to cut off my lace. I use scissors, you can use a razor or whatever I just cut it off. I usually don't have any lace left over. I just have the I cut it close to the front of the hairline, as I can so here. These are my corn rolls that I did in no time and I'm using got to be glue to make sure my edges are flat. That'S a very helpful step when it goes to going down your wigs and I'm using these wrap strips that I got from my local hair store things like a dollar, some change for a lot of them, so I'm just tying it on my head for about five Minutes and then after five minutes I'll, go ahead and slide it off. So, as you can see, it makes my edges really flat in they're out of the way, so here I'm taking this 91 % alcohol and rubbing it around my hairline on my skin, where you, the glue, is going to be so. I just do that and then I'm taking this Walker tapes gap protector, which is basically alcohol and a few more ingredients as well. I just do that to be on the safe side, so here after that has dried. This is the cap that I'm going to be using it's a tan cap. This cap is a little too light. I do like to use this brown one. However, when I use the darker brown one, it's like I have to go back with concealer and then, when I used to tan one it's like I have to go and add makeup, so I don't know say it amiss. So these are some popsicle sticks. I got from Dollar Tree, you get sixty for a dollar, and this is the best way to apply your glue. The glue that I'm using is ghost balm, which is my favorite, really. The only adhesive glue that I have tried, besides, like the ones from the hair store that do not work and get really greasy so here, as you can see, I applied the glue in front of my hairline and then I smooth it out with the popsicle stick. I do this first before I add my cap, so that when I do at my, I would have a God, because I found when I put my cap down first and then tried to lay the glue down. I'M either way in front of my hairline or like on my hairline, so I like to do this step. First put the cap on make sure I'm covered underneath my ear, so I could have my tabs down and then I'll go and ask the glue. Since I have a God to go by, so that's a really big helpful tip there and then, of course I take my popsicle stick and just smooth it out and then I'll wait and let it dry. I don't blow dry or anything like that by me. Smearing out really thin, it dries in no time so it was about five six minutes and then it'll dry, clear like that. So here I'm just taking my scissors and cutting off the remaining of the cap. You want to get really close, but of course make sure you don't cut your skin and you then you'll go ahead and add some more of the ghost bond glue and then I smooth it out with the popsicle. Stick this way after each layer it tends to dry a little clear, but you don't want it to dry completely. You just wanted to get a little clear, so you go to the next step. So now I'm gon na wait - and this is how I was looking. I'M gon na hit go ahead. Add my second layer right on top now, as you can see, I'm adding the glue like right onto the cap, but you do want to make sure you have some glue like on your skin, so that you can have the lace on your skin and not just On the cap, I find that it lasts and sticks a little better when you just have like half and half half the lace on the cap and half of the lace like on your skin. So I'm just smoothing it out repeating these steps. I did four layers. Just like this, and smoothing it out with that popsicle stick, which is my best friend, can't do without it and that way it helps it helps with the drying process. So, as you can see here, that's about as good as it's gon na get. I know it is still a little white, but that's okay, because it will dry clear. So this is my wig, as you can see all nice, and straight in so I wouldn't have put that on my head and I'm gon na start by pressing down the middle first and a lot of people say make sure that your fingers don't touch because of Old, I don't think that has nothing to do with it. I use my fingers, but I like try to push the hair in front of it. So it's not like my skin, like my fingers on the glue, is more so like the hair is on it. So I'm just pushing the middle and then I go and do the sides and, as you can see, we're gon na cut that off, since this is my first time wearing this week that I made so next time. I'M that part to be taken care of. So I'm just moving down as you can see, I was pushing some of the hair down with it and now I'm just taking my red tail comb and pressing it down to make sure that it is all secure and nice and flat and, as you can see, Is like really holding down like mice? They look like cat eyes so here, like I said, I'm gon na go ahead and cut off the rest, the remaining of the lace, so it basically fits. My hairline is not like a moon shape or like some kind of circle, so I got ta cut off the rest of the frontal, so I'm just gon na pull back my hair section it off around my ear so that we can make sure that the week Does fit to our head? So that's what you have to do to get the remainder of the lace, because the frontal comes way too long, but I'll rather it be too long than too short. And then I can, you know customize of how I want so, as you can see, I'm just following around my ear, cutting that off like so so now. That'S how we look the remainder of the lacing. Now you are able to pull down your little sideburn as well as cup it and pull it behind your ear to get a more natural, realistic, look and I'm doing the same thing to the other side. And then I'm just going to find where my ear is again and then clip it back and then I'll go ahead and cut around my ears so that, of course we can pull it back. So I mean next time I go to put on this wig. I won't have to do this step, but since this is a new wig, that's how I have to do and you can see this is how it's looking pretty good pretty flat, but I do have a white residue, so I'm gon na use this black radiance powder. As well as this morphe brush to just go and cover up the white or you can just wait, I keep saying that I'm gon na glue, my wigs on like the night before and then record the next day to where I don't have to do the makeup And it will dry clear on its own, but I never do that. So I just went ahead to some water on a toothbrush to put that on my edges, so I can get the makeup actually off of the hair, so I just pulled it back cut off. So I can make some baby hairs and I'm using this style factor edge booster, to create my edges and look at that. Don'T it look so good, so I'm just I got a little carried away with my baby hairs, but I thought it was cute at the end, even though I did a lot, but I was just really filling myself and this hair, so I'm just taking my straightened Comb and you know trying to make it a little flatter at the top, even though it was flat enough, but I was being extra, so I'm just taking my strength, comb and just going through my hair brushing it through, and this is the finished look. It looks so flat so good. You would not even know that it's a wig, it's cool with me, sweeping it behind my ears, and this is how the hair is looking. I love this D. Y77 hair. The hair is really thick and again this is their Brazilian straight hair yeah. I love this hair is so soft and just looking so natural and realistic swooping behind my ear pull it up got a really nice nice. What, and this is how I do my updated routine for my photos, all right,


Comments
Lakeisha: This is witchcraft! thank you for being so detailed in your steps and explaining why you did each step. You make it look so simple and it’s beautiful on you! Thank you for sharing!
De'Asha Mitchell: I will DEFINITELY be following this tutorial when I get me a wig. Your instructions were simply and understandable and it came out looking soooo natural! You did that!
allofdestiny: So detailed and perfectly done. Goodness. I really Love the edges girl.
clawdeena9: Oh my GOD I'm shook. This is literally the only way to wear a lace I love it!
kai clarke: you really did that !!! this was so helpful i loved how you went step by step with this whole tutorial! i watched from beginning to the end ! make more videos !!!
Seon Gates: This was actually very detailed and helpful. You have new tips I've never heard of. Thank you beautiful! ❤
ANNIE POOH: I love this video! It makes me believe I can do this! I’m nervous but I’m gonna try! Thank you! You did an amazing job!
Embracing Natural: Your hair came out perfect!!! I can’t wait to try this method!
Peachy Gege: Girl, there isn't a style you have not slayed. You always leave me amazed with your end results. Great job!!!!
MsE Phillips: I love how you took this tutorial step by step. You done a excellent job, I got kind of scared when you was cutting around your ear, but you are vert professional. Normally I use to just throw my wig on and pin it down to my hair but now I blend the wig in when my real hair. I need to take it one step further and complete my wigs like this. I have seen a lot of how to video about hair. Many of you young ladies do a great job.
Moor Gigi: I like the way u did it. It’s very pretty on you. I choose less baby hair but that’s what works for me. I think the world would be a much better place if ppl learn from one another even if you don’t agree or like what they do. But nonetheless, I like the way you laid it babe. Thank you ☺️
Pammy #A.R.M.Y: they make it look so easy!! i love this tutorial.
Zee: Omg this is soo laid and we're the same skin tone! I was kinda scared to try a frontal because of my skin tone but you helped me out with this.! Wig making and frontals all 2k18! **Subscribes**
Kierra Malone: The wig looks amazing.
Maria Inez: Muito lindo!. Perfeito
Irene Boateng: The best detailed and easiest frontal tutorial I’ve ever watched in my whole life
MissMelaninated: I absolutely LOVE how she did this, and she was so step by step informative... girl thank you❣️
Aqua: This was a really detailed step by step video thank you!!!
K Vlogs: It looks so natural
Shana Merrick: Great ! Great video!!!!!!!!!!!! This was very helpful to me. I plan to wear a wigs this year. I am watching wig videos to learn how to make mine look more realistic. This video just helps so much. Cutting this wig around the ear and using a straightening comb are two very helpful tips that I haven't seen. Thank you so much, Ty!!
Aminay: i really want to get into the wig game, and when i say sis you DID THAT! so friggin pretty!
Helen arevalo: This is such a detailed video! Loved it, she really did slay that
KREATIVE HOLINESS TV: This was so flawless!! I just wish I could pay you to do mine because I don’t have the patience for this ♀️ lol
Always True: It came out very nice. Thanks for the detailed tutorial.
Valecia Landry: Love Love Love!!! Idk how many times I've watched this video , You really slayed this wig
Ashley1806: I absolutely love this look!! Thanks for sharing!
Simply Corre: I actually LOVE the way you swooped the baby hairs it looks cute at least it’s not down to your eyebrows like some of the ladies who are complaining
Ariel Denise: You did a great job!!!
valencia Moss: First time watching and your video was very detailed from start to finish. Amazing work
Cree Stewart: You’re so talented from hair, to make up to dressing, I need to get it down packed like you
Petite Madame: Love this tutorial and the outcome looks very natural ! Girl ur a pro with that scissors
Taja Walker: Love this! Very detailed.
BikerChic Rolling: WOW! I'm in lol. Ok just so y'all know - BeautyWithTy is on point w/Ghost-Bond protective glue. I ride my own motorcycle in fierce heat & high winds girrrls my wig stays put! I also work out (I sweat girls - nuthin cute) & yup, it STAYS put! Loving your spirit B.W.T. & THANK U my beautiful YT sista #SaveTheEdges. Keep doing YOU, haters give your wings WIND to keep flying high. yass!
Much Ado About Nails: speechless best wig install I've seen so far, so realistic and natural looking! not wiggy at all! wow
Stella Bella: This is the most simple yet detailed and effective video!! It needs to go viral fr
Stephanie Taiwo: Girlll you are IT!! Wish I came across your video before trying to install my frontal
PrettyKach: Finally! I been stressed watching all these women install wigs on top of their makeup! Thank you for finishing your hair before makeup. Jeesh.
BellaFox: This is the best video I’ve ever watched !!! Thank you ! I’ve Been getting the wrong info for years now smh I’m so glad you made this
sosweetbaby4: Girllll me watching your videos made me buy a new long lace front ombre pink bottom wig from your link i can't wait to get it I'm going to start my collection!! Thank You
Shon Jolie: Absolutely FLAWLESS!
J Moore: Bomb af! She did a hella good job thanks for this sis
tashapratt01: So pretty thank you for this tutorial
Empress Queen: love your tutorial I actually followed it ❤❤❤❤
68Jacks .: You did a EXCELLENT JOB whenever I get ready to put my lace wig on myself, I will definitely use this video as a reference. GREAT JOB.!
Jaccy Da Jawn: this the best wig tutorial i’ve seen by far on youtube ! i’m looking for my wig now ! sis snatched mines! good video
JaCeel Zhane: GURLLLLLLL, This looks sooooo good honey
Jay Bratzz Tv: Love this video help me put my first wig on just now
Beautiful YAS: It looks pretty good, I still haven’t tried the “stocking cap method” myself .. when you said 4 layers of glue I was like well damn
Tabitha Rose Freeman: 9:48 you are too cute. You said I was really feeling myself Your hair looks great. You made me realize I don't add enough layers of glue and I have "lift up" around my front edges. I usually wipe my forehead with 91% alcohol and just use one layer. Definitely trying this method
Bianca Monae: I absolutely love all of your videos you slay every single time
Asia Brennae': Omg! Those Baby Hairs, That Flat Sleek Straight Look! Girl You Never Fail Me Lol
Khi Taylor: You BODIED this!!! Great job!!
Jajuanna Chapman: THIS IS SOOOOOO PRETTY GREAT JOB HUN
NENEUNRATED: You make it look SO DAMN EASY
Infamous TYTY: You always SLAY THESE HAIRSTYLES! Do the back be laid down with glue as well or you sew it down???
MsBluSpot: You are really photogenic & cute -- especially the lashes. Luv that flat look --- on the frontal so flat ----Yasssss You Slayed it --- Great voice tone ! too
Truly_ Toyaaa: Yassss girl !! You did that.. love it
Hello 👋🏾 I'm Candice: This....is....BOMB!!! You did that, sis! ✊
vickie gamble: Love all that you do!!!!
arionna mccray: Ty you are so pretty! Whenever I watch you it's always a slay! Love you and your channel
Shantell Monique: It looks so natural i love it
DeniseNicole !: Came out perfect!!! ❣️☺️
Rivka: “I was just feeling myself” I love it! Yaaas queen!
Salea Dean: You make me feel like I can do anything with hair TFS
Dia Dior: wow, I can't wait to order and start making my own. thanks. one of the coolest teacher for lace wigs. when i start i will be watching this again. to upload my own video soon.
Shaniqua Sewer: Slayed by a true Hair Goddess
Cubanmarni X: So good! Sis this is my first time learning about all this, wigs lace and install. I’m learning
whitney brown: It looks so perfect
Daniyell Payne: Great tips! Loved the video. Thank you again.
Deshay Cooks: It looks so damn good sister
Keona Janai: You did a good ass job . Love it !
Euphrates Jones: Best tutorial ever. Thank you!
douthedou: Thanks for the video ! Your hair looks very pretty
Dj Mustard: GIRL YOU SLAYED TF OUTTA THIS WIG!!!
Nae G: U did that sis and show how simple it can be
juju T: You did that looks great
Aida Mendoza: Fantastic video! Thank you so much! How do you go about removing it? How long can you wear this?
초콜릿맛서울: Im late to the party but i did a lot of research on how to lay & cut my wig properly. I was so scared i was gonna f*ck it up that i literally constucted & had the wig on the mannequin head for 3months before i had the nerve to attempt to put it on. I also wanted to see it done on a brown girl such as myself so i could see the results. Im shook. I followed everything u did to the T & it came out perfect!! You're a god send. Thanks boo.
IamAC: GIRLLLL YOU DID THAT ! Period
Krystle Gourjuss: You did an Awsome job but too many steps for a lazy wig wearer like myself lol...oh your baby hairs are off the chain I love them. Thanks for sharing
diamond harris: Girl you are gorgeous and you taught me a few things
Antoinette Sanders: Thank you so much for your video! I think I can do this now! Lol
Marcella Williams: Nice , and you gave plain, obtainable Easy instructions, that's how i instructional teachers are to suppose to demonstrate . To make it plain and understanding "You go girl!" You did an excellent job... Thanks for sharing.
Bouzsani: YES BEAUTY!!! THIS HAIR IS GORGEOUS!
Tolindra Collins: Why y'all mad about the baby hair? DO IT FOR THE CULTURE ✊✊✊
Deja Carson: What happens to the back of the cap once you cut it? Does it just stay laid down or do you sew it down or something ?
APRIL Fielder: What a phenomenal professional job
Darion Longmire: This is AMAZING!
Really Shania: The baby hairs made the look❤️ new subscriber
Tavona |Perfume Obsession : Great tutorial! Do you do this step daily or do u tie your hair up and sleep in the unit? To avoid having to do this process everyday ?
Starring Shameka : You slayed this honey!!!!!!!!
Eeee C: It looks amazing
shauna0507: Love this! And I’m feening to try this frontal look. But can you please do a gym routine video with a frontal and this glue. I want something that’s going to hold up. I don’t want my unit sliding off at the gym
Mahre Ebron: Very helpful, thank you.
faith gage: She slayed it. Girl you did your thing, very neat. Just beautiful
I style liz: You did that very detailed..no you wasn't extra on them edges you slayed them.
UNAPOLOGETICALLY AVIS: New SUBBIE. Love the way you installed this.
Leelee: Beautiful want to make me one , so relaxing to watch
Daphynee Blake: Gotta do that " cut off lace in the front part " cause at first I thought I wasn't glueing to far back at first thanks for this video
Stephanie Taiwo: Sorry had to come back to comment again, BEST ONE I've seen, you really snatched my edges, ima wake up early for work tomorrow just to try this