Customize Lace Frontal Wig Like A Pro!! | Beginner Friendly
- Posted on 13 January, 2020
- T Part Wig
- By Anonymous
Hey Ladies!
In this video Im showing you 3 must steps to make your #lacewigs look natural. Im trying to step my wig game up in 2020! I will have more information about this unit in my next video, so make sure you are subscribed!
Install Video: https://youtu.be/cSAwXcwWNSE
Thank you all for watching! Don't forget to like, share, comment, and subscribe! Also make sure your post notifications are are on!
I am now offering “Snatched & Highly Favored” t-shirts & sweatshirts! Merchandise can be ordered via my Teespring page, https://teespring.com/stores/snatched-... . Thank you all in advance for your continued support! ♥️
Helpful Videos
How I Make My Wigs| https://youtu.be/1WrN3B7p1n0
How I Install My Wigs| https://youtu.be/pckRd488TU8
My Fav Edge Controls| https://youtu.be/S8q027j8RSY
**CONTACT ME**
For Business Inquiries
Email: [email protected]
For my random whereabouts & fun, Follow Me!
Beauty IG: @SnatchedBySharmel
Facebook: facebook.com/snatchedbysharmel
Snatched & Highly Favored "She is clothed with strength and dignity; she can laugh at the days to come."Proverbs 31:25
#hdlace #undetectablelace #tintedlacefordarkskin #bleachknots #laceclosurewig
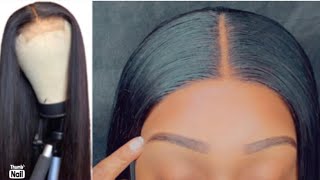
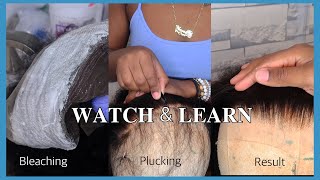
Everybody is charnel, welcome back to my channel, so today I'm gon na show you guys three steps to make your lace, closures or frontals pop and look super natural. So I'm starting off with this 6x6 lace closure - and this is just your standard, Swiss lace and as you can see, if you are a deeper tone normally the lace has like this as she cast, and so we do not want that and I'm gon na show You guys how to get rid of that as she cast and make it blend into your skin a little better so step one is going to be to bleach your nuts, so I'm gon na take some dw2 and 30 volume developer. I'M gon na mix that in a mixing bowl and I'm using an applicator brush just to apply that all over the lace. I like to start in the front of the lace, because I like to make sure that those knots get bleach the most because I feel, like that's the most important part, and then I'm just going to start working. My way back, going from side to side. Applying the bleach, so as far as my consistency of my bleach, you know not too big, not too runny just enough to kind of sit and stay in place, yeah. So that's what I'm gon na do first and so then your wig. She looks something like this once all of once you have everything applied, and so now I'm going to flip my wig over I'm gon na. Take it off. Take my pins out, I'm gon na put a plastic bag down to sit underneath that bleach and then I'm going to put my wig with the closure damn and be careful not to get the bleach on the roots of the hair too much. You want to make sure that it kind of just stays on the inside of the lace. Yep two is going to be to color your roots black, so this is actually kind of optional, but I'm going to use this Revlon box color and soft black, and I just followed the directions and I'm gon na clean, my mixing bowl in my applicator brush and I'M gon na squirt some of that into the bowl. It'S just a little easier to apply the solution to the brush when it's in the bowl but yeah step. Two is we're gon na color, our roots black again, this is optional, but personally I prefer to color my roots blood. I just feel like it makes this your quote-unquote scalp pop. So once you bleach those nuts, I feel like the contrast between the bleach nuts and the dark roots, really makes that scalp like a parent, and it makes like the scalp pop. So you know that's why you see people kind of going in with like dark brown powder or something in their parting area, because they want to make that skin like a parent's pop. So I just prefer to just go ahead and color my roots, so that I don't have to apply makeup to my scalp all the time or to the roots of my hair, all the time so yeah I like to do this, even if I do like a Colored wig, you just want to go in and color those rooms and you only need about an inch of black dye. If that's what you prefer, I actually went ahead and colored my entire red black. But if you don't want your wig like you, just only need about a inch of color, a black color at the roots, and it's gon na give you that extra little pop, but again step two is actually optional. You don't have to do this if you don't want it so now, I'm just going through making sure that I got all the areas and that I didn't miss any spots in the scalp, and I let that off same process for maybe thirty to forty minutes and Then, to wash it I'm using my blonde brilliance, toner, and I use that for my scalp and that's just to tone the nuts so that they don't look too brassy, and I did all of that off-camera - and this is how my wig looks after I have bleached The nuts tone, the nuts and colored my roots, jet-black as you can guys, can see it looks really natural already. So the last step is toning, the lace so next you're going to need a spray bottle, preferably something that's a mist and not squirts. I'M using just an old setting spray, I put my makeup a whole makeup bottle and you're gon na need some SAP, so I'm going to pour some salt in to that bottle and then i'm using the adorn in the color honey brown now and depending on your Skin tone you may need to go up or down the color you're gon na have to kind of search the color range and find a color that works for you. But I'm going to mix pour some of that into the bottle, necks and then I'm going to add some water. To that make sure I did that off-camera and I'm going to stir it and I'm just going to shake it up and make sure that everything kind of mix together perfectly and then I'm gon na spray on a paper towel just to kind of see what color. I have and see if I need to add more color to it, so I went ahead and added some more of that adore honey brown to kind of amp up the color a little bit. It'S coming off a little green on the napkin, but it works really. Well so yeah again, then you're just going to spray it all over your lace. I mainly kind of concentrated mines in the front, because that's the part that I really need to know into my skin and this bottle actually wasn't a good bottle to use it didn't miss as much. It was more of a squirt, oh yeah. I just have to go in with my paper. Towel and kind of you know make sure that the product was distributed evenly but yeah as far as the color you're gon na have to play with the color. Depending on your skin tone. I did some research, usually honey. Brown is like the most recommended, it's kind of like in the middle. So, depending on your skin tone, you may need to add more honey brown or you may need to find another darker Brown, ad or color to add, or if you are a lighter complected, then you, you know you can use a lighter concentration of the mixture you're Gon na have to play around with it, depending on your skin tone and then I'm just taking my blow-dryer on a closed setting and I'm just blow drying it, and then I'm gon na go in and add another layer. I did about three layers of this solution. Similar to finding your color match, you can add as many layers as you want, depending on your skin tone and your desired color payoff. Another quick option you can do if you don't have bleaching powder or via add or hair dye, is that you can take some foundation and mix it with some water into a spray bottle and spray that on your lace, I tried this on another unit and I'll Show you guys what the color payoff looks like, so it doesn't necessarily tint your lace for me in my opinion, as you guys can see like that brown on the ring, it gives it more of like the bleach knots. So if you want to skip bleaching your knives, you can also try this tip as well guys and here's just a side-by-side comparison of before and after, as you guys can see, I no longer have that as chic as and the roots and everything looks so much More natural, so yeah, that's it guys. If you want your wigs to look super natural, I definitely recommend following these steps I used to shortcut and kind of skip it, but it's a it's a necessity, and so here is how it looks once it's installed. I will have a part 2 coming show you guys how I install this hair and more information about the hair so make sure you're subscribed. If you want to see that video and yeah. Thank you all for watching, don't forget to Like share comment and subscribe and I'll see y'all in the installation, video bye,


Comments
Tj Johnson: I just purchased my first lace front wig and this is so helpful!! I have no idea what I’m doing lol! Thanks
Najah Jones: Yesss ma’am. Shout out to you for releasing the secrets to your fellow sistas!!
sandra o: Really helpful thxx
Kayla Jay: How is the hair holding up so far?
V. Lynn: Great video!!!!
Foreign Queen: How long did you leave the bleach on for . 30 minutes or 20?
Itsmeslimtee: Where did you purchase the wig looks nice !!
LadyLydia: All that work. I don't think so.