How To: Long Curly Hair Install And Cut Ft Tinashe Hair ☆
- Posted on 26 May, 2022
- T Part Wig
- By Anonymous
cute and easy install beginner friendly all hair details down below
●▬▬▬▬▬▬※ Tinashe Hair ※▬▬▬▬▬▬●
Hair info: Deep Wave 13x4 HD Lace Front Wig 26 inches.
The Same Hair in The Video: https://bit.ly/3lrhw08
※ Tinashe Hair Website➤ https://bit.ly/39yX1vU
※ Coupon Code"TSIG" to Save extra 15% Off
※ Buy Now, Pay Later with PayPal & Klarna.
Invisible HD Lace Wigs➤ https://bit.ly/3PuFnKj
New In Glueless Lace Wig➤ https://bit.ly/39CiHHm
2022 Trendy Colorful Wigs➤ https://bit.ly/3sIQsxw
Short Hair Styles➤ https://bit.ly/3MGeiBS
#Tinashehair #invisiblelace #hdlacewig
Instagram @tinashehair: http://bit.ly/2Isud9X
Facebook @Tinashe Hair: http://bit.ly/34FxUAm
YouTube Tinashe Hair: https://bit.ly/3NXvwMi
WhatsApp: +86 16649781957 Wholesale: +86 17537405381
Email: [email protected]
MY AMAZON STOREFRONT
https://www.amazon.com/shop/stephanyan...
shop my early 2000s website (its the best way to support me )
https://www.soulstylesshop.com
*restock coming soon*
buy me a coffee ($3 donation to the channel *very much appreciated*)
https://ko-fi.com/stephanyandrea
follow me :-)
instagram - soulrichx
tiktok - stephanyandrea
business email: [email protected]
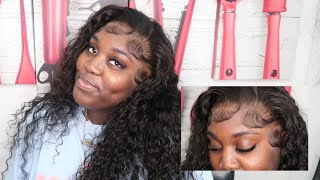
What it is, what's up you guys, so it's a gloomy day out, so the lighting is probably gon na be shitty throughout this video. So i apologize, but i'm so excited because i have not done a hair video in forever and i have not done my hair in forever. Like girl just been trying to be like a natural girl, you know love my natural hair, a little bit more so yeah. I'M really excited for this video to be trying on a new little hairstyle or whatever. So today we are working with panache, hair and i've worked with them in the past. I love them. Their hair is always amazing. This is what the box looks like, so i wanted to show you guys a quick little unboxing of the hair, so it comes in this nice little pouchy and then this is what the box looks like and the hair fresh out of the box. So there's their card, here's some details and they did throw in some goodies for me. So i got a comb. I got an edge brush, we got some clippies, we got a wig cap, we got a bonnet and some lashes. So this is the hair we're working with look, how long guys, she's long okay, i have worked with dark hair in the past and an issue i always have is like bleaching, the roots or like the knots. I meant i'm going to show you guys, like the process of me, bleaching the roots. So this is how the knots looked before and honestly they weren't that bad. I didn't even have to bleach them honestly, but i wanted the lace to be flawless like i wanted them to be invisible. Okay, so i saw this process on tick tock, so pretty much. They sprayed the hair, pushed it back with the comb and now we're going to mix the bleach so on tik tok i saw that you could use 20 or 30 developers, so i was like okay. The 20 will be fine girl. The 20 was not fine, but anyway you want to mix it. So it's a pretty thick consistency. So that's why i'm like adding little by little - and i also saw that like if you mix blue, that helps it to not get like that brassy tone. You know, but for some reason it was coming out green, so i was like what the heck, so i decided to throw in some purple to kind of give it more of a cool tone because, like why is it coming out green okay? Now it's kind of blue, so it looks a lot better now, but um yeah. So then we're gon na start, applying it to the lace and i was kind of struggling a little bit. This is my first time doing this y'all. So i just really didn't know what i was doing, so i was just trying to find the best way to get it on there. So this is what it looks like once it's on, and i heard that you're supposed to put like a foil and then like flip it over upside down, so it doesn't like bleed into the hair. So yeah, that's what i did and i left it on for 20 minutes. I don't know if i did it right, it didn't lighten enough. So i'm going to show you guys up close, so these are kind of the results, so it did lighten the root. A little bit the knots didn't all the way light in like only a few of them lightened, and then some of them are still there, but i feel like it still doesn't look bad at all. The knots aren't like huge and noticeable, so i feel like either way we could have a cute install and just like make it look cute. So yeah shout out to tanesh hair for sponsoring this video and now, let's get into this install okay, y'all. So first things. First, we need to detangle this hair, so i'm just brushing through and then we're going to start braiding. So i've just wet it a little bit to give it some texture and then part it down the middle. So i'm gon na take some gel just to make sure the edges are slicked back and that i have a clean, um part down the middle, so yeah we're just gon na start braiding. The gel also helps to have more of like a grip, while i'm braiding. So i can braid tighter so yeah, i'm just going to braid all the way down, also inches period, so yeah, i'm just going to do the same thing on both sides and obviously the braids do not have to be perfect, just make sure they are tight because You don't want any hair to fall out or anything i usually put on some hair oil, but i forgot this day. So does anyone else's hands cramp up while they're braiding, because mine does my hands were killing me at this point? After that? I'M going to just go over the edges once again with you got to be glued spray, and i do this because um i want to make sure all the hair is out of the way and it's secure. So now we're going to just pin the braids up with some bobby pins and just cross them in the back. This is usually how you get like the flattest look. I feel like and now we're gon na put the wig cap on. So i like to extend it like all the way down just so. It'S like really tight on, obviously cut out some eye holes, so you can see what you're doing and then we're going to take the got2b spray again and spray just around the hairline, because that's where you want it to stick and we're going to blow dry it To help it dry quicker, so once it is more or less dry you're going to start pulling it up and we're going to cut it off. You want to cut it as close to the hairline as you can get it. So that's why you see me kind of like peeling it back a little bit just to get closer to the hairline, and then i'm just going to trim all the way around. You can take your time with this y'all. You don't want any of your real hair to start poking out so once that is done, we're going to take our ghost bond glue and i just like dot it along the edges, all the way around and up to the sideburns, and then i take my comb And kind of just like press that into the wig cap and this kind of makes it like really like flat, really smooth along the edges, make sure it's not going to lift so now we're going to cut our ears out so yeah, while the glue dries we're Just going to tie the wig cap in the back and this kind of holds the braids in if they do like, tend to fall out or anything so yeah. Now i'm gon na try the wig on just to see how it's gon na fit around the edges around. You know the hairline around the ears and everything like you wan na see how it's gon na fit before you just like, jumped laying it down so yeah. I'M going to do the got to be glue all over. I started actually on one side and then i did the other side, because this wig didn't perfectly align with my hairline. I feel like my hairline is kind of weird, sometimes but yeah the weight did not align. So i did it in pieces right the got to be spray, and then i put the wig band on so you want to leave the wig band on for at least 10 minutes. That'S what i've heard, because you want that that you know bond to be secure. Girl, you don't want your wig to lift. You don't want that lace to lift so now we're working on the part. So you want to get a straight part of course. So, while the lace is melting, we're going to start cutting the hair because i feel like it needs just like a little bit more shape to it. So i'm going to take the scissors and just go in a downward motion and just cut these little layers into it. Just to give it more dimension like look at the before and after y'all, like you see how the side eye cut is all full and voluminous and the other side is just all flat and weird so yeah. I feel like this process definitely helps the overall look of it. So now we're going to work on the part actually like for real this time. So i'm going to take my hot comb and just start to try to lay it down as flat as we can get it and now we're going to work on the weaves. So i like to wet it just to get the curl pattern back in and then i'm going to take some mousse and just lay down to make sure it's not going to get frizzy throughout the day and to hold the curls in throughout the day. So yeah. I'M just using like a tresemme mousse, whatever like i bought at target and yeah, so we're going to do that all around the hair and then, after that's done we're going to take the wig band off. Finally, the moment of truth and womp that looked crazy. I was like nah: what is this so it we needed to put in some work? Okay, so right now, i'm just cutting the lace off trying to get it as close to the hairline once again as possible cutting around the ears. I was really in awkward position on the other side i was just like. I don't know how to get this side, but whatever we do, what we can girl, we got, ta do our best, and now i'm just plucking the hairline. Sorry, this part is kind of like out of focus but yeah, i'm just plucking the hairline to kind of make it look more natural and not so like bulky in the front. So here i'm just wiping off the extra like residue from the hairspray and now we're going to pull our baby hairs out. So i usually just do two swoops i feel like my forehead is too small to be doing like a lot of baby hairs in the front. So i just do two swoops on the side, so i pull out a piece and start to tweeze it to kind of just like thin it out a little bit make it look a little bit more natural and less bulky, so yeah, i'm doing the same on The other side just pulling out a section, i trim it with the eyebrow razor thingy and yeah plug it a little bit and then just lay it down with some gel. I always use gel on my edges. I don't know that's just what works best for me, but yeah. This is how it came out. I did a little sideburns and everything - and i love it. It'S super cute, okay, baby, so it's actually the next day and i'm getting ready for a class right now, but i just want to show you guys the hair like the finished product with, like my makeup, done and everything. So this is how the hair looks and i feel like it's really cute. I love it. I did like cut it into like um like a little bit more layers and stuff to give it like a little bit more shape or whatever, but um yeah. This is how it looks. I think it lays really nicely um. I actually i'm really proud of this install um. I haven't done curly hair in a while, but i think it came out really pretty the curls hold really well um they're, not like frizzy or anything. So this is how it looks from the back. Let me try to give you guys a good view of it, so yeah 26 inches. I did trim it down a little bit. I love it. I think it's super cute, so this is how it looks up close. Oh, don't buy my bed y'all. I did not make my bed today, i'm running late for school, so this is how it looks. I think it's so pretty. I love having curly hair. I always feel like a bad with my curly hair. This is my outfit just wearing this nude dress with my fuzzy leg warmers, because it's still a little bit chilly out so yeah guys, i'm running so late for class. Right now, just wanted to say shout out to tinashe hair for sponsoring this video all links and details will be down in the description y'all so make sure to go check them out so yeah. Thank you guys so much for watching. I hope you enjoyed this video. Don'T forget to like comment and subscribe to your girl and i'll catch y'all in the next one.
Comments
mytearsareapplejuice: you’re so pretty with and without makeup also how did u grow ur hair out so fast
Jada Williams: It looks really good
Junior Chaves o Picasso de Yahushua: Omfg you are so gorgeous without makeup. I luv ur beauty
Goddess El Ali: Your hair has grown so much
Krystin Joseph: love your vids❤
Кирилл Семёнов: ফেলিসিডেস, এটি মিনাংকাবাউ উদাহরণ। 250 sentadillas son unos 19yearsold.Monster muchas y un buen ejercicio. 5:25 Dadi dejaj ver que hay muy buenos ফলাফল
MrSandRune: Catched up 5-6 videos.Change,after 100 pairs,to new jeans called Garcia.From Italy,cheap,much better than the rest.Another brand,never use,but they have only top-80,called Superdry,from Japan.
KingKay: Clear blue bleach + 30
Kay Franshay: yesss, omg!
Treaty: omg I LOVE YOUR HK PJ PANTS!!! where are they from????
Treaty:
Honey Hey:
Fabian Perez: omg how is school going!!
Sxoxie: Omfg 1. PS: luv ur Vidios<3