How To Sew In Wig Clips | U-Part Wig Tutorial – (Part 4 Of 6)
- Posted on 11 June, 2015
- T Part Wig
- By Anonymous
Virgin Hair From: http://www.MrsRutters.com
Instagram: http://www.Instagram.com/MrsRutters
Facebook: http://www.facebook.com/MrsRutters
In this step of the U Part Wig Tutorial, Breanna Rutter will teach you step by step how to sew in your wig clips to put the finishing touches on your u part wig.
Sew two clips evenly spaced in the back so that your wig feels even and comfortable while you are wearing it. Also, sew two wig clips on both sides of the opening of the U part wig so wear it onto your anchor braids that surround your leave out part.
PRODUCTS FOR THE U PART WIG;
3 Mrs. Rutter’s Bundles Lengths: 24 in, 22 in and 20 in http://www.MrsRutters.com
Black Nylon Sewing Thread http://goo.gl/rr36p4
Weaving Needles (Curved C-Needle) http://goo.gl/cugnQi
Rat Tail Comb http://goo.gl/NTJJnC
Wide Tooth Comb http://goo.gl/mkXsZC
Dry Towel http://goo.gl/JN0XQP
Hair Cutting Scissors http://goo.gl/rYH7BX
(4) Wig Combs http://goo.gl/ZvDKzx
Bobby Pins http://goo.gl/M6997x
Edge Control (Design Essentials) http://goo.gl/2ibYgw
Hair Holding Spray (Garnier Fructis Style Flexible Control) http://goo.gl/dKC7ni
Duck Bill Clips http://goo.gl/SQ5SNn
Measuring Tape http://goo.gl/MmeI9V
Flat Iron (Nano Titanium Babybliss PRO) http://goo.gl/TbgJFv
1 inch Curling Wand (HSI Curling Tool) http://goo.gl/maV8uy
Block Canvas Head http://goo.gl/UPqHWx
Spandex Dome Wig Cap http://goo.gl/MCa4Rw
Makeup Pencil (Maybeline Wear ‘n Go) http://goo.gl/3DuwlL
Heat Protectant (Garnier Fructis Marvelous Oil Frizz Defy) http://goo.gl/NaspXv
How To Dye Hair Extensions Black HERE https://youtu.be/y93K9gZiBww
How To Dye A Lace Closure Black HERE https://youtu.be/f0F7FWrgnPY
U PART WIG TUTORIAL STEPS
Step 1 http://goo.gl/gGvdVI
Step 2 http://goo.gl/4jbK6N
Step 3 http://goo.gl/cHTJSD
Step 4 http://goo.gl/6S5diw
Step 5 http://goo.gl/6le0ZR
Step 6 http://goo.gl/gzMryd
Thanks For Watching!
----------------------------------------------------------------------------------------------------------------------------------------------------------------------------------------------------
Free Giveaways & Weekly Updates By Email! http://eepurl.com/bN6ddr
Buy My Books, DVDs, and T-Shirts at http://www.howtoblackhairstore.com
My Website: http://www.howtoblackhair.com
Twitter: http://www.twitter.com/BreannaRutter
Facebook: https://www.facebook.com/OfficialBrean...
Instagram: http://www.instagram.com/breannarutter...
Google +: bit.ly/15gNK3M
Got Hair Questions? Email Me!
Email for Business Inquiries
----------------------------------------------------------------------------------------------------------------------------------------------------------------------------------------------------
DISCLAIMER: All suggestions, tips, prizes, techniques and advice given are for informational purposes only and should be used at your discretion and best judgment. I highly recommend conducting strand tests when trying or using new products, hair appliances and product mixes. I am not responsible or liable for adverse or undesirable effects including hair loss, hair breakage or other hair/scalp/skin/body damage as a direct or indirect result of the suggestions, tips, prizes, techniques and/or advice given.
FTC: I am not representing, being paid by, or endorsing any of the product brands in this video & I purchased everything with my own money - UNLESS OTHERWISE STATED in video/blog content. There are links to products that might be helpful based on the content of this video/blog. Each of your purchases via our Amazon affiliate links supports our cause at no additional cost to you.
Music Used
“Easy Lemon”
Kevin MacLeod
Incompetech.com
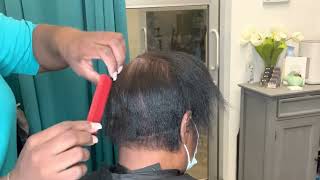
Welcome to step number four of the: U part wig tutorial using Mrs. Rutter's hair extensions from MrsRutters.com in this step, I'm going to be teaching you step-by-step, how to sew your wig clips onto your wig, as well as how to safely remove the excess cap that was Left over so before you begin actually sewing in your way clips. You first want to remove this excess cap that you see here now. Remember you need to make sure that you leave a U-shape fashion. That'S actually going to be able to cover around your leave out. So you have already done those measurements created your wig and come up to this point. So now at this point you want to use your scissors and you want to carefully remove the cap. Now, when you remove the cap, make sure that you are about a couple of centimeters away from the actual knots itself, because if you cut to close your knots, it will cause your? U part to unravel around where your leave out will be so in order to safely do this, so what you want to do is get kind of close, but not too close to the knots with your scissors and began cutting once you finish, cutting all your cap. You are then going to begin sewing on your wig clips. The goal is not to get as close as possible, it’s to be a good distance away from the thread. So you don't accidentally cut your string. So once you remove the bulk of your excess cap, we are going further and clean up any extra cap that’s left over remember the goal is to get as close to your knots, but not to actually cut your knots so that your, u part, doesn't unravel so Once you finish, cleaning up the rest, the cap around your? U shape this is. How is how your? U part, should look at this point so now. The next thing that you need to do is sew on your wig clips. So after we finish trimming off the excess That was on the - u part, wig, you then going to go ahead and begin sewing on your way clips what you can see. I have two wig clips at the top of the wig and one in the back. You want two at the top, because that braid, that you braided on both sides of your leave out will be where you sit your clips onto, and then you want one positioned in the back on the left right side, as well as on the other side as Well, so, to make sure that they're pretty much evenly spaced in the back, you can use the design of the cap to guide you where you want to place your clip. So, as you can see, there is some stitching inside the cap here and to make sure that they are lined exactly perfectly in the back at a good distance from one another. I made sure to align one clip with the netting that you see here on The wig and then you are going to do the same thing on the other side. So you are going to sit the clip here where it lines up with this netting in the wig to begin stitching. So here's the last wig clip and also you want to make sure that you prepare some weaving needles and thread so that you can continue to work without having to constantly stop just to rethread as well, so prepare about 4 to 5 needles. Just so, you can keep working so at this point, you're going to lay it down to where the circles are position on the edge. The reason, why is because this is what will actually go into your braids, so this is where it will be positioned. So to begin, what you want to do is to connect your needle and thread on the edge, so you want to go ahead and put your needle to the edge ring here, because remember these will actually go into your braids. This is what needs to be sewn down, so you go through that and you are going to do your same knotting technique that I have been teaching. You are going to wrap the string around twice and pull through to create a knot. So once you connect your needle and thread to your wig clip, you are going to begin stitching it down to the edge of your wig cap. So what you want to do is make sure where you place it is aligned right across from the threading. That'S on the side of this, because you have to thread that goes inside this way in and also in the opposite way. So, in order for the two clips in the back to be evenly spaced apart from one another, you want to go ahead and align up with the threading that’s already inside the cap. So its going to be position here and what you want to do is hold it securely with your hand, and you are going to stitch by going through the edge of your wig cap here. So once you go through the edge, you are going to go through the opening of your wig clip and you are going to do the same knotting technique, which involves wrapping the string around the needle twice and then pulling through to create a knot. Now, with every point that you stitch through, you want to make sure that you're doing it twice so two knots are going to go here. Two knots are going to go again through each hole, so that way is very secure and the wig clip unravel from your wig so go through the edge of the wig cap Once again and through the opening of that hole through your clip, then once you do, That you are going to wrap your string around the needle twice and pull through to create a knot. Now, if you happen to get a little bit of thread tangled, you can cut it off and then just continue working. So now we are going to move onto the next one you going to go through the edge through the opening. There wrap it around the needle twice and pull through. Do it once more and then move once your next opening? Now, once you finish stitching two knots per hole at the edge of your wig cap, you are then going to be able to wear you wig, so this wraps up step number four of sewing, your clips onto your! U part wig and in the next step, step number five going to be teaching you how to style your hair extensions,
Comments
Breanna Rutter: YOUTUBE HASN'T Been Showing You All My New Videos?? CLICK THE BELL ICON Next To The Subscribe Button to Turn on Channel Notifications To Never Miss A New Video Again!
Natasshia Brown: Breanna great video I have been wearing a u part for about 3 months or and I notice my hair is starting to thin in the back where the clips are placed. I have tried two different types of clips, but it is still thinning. I haven't used the clips showed in your video. I don't want to permanently damage my hair. Do you have any recommendations? Also, I just learning to braid, so I have not transition to sewing it on.
A S: Are these wig combs sturdy? I'm afraid of getting something flimsy. I'm also concerned about tangling and breaking my hair off. Idk what the best wig combs to use are, but I do know I want longer ones like these.
Destiny Jones: Could you PLEASE PLEASE PLEASE do a crochet vixen braiding hair tutorial.i love your videos and you explain things very well.I like using kenekalon hair but if you dont use that in your video could you explain how your suppose to install different types of hair and how to braid it.Also how to make it look natural witbout hurting your edges.THANKYOU!
Sundeep Ocean: I subscribe.... I love ur videos very informative.... keep up the good work hun
Desireé Slayton: Ur like a young black martha stewart i see it lol keep going mama dont stop building girl theres so many young ones looking up to you! Go harder!
karmah Leone: yessss this is greatt!! but those are in fact wig combs! wig clips are way smaller and difficult to put on..
msjazzy64: Are you from oakland?? I said to myself ahe looks like a brianna i know then i see your name. And the video is the best thank you i cant wait to do my own
a handful of love: ❤
terricaaa turnerrr: Nice video but those look like wig combs instead of clips.
Brandie Griffin: is there a difference in the big clips and the small clips? is one better for your hair?
glenda burton: couldn't watch your video because youtube put a 5 and 1/2 minute video up with no option to skip.
Caramel_ blend: Too dark can't even see
Sundeep Ocean: tutorial please on how to make a wig with bundles of hair n a closure please
Breanna Rutter: Video To Long? If So Watch The Shorter Condensed Version of This Whole Look By Clicking Here https://www.youtube.com/watch?v=jbze0Xv_z8Y
TheJazzie6: I see what i did i did not add the wig clips in the med part it was not flat on me hate it!!