Diy Side Part Wig || No Closure || Yolissa Hair
- Posted on 06 March, 2019
- T Part Wig
- By Anonymous
Hi guys! Long time no upload (again). Sorry about that. I’ve been going through a bit of a rebranding crisis. I was considering adding fashion & makeup videos onto this channel but was quite nervous as to how you would react. Mainly because all my recent videos have been about hair. I’ve decided to just make a separate channel for all of that so I won’t bombard you with content you haven’t signed up for. So don’t worry this is still a hair/wig only channel
Also thank you so much for subscribing. A giveaway will deffo be coming soon. I appreciate you all. Thank youuu
So much.
My crochet wig update video will be coming out tomorrow. I’m excited to show you what has happened to my wigs over the past year
Hot sale water wave in 20 20 20 with a 18 inches frontal:
Video hair➤ http://bit.ly/2E5Aaq6
Best water wave bundles with closure➤ http://bit.ly/2E5dmqx
Best straight hair bundles with frontal➤ http://bit.ly/2E8fQEu
Top body wave bundles with frontal➤ http://bit.ly/2E614OB
New arrival lace front human hair wigs➤ http://bit.ly/2E7nRtf
Yolissa Hair Official Website: http://bit.ly/2E6VKdO
Email: [email protected]
Tel: 0086 15803834514 (WhatsApp, iMessage all available)
Instagram➤ @yolissa_hair
Facebook, Twitter, Pinterest, Snapchat: yolissa hair
Save $3 Over $68 With Code Queen3
Save $8 Over $158 With Code Queen8
Save $12 Over $238 With Code Queen12
Save $18 Over $388 With Code Queen18
Yaki Orders Save $6 With Code Yaki
Wigs Orders Save $6 With Code Lacewig
Water Wave Save $6 With Code Waterwave
Video contains paid promotion
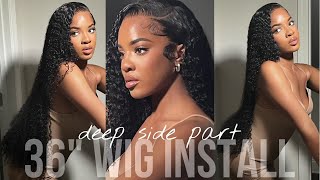
Hi guys it's automats my channel it's sandy here so today, I'm gon na show you how I made this side part wig without a closure. So I hope you learn something from this tutorial and let's just get straight on to the video sorry. Today'S video is sponsored by yo Lisa hair and I used three of their 20-inch water wave, bundles and I'll leave links in the description box below just in case. You guys want to check them out so to begin, I'm just carving out exactly where I want my nails to go. So I wanted my side part on the right side of my head, and so I drew my outline on the left side of my wig cap. So when I turn my wake up, the right way around my side part ends up being exactly where I want it to be. I hope this isn't too confusing, but you will see later on in the video that the side part ended up on the right side of my head and that's exactly where I wanted it. So next, what you have to do is sew down your lace and I bought some lace. I finally expressed it was like 7 pounds for a whole yard and I haven't yet dyed it to suit my skin color. I'M gon na do a whole tutorial on how I dyed the lace in order to suit the color of my skin, so once I've sewed it down, here's how it looks and then I cut off the part that I no longer need, and once I cut it, This is how it looks now, as you can see the connection between my wake up and my lace isn't too strong. However, I'll show you how I strengthen it later on in the video right, so this tutorial is only gon na focus on the actual closure section. So up to this point, I had just sew down at my tracks and once I reached closest to the top, I began to sew my tracks down vertically, so that it would fall towards the left side of my face. And after this I get a section of my bundle and then I split the West into two: I'm gon na keep switching between the words tracks and West by hope. You guys know exactly what I'm talking about and I hope I'm not confusing you. So I split it into two and then I begin to sew it around the perimeter of the lace. Now, when I'm sewing it down, I made sure to go through both the wig cap and the lace in order to strengthen the connection between the teeth, because I don't want my closure falling apart. You know later on, so I do this twice and another reason why I do it is because it gives me a really smooth transition from wake up to lace and, if you've been subscribed to my channel for a while. You know how much I emphasize on this whole smooth transition for my cap, today's because it can make such a huge difference and that's one thing: I've learned ever since I started making DIY wigs like we need 3 transitions from recap. Today'S because it makes such a difference right, so here's how my wake was looking and I was getting excited because I could actually see the whole side part thing coming together, very well, and so the next thing I did was outline exactly where and how I wanted. My side part to look so I wanted a curved side part, and so I got some concealer and then I mucked out. You know the line for my parting and then I figured that I had way too much lace space available, because one thing I've learned from making and DIY closures is that you only need about half a centimeter width of space to ventilate in order to cover the Tracks, and so what I did next was basically use more of my thin wefts to fill up this space and I'll show you exactly how I did that. So I marked out three lines on the left side of the closure, and those three lines are where I would sew down some thin West just to fill up this space and I made sure to leave my little half a centimeter space for ventilation. So next I just measured the length of the track that I was gon na be sewing down, and then I cuts the end like so and then I just sewed it down. So I did this three times, but I'll come back in a few seconds to show you what I did after so when it came to doing this. The third time I decided to carry on stayin a little bit further down. So I took this all the way to the middle of the closure and you guys will see what I'm talking about and so the reason why I took it that far is because initially I wanted to take it all the way to the other side. But I start tough way to kind of see if what I was doing was making any sense and so yeah. That'S the only reason why I took it halfway. So here's how it looked once I'd finished that and now I had to decide what to do with the other side of the closure. Now the options I had was to either sew down some tracks to fill up this space or just been today, and I decided to just ventilate it because I didn't know how it was gon na lay - and this is also a side that I wanted to lay Really flat because it's gon na be the right side of my head, where I want my part in to kind of be, and so I decided to go against sewing down any tracks there and then I just ventilated and said so to ventilate. I made sure to clasp the wefted section of bee hair and then I removed any of the really short sections I'm not going to be able to ventilate with, and then I hold the hair on the thickest section of the strand. Now. The reason I do this is because I want to make the most of every single hair strand, whether it's long or short, I want to make the most of all of it. So I hold the thickest section and then I fold in half and I kind of run my fingers through it like so and then I begin ventilating right so technically. This is not ventilating because we are not using a ventilating needle, like I said in my other video, I'm not that advanced. I haven't reached that level yet and I feel so much more comfortable using my little nitpicker. So why I did was I ventilated in front of the tracks just to try and cover it, and I realized after about three words, I covered the tracks, so I really could have gotten away with using more tracks to fill up the lace instead of ventilating as Much as I did so, that's just a tip if you decide to make this wig, and I also been today at the other side now once I got to the middle, I then added another thin track, because I didn't need to ventilate all of that space. I also made sure to sew down at the track in a curved fashion, so that my curved part would look as curved as possible. After that I got a mother pin track to fill in the space between the head. I'D already been slated and the knee track that I'd sewed down because there was quite a bit of space in between and you could really see the lace. So. Finally, all I have to do is eventually my half a centimeter width around the lace section now, when I'm doing this, I use around 2 to 3 hair strands, and that just makes it easier for me to cover the tracks and if you do decide to use Like only one hair strand, you might end up having to ventilate a larger surface area and it will take you a lot longer and a random tip that I've basically just discovered. It'S really helpful if you put mousse on your closure, while you're ventilating, if any of the hair keeps getting in the way. So the means basically just like brushes down the hair and makes them stick down so that you can just carry on Ben's laying in peace and the hair doesn't get all tangled and like mixed up together. So, as you can see, my parting was beginning to look a bit harsh and so after I used the mousse, I went back over my middle part and did thinner hair strands. So I used one to two to make it look more realistic, I'm more natural and just not too harsh right. So finally, I washed the hair, and then I laid it like. I would a regular closure or frontal wig, and then I brought out some edges now. One thing I didn't think about when I was making this week was edges, because I plan to use my natural hair and lay that as edges, but it's just too difficult. My hair is way too thick and even the one bits of edge that I got towards my ear was too hard to lay, and so next time I make this type of wig. I'M definitely gon na try and mimic a realistic well like a pre plucked clay. We plucked frontal and um yes, so I ended up cutting it into a bob and initially I was like y'all. It'S probably not gon na turn out too well, because the hair was wet and it just looked so it just didn't look nice, but then the hair, dried and then I started to see the cows, and it just looks so it just looked cute and it just Looks nice and natural in shorts and so yeah. I hope you guys learn something. Oh wait. One more thing I haven't mentioned this: it's really important to use a concealer or foundation that matches your natural hair color. No, your your skin color, not your hair, color use a concealer or foundation that matches your skin color, but yeah. That'S pretty much it. Thank you so much for watching, and I hope you learn something from this tutorial and have a nice day.


Comments
UchihaMoonSerenity: I checked for updates everyday for weeks and here you come out of the blue with something so cute!
Jhunelle Thompson: This was amazing! Gna try rn and use this for inspiration!
Peyton Pendleton: Gorgeous per usual! Your work is immaculate❣
Cynthia's Life Corner: I missed you girl. Awesome video, your work is flawless✨. I liked right before I even watched the video
Akorfa Crystal: Your work is very inspirational
Lifestyle by Kam: Yass another slaytorialI just made up this word rn
Sonia Momnougui: Love all your videos, you inspire me a lot, do you bleach the knots after ventilating?
Dat9jascorpio Noturbizwax: I love your work sis.
Candy Holley-Hawkins: Amazing!
Temi Kojo: Am looking forward to see your crochet wig update
Beatrix AA: You're so talented
Anita Williams: I’ll need the full length version
TennisBlossom: Thanks you so much!!!
NIC ROSE: The question I need to know is do you sell your wigs cuz I want one like this
Teresa Moore: Thank you!!
N Martin: Hi, what hair are you using to ventilate, is it the same hair cut from the bundles you used for the wig? It came out beautifully, by the way! X
Jennifer Laignel: Beautiful
Tanzy The Glow Up Guru: Welcome back BEYOUTIFUL! MISS YOUR VIDEOS!! i hope all is well! Im rebranding my youtube and i started a second for other stuff! Sometimes u just got to express yourself in different ways or life gets boring and youtube videos become repetitive.not cool.thanks so much for the videos.love tanzy the trophy
Eby Georgee: Beautiful
nadia noel: Hi I love the way you make your wigs..can I ask where do u buy or get the not picker please? Or the small crochet needle from? Thank you
El Belle: Lord of mercyyyy you're really good....i wish i could do the ventilating but my hands get squishy and weird and i just stop......but imma try girlllll.....you're amazing
GRACE HERMAN: Is good to see you again gorgeous ,am very happy to see you❤❤
Madison Somuah: Thk,u,cuz I'm tryna start a business and wanted 2 see how to do it w/o a lace frontal but this is perfect and if I gotta do this on Sumone,I will charge extra,but thx,4 the help
CK vs Kk: Well done
Vivian Pretty: I love this
Siphelele_ Chauke: amazing love
Passion4 Beauty411: Wow thanks for the video
Sarah Lee: R u crotchetiness the hair in is that what you mean by ventilating? If so how did you do it flawlessly how is there no knot? Plz help
Afua Ahenkora: Had to subscribe to u as soon as I heard Otoolege playing
Yaoi life Yuvic: beautiful
Gracie Wandyte: Wow very beautiful. Love you
Miss k: Very btful ❤❤❤
Nicole Gladys Agbi: Just waoo
Kay Coleman: Now is that needle a small crochet needle
Tatianna Lee: Yay
M C Torres: Wonderful video
Kay I: Wow! I are talented!
milliondollar styles: Very nice
At this moment: nice
Endurance Tekyi: The video was so fast