Luvme Hair Water Wave Wig Install
- Posted on 22 February, 2022
- T Part Wig
- By Anonymous
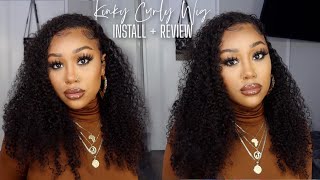
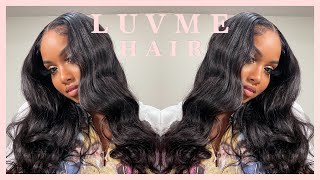
Hey you guys and welcome back to my channel today, i'm coming to you with another love me wig. This one is a glueless wig, we're actually going to go ahead and glue it down, but i will show you that it can be glueless and all of that i'm gon na pluck i'm going to go through all the steps of installing this wig. This wig is too good, okay, so anyway, this is the wig. This is the inside the construction of the wig. As you see, it comes with um the little band that you can wear the weird glue list. It'S uh like hd lace, it's already pre-customized and they pre-put it just a slight amount, but not much so um. I would definitely go back in and pluck it and customize it some more and here i'm just showing you how to go through and just pluck it, and i don't like to pluck it completely bald on the first install because we want these wigs to last a While so, i'm just going skipping a few hairs and plucking skipping a few hairs and plucking and i've just sectioned out three little sections and i just started from the back and came for. You can definitely pluck out more hair if you want to. But we want the wig to last and have longevity, so i just put it enough so that it's very natural looking not overly plucked or gon na start, looking bald really fast. So that's what i did there and you can tell the difference on the other side from the original hairline to what i put, you can definitely do more plucking, but i wouldn't um. Do it on the first install because some of the hair is going to come out anyway, so you won't have to um. Pluck it too much so here, i'm just going in after i'm done. Plucking it with the wax stick: uh, that's the edge tamer wax stick. I believe, and then my other uh prison call went out. This was taking a long time to heat up, but it i'm just pressing the edges back and then here i'm going in with the eyebrow razor eyebrow orchard. I'M just gon na cut the lace off because i like to cut my lace off first, i do not like to leave that excess lace on the skin. I like to cut as much of the lace off as i can now. If you want to apply with the lace, you can and then just cut it off, but i like to make sure any excess lace is not on there. So i'm just using the eyebrow um archer to cut the lace off and this lace is super super thin and then y'all can see right there that it just lays right down. You can wear this thing like glueless, you don't have to put any glue on there or anything. So i already already um braided her hair down and laid her cap down so y'all seen me do that a million times. I have some other videos with that on there and then i'm just cutting the x's stocking cap off and i used a ghost bun. I just used a little light line of ghost bun to lay um her cap down because it seems like it keeps it laid down longer and it doesn't start to slide back. If you do it that way, you just want to make sure you do it in front of the hairline and then i'm going in with a little bit of ruby, kisses and y'all. This stuff right here is so outdated and it can can totally be um skipped, especially with the new uh age lace that we have. Everything is transparent hd, so it will cover really well really. I don't even think a lot of times you even have to have a cap on, but just for protection, but here i'm just going in with a little bit of alcohol to clean that um extra makeup off and then i'm going in with some ghost bun xl Y'All know that's my favorite glue to use uh my go-to glue, because i i've used other ones before that worked well, but this is my go-to and it really does the job. I don't have to worry about nothing. I can apply three coats and uh just let it sit and that's what i'm gon na do here. Just gon na apply three coats of glue and i'm just spreading it with the end of that red tail comb and you can definitely use anything else. You have that can spread it, and that is the wig y'all y'all see how that sucker just laid on my hand, and there was no beginning or end because that lace, i'm telling y'all, is too good too good love me y'all did y'all think with this wig Right here, so i'm just sitting my uh sitting the wig on her head, i'm about to get ready to um, lay it down, so i just want to get it on. First so and then um adjust. It make sure it's in the right place and then i start laying um the wig, and then this is a glueless wig, so they have it curved around. Where um you just put it on, you, don't have to put anything on there. So that's why i'm having to have her to hold the side ear tabs down so that it'll stay in place, because this is actually a glueless, a wig. That'S meant to be glueless, but we went ahead and glued it down so that it can. Last for a while and she's, just gon na hold both ear tabs. While i get um get it laid down and also get it um comb back and the extra lace cut off the ears okay. So here i'm just going to separate the extra lace and i'm going to uh the hair with the extra lace on it. I'M just gon na cut over the ears like the sideburn area and over the ears, i'm just taking my scissors and i'm gon na. Do that and being careful not to cut into um straightened out uh? If you need more baby, hairless baby hair, you can adjust it here and also, if you need to do more plucking, you can do more. Plucking id go back in and do more plug, and i just didn't show that. But here i'm just using an elastic band to even further melt um, this lace, man. This was the myth that we used when first doing start doing lace, and i think this was something that i should have kept doing a long time ago, because it really melts the lace down and then here i'm just trying to get a middle part um. She is tall, so i had a hard time seeing so this part is kind of off centered. So don't judge me for that, but i was trying to get over her so that i can uh see so it's just kind of just a little bit off center. Just a little bit, but it still turned out really cute and i'm just taking my presser comb and just pressing the areas down. I did add a little bit more of the um wax stick to her hair. Just so we can get it laid down really good. Get the roots laid down really good, uh, i'm struggling with this pressing home. This is a extra pressing home that i had because the one i had um, i can't even remember the brand. I got it from target. It went out. He got a shortage, so i'm using this one that i got from the beauty supply. This stuff will burn through anything, but it takes forever to get hot. So if you want to use it, you need to plug it up like an hour ahead of time, but it's only like ten dollars at the beauty supply anyway. So yeah, i just got everything laid down and i'm just gon na pull the hair back uh. Out of the way for a minute, so i can get um the baby hairs laid and i also went in the back and i sewed the back part down now. You don't have to do that with um with this wig, but i did and then here i'm going back in with the tweezers. I tweezed it a little bit more around the hairline, but i'm just tweezing the baby hair some. So they won't be super thick. So you can get them as thin as you want to the hair that you choose to um make the baby hair. You can get them as thin as you want it to be. So i'm just going back in that's what i'm doing now and i'm just taking the tweezers and pulling it down toward her face to get the additional hair out and y'all can see that that lace is laid. Look at that it looks like her own scalp with their lace. They look like her own scalp and then here i'm just going to take the eyebrow orchard and i'm just going to cut the baby hair. You can do it with scissors or whatever. You have convenient to you, you just want to cut the baby here. I did it like about a half inch and then i did her some sideburns. I cut those also and now, i'm just making sure the excess hair is um, cut off, make sure there's no. Like strings hanging, i'm doing the same thing to the other side. You just want to cut about a half inch. I believe i lift it maybe a little longer. I don't know but um, i'm just cutting the sideburns now here and you want to cut it about the same size as the other side. So everything will be even and then here i'm just taking my red by kiss a little mini pencil flat irons and i'm just curling the baby hair back. I know my elbow is in the way, but i'm just curling the baby hairs back and then i'm just going to curl the sideburn downward. You can curl it back also just depending how you want your sideburn to lay you can also curl the baby hairs downward too. It'S totally up to you and i'm just gon na do the same thing on the other side. Y'All, excuse me: i'm looking a hot mess in this video, but it's totally fine and then i'm just uh curling the other side and i'm going to do the same thing. I did to the right side to the left side and then i'm just curling, the um sideburn here she's acting like i'm burning her, but i'm not, and then i hear i'm going in with the even um. I think it's called for life gel or something like that. I'M just going to use a little bit of it to put it um on the edges, and then this lotta body, milk and honey uh foam wrap. I'M gon na use these two items to lay the baby hair, the lotta body, uh, milk and honey foam wrap. It works to me just like the nairobi and it's like half the price. So if you're, looking for a good um foam, wrap um it that milk and honey a lot of body, it works, really really good and i'm just using my little edge brush and then the foam wrap and i'm just gon na lay the baby hairs down. And i told y'all this week can totally be done without any baby hair, because the lace is just so good. It'S like really really good, so you can um do this without any baby hair or you can do a whole lot of baby hair just a little bit of baby hair. So i'm just doing the two like big baby hairs. I guess you want to say on the side and then i'm gon na do her sideburns also y'all. This wig is a 22 inch water wave like it's hd, transparent lace, it's supposed to be glueless, um and um. It has combs. It has everything in it that you need to do this thing without putting any glue on there. You can just probably use like a little spray or gel. If you want that um glued look, if not you don't have to put nothing on there. You can just put it on and lay it down and then here i'm just going in and doing the sideburns, i'm just kind of doing like a little curve sideburn and then just make sure any excess hairs or back. And then that's how my sideburn looks right. There y'all that's cute ain't, it i know okay, so i just went back in and i put a little black wrap over it so that it can dry and i did both sides the same the exact same so and you just want to be careful pulling your Black wrap off make sure everything is dry before you mess with it and then um, i'm just making sure like the little excess hairs and all that now, that part is just a little bit off center. It'S fine! This is art. This is not um perfection. So it's not everything is not going to be perfect, but the hair is soft and luxurious and beautiful. This hair is from love me. It'S a 22 inch water wave glue. This wig, don't forget to like comment, subscribe click that notification bell so you'll be notified. Whenever i upload a new video also leave a pink heart in the comments. If you love this video, thank you guys so much for watching and i'm back
Comments
Tennia Collins: Love how you did this install came out amazing
Shantryce: Ive been looking for a pencil flat iron for my short relaxed hair. How do u like that one you used?
Phyllis Gandy:
Gail Hopkins: My GOODNESS where have u been!? I have not received video's of yours in months! Was thinking RECENT of u & so glad to get this today! U have such a admiring REALASHIP with your son girlfriend! I long for that as well. I call her a daughter of Ruth a beautiful women who cling to her mother in law even after her husband have pass away! What a BLESSING u have in her & u with her ad well. Pray my son meets his Ruth! I live your work! I first did her leave out WEAVE! I still refer to it for a flawless leave out! grace to u & all.gh
Samantha Morgan: