Affordable (Must Have) $90 Amazon 99J T-Part Wig | Step By Step Install | Ft Beautyforever Hair
- Posted on 11 February, 2021
- T Part Wig
- By Anonymous
HI ROYALS✨
WELCOME BACK TO MY CHANNEL
●▬▬▬▬▬ ❤ #BeautyForeverHair ❤ ▬▬▬▬▬●
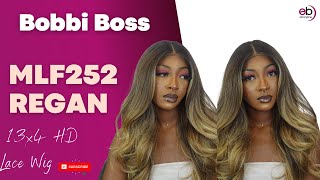
I’m Using 99J Straight Wig 14"
GET IT HERE:https://www.amazon.com/dp/B08N9PLWG6/r...
Best Kinky Straight 3/4 half wig:
https://www.amazon.com/Beauty-Forever-...
Headband straight wig:
https://www.amazon.com/dp/B08L666PZN/r...
Lace part body wave:
https://www.amazon.com/dp/B08LYQPCM1
HD lace closure with bundles:
https://www.amazon.com/dp/B08RBHLW6L
13x4 Lace front wig:
https://www.amazon.com/dp/B08TWKZM66
T part straight 99J color Wig:
https://www.amazon.com/Beauty-Forever-...
Bob headband wig:
https://www.amazon.com/dp/B08SQB9SCN
Three part lace wig:
https://www.amazon.com/dp/B08SQJNX3N
Lace part Bob wig:
https://www.amazon.com/Beauty-Forever-...
2 in 1 wrap wig:($50)
https://www.amazon.com/Beauty-Forever-...
https://www.beautyforever.com/
➤ New Arrival Wig:http://bit.ly/2K74K8l
Hot Headband Wigs:http://bit.ly/34mPZVH
Straight 3bundles:http://bit.ly/389klMs
Straight 3Bundles&Closure:http://bit.ly/3numCZb
Straight 3 Bundles& Closure:http://bit.ly/3anezK0 Wigs:http://bit.ly/2WsK4Ku
Half Wigs:http://bit.ly/3msyqtC
Lace Part Wigs:http://bit.ly/3r7tH41
Lace Front Wigs:http://bit.ly/3nwi9VQ
Aliexpress Beauty Forever Website:http://bit.ly/37tKrdW
Hot Sale hair on Aliexpress Store:http://bit.ly/3gWjV01
Amazon Beauty Forever Hair: https://amzn.to/2KSGkyB Instagram@beautyforeverhair: http://bit.ly/IGBeautyForever Beauty Forever YouTube Channel:https://bit.ly/34a1Y8Y
_____________________________________________
TIME STAMPS
00:00 - Starts
00:18 - Intro /Beauty Forever hair 99J 14" T- part Wig
01:02 - Specs on 99J 14" T-part Wig
01:54 - T- part Wig customization
02:34 - Wig Prep / Styling
03:28 - Wig Installation begins
06:24- How to lay baby hair on T- part Wig
07:04- Final Touch up/Customization on T-part Wig
08:46 - Initial thoughts on Wig ( PROS/ CONS)
THANK YOU FOR WATCHING *
____________________________________________
PRODUCTS USED:
Esha Absolute lace glue
Isoplus oil sheen protective hair spray
Gorilla snot gel(PUNK)
Wig dealer Wax Stick
Got 2 be blast freeze spray
LIKE + SUBSCRIBE + COMMENT
Hashtag #BEAUTYFOREVERHAIR #TPARTWIG #AMAZONWIG #99jWig
_____________________________________________
♡C O N N E C T W I T H M E ♡
⇢https://instagram.com/cosbeauq?igshid=...
⇢https://www.facebook.com/latoyaroanna
⇢https://twitter.com/Toya_Roanna
____________________________________________
⬇️Music credit⬇️
▶︎ Beat produced and provided by MaluMusic ▶︎ Beat Link → https://youtu.be/AvktW0OgKZM ▶︎ Browse, listen & download royalty free music produced by MaluMusic → https://www.youtube.com/channel/UCEN2... ▶︎ Stream MaluMusic on Spotify → https://open.spotify.com/artist/23apl...
_____________________________________________
FOR BUSINESS INQUIRIES/ PROMOTIONS↙
Color you guys look at this hey royals and welcome back to my channel today, i'm going to be showing you guys how i installed this 99j 14 inch unit that i got from beauty forever hair. It came in this cute little box right here. This is their tea party unit, not to close your wig just a teapot unit that could only be part in the middle i'll leave all the information in my description box down below. So if you guys are interested to see how i laid this unit i'll keep on watching, don't forget to subscribe to my channel if you haven't as yet give this video a big thumbs up and to comment down in the comment section board down below. So with no further ado, let's jump right into this install, so the wig that i'm going to be installing today is from beauty forever hair company on amazon. They sent me over their 14 inch, t-part wig in the color 99 j inside of the box. Along with the wig i received a pair of stocking cap and a cute silk scarf so straight out of the box. The hair was really soft, really nice and i love the texture on this unit. So a bit about the cap construction. This wig is a silk based closure and it only can be worn in the middle part. So inside of the wig, it has two combs to the sides and one to the back, and it also came with adjustable straps. So you can adjust this wig to your particular liking. I didn't like the silk base closure. So what i did. I went ahead to cut the silk base off, so i took my scissors and then my razor blade to cut it out. So this is how it looks after it would blend perfectly with my skin complexion. So i wanted it just like that. So i attempted to bleach the knot on this unit. However, the lace did not bleed, so i would just recommend you just adding your foundation so after i finished bleaching the knots on this wig and i washed it and everything i'm going in with my protective hair spray before i start to flat iron this unit. So i'm just going ahead to flat iron, the wig i didn't know if i wanted it straight or if i was gon na curl it or if i was gon na cut it in a blonde cut, but i just decided to just flat iron the unit. So after i finish flat ironing this unit, i'm going in with my wax stick from wig dealers to just lay the parting space on this wig before i install the wig onto my head. So that is what i'm working on and after that, i'm going to move on to the insulation process. I have my stocking cap on. I'M not going to be doing the ball cap method, i'm just going to be applying the wig, just as you see it. So i'm just going to be taking my foundation brush, so i just use my black opal foundation in the shade carol and i'm gon na just cut off the extra lace to the back. So this is the parting space. So i'm going to be using my rubbing. Alcohol to clean off any sort of extra makeup before i apply the wig and then i'm just going to cut off both sides of the lace i'm going to be using my escher absolute glue. This is like my holy grail when it comes to glue, so i'm going to be using two layers of this glue, so i'm just applying the first layer of the glue, i'm just blending it out with the end of my comb and when that is dry, i'm Just going back in with a second layer of the glue, and i'm just going to repeat the process that i did before so after i finish blow drying my hair, i'm pulling the lace onto it while the glue is tacky and i'm going back in with my Blow dryer now i'm taking my got to be blast free spray. Just to put on the edges of my hair before i tie my hair down with my elastic band just gon na. So after i finish trying my hair with my elastic band, i'm just gon na go in with my comb to take out some hair to pluck that out with my fingers. So after that, i'm going in with my wig dealer wax stick and i'm just going to flat iron the top of this unit, so everything can be on flat flat. So after i am satisfied with how everything is laid, i'm going in with my oil sheen to spray my hair before i go in with my flat iron, so i'm just going to flat iron everything out, go back in with my hot comb, just to make sure Everything is laid how i want it to so after i'm satisfied with how my hair is laid to the top i'm going to be cutting off the extra lace to the front portion. I normally take my scissors and what i do i cut in a jagged motion. I do not cut straight across because it makes the wig look wiggish. So after i finish cutting off the extra lace to the front, i'm going in with my black opal foundation, and i'm just going to put that in the part of my wig and after that i am going to start to work on my. So i'm satisfied with the amount of hair that i took out to lay my baby hair, i'm just going in with my razor comb to razor down the hair a bit and after i'm going in with my scissor to just cut everything the way i want it To so to lay my baby hair today, i'm going to be using my holy grail, my gorilla snot gel in a punk, and i'm just going to use that to just lay my hair today. So i'm just going to swoop my hair in the direction in which i want it to go and to clean off any sort of pla build up. What i normally do is i take a baby wipes to just wipe off everything. So after i'm satisfied with how my baby hair is laid, i'm going back in with my wax stick and then i'm going over that with my hot comb to make sure that the parting space is laid really flat. You guys so to finish up the look. I'M just going to cut my wig in layers because the end of the wig was on the tin side, so i'm just cutting it in layer so that it can frame my face to my liking. So after i'm satisfied with how everything is layered, i am going back in with my flat iron to make sure everything is smooth and looking flawless. So after i finish flat ironing this unit, i'm going back in with my sheen spray. Just to add a bit of shine to this unit - and this is the end result of this unit - you guys stiff clear, so you guys this is the end result of my install as you guys can see like stick. It was a quick and easy install because it's not a closure wig. Neither is it a lace front wig. All you have to do is just lay your wig down. We got to be blast, free spray, the glue or anything that you desire today. I just used my gorilla snot gel because i'm not going to be keeping it in for long. The first thing i noticed when i got this unit, it was really soft and after i washed it and flat iron it. It is still like soft. This unit is 150 densities and inside of the box they send stocking caps. They send a head scarf. So this is the head start. This head scarf is really cute. It'S pink and mold because saturn head scar, you can tie down your wigs, so this unit retails for 98, 98.95 on amazon, so it's below a hundred dollars and for the price this unit is like bom. You guys my on this unit. It only can be worn in the middle, and i use my foundation in the knot of this unit. If you pull too hard on the lace, the lace would eventually rip and my lace actually rip. I might eventually cut it into a bob or leave it as is or curl it. You know, i'm gon na see how versus how it is, how it takes curl and give you my final review on this wig. That would be really nice like look at this color. You guys look at if you are interested in purchasing this unit. I'Ll leave all the information in my description board down below, so you can go and check out the beauty forever hair company. All the information will be in my description box so until next time always remember to put god first and see you in my next video, you


Comments
Kiva Hunte: Ouuuuu this is super cute
Life With Shania: You slayyyyed this install ♀️
Silky Saks: I love your editing You laid this wig down. This is great color. I want to try a T-part unit. Nice review
Angela Pitt: This color looks good on you!! Love how the whole look came together❤
Miss Blaze: I'm so jelly!!!! Love the colour Amazing video hun!!
Nyla Allure: When I tell you amazon be coming through girl this is gorgeous and you are so pretty
Jeronique Labban: u really know how to make these thing look natural. I'm impressed.
Styles By HONEY: Yess I’m here for this color The hair is niceee , You DEF laiddd and slayeddd Loving them baby hairsss OKAY You meltedddd this PART, sus ! Lace who? Lace where? I know this would be cute cut into a bob , too STIFF WHERE ??!! NO STIFF
Patricia John: Lovely
GrowWithNiki Gaga: Yaasssss slayed. Love the colour.
marvelous sweet411: Hey I must say this color looks amazing on you Ike always I'm good to you
Norma Lee V: Hello beautiful I miss your videos so much! I will be catching up!! you need to give us some tutorial on them brows sis!!!
Danni Bee: It’s the color for me ☺️☺️ You look so beautiful
Fee-Bee Rome: This is super pretty love this color gf.
jai trinidad: this is so nice. stay safe and see you around!
Ythera Eve : Wow beautiful hair wig, sending full support
NHỚ QUÊ.: So beautiful my friend
ATouchofEcstasy TV: I KNO DAS RIGHT