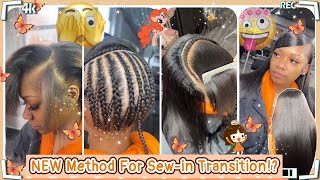
New* Versatile Middle Part Quick Qeave With Leave Out From Start To Finish Ft. Arabella Hair
- Posted on 20 May, 2022
- T Part Wig
- By Anonymous
Tutorial showing you in detail how to install a quick weave from start to finish. This is super detailed and beginner-friendly. A new method for 2022.
❥══════════ #ARABELLAHAIR OFFICIAL═══════════❥
Same hair bundle in the video➤https://bit.ly/3OKNSjX
Hair info:Virgin human hair Straight Bundles 24 inch
—————————————————————————
Exclusive Coupon Code: "Say12" get 12% OFF
Arabella Hair Hot Sale
Top.1 affordable 13x4 #transparentLace Front Wig➤https://bit.ly/3ktDlf4
[NEW Trend] Skunk stripe Wig➤https://bit.ly/3KAbLr3
Affordable T-part lace wig➤https://bit.ly/3MAjkQ2
Protective edge glueless Headband wig➤https://bit.ly/3KAbPXP
Arabella Glueless V/U part wig➤https://bit.ly/39h1CTi
Cheap Transparent lace closure wig➤https://bit.ly/3OM5JXI
(No tangle, less shedding, human hair, last to more than 1years!)
❥══════════#arabella hair official═══════════❥
Why choose #ARABELLAHAIR company?
✅100% raw human hair vendor
✅3-4 days fast worldwide shipping
✅Good quality/affordable price
✅Can be dyed, bleach, ironed ect, without damage
Follow arabella hair for giveaway:
Youtube: https://bit.ly/3Ou6vZe
Contact for promotion:
Email: [email protected]
WhatsApp:+86 18937456160
Supplies Needed:
Hair
Hair glue
weave cap/ stocking cap
hair protectant or Got 2b glued hair spray
blowdryer
scissors
White eyeliner/lipliner pencil
Steps to install quick weave:
PREP:
1. Braid down your hair (optional, can pull into ponytail/slick down), and make sure to leave out enough hair at the top to cover your tracks.
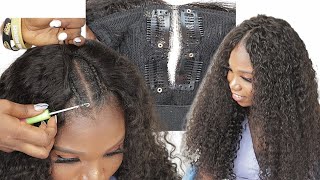
2. Put on the wig cap (any color)
3. Use a white eyeliner/lip liner pencil to mark the area around your leave out
3. Apply hair protectant to cap avoiding areas of hair left out, can use got to be freeze spray or morning glory hair protectant
4. Blow dry hair protectant making sure it is COMPLETELY dry
INSTALL
1. Measure the track hair against your head from ear to ear
2. Cut the weft that you measured
3. Apply hair glue to track and allow to dry for no longer than 30 seconds
4. Lay the track onto your cap beginning at the bottom and working your way up
5. Repeat the above steps until you reach your leave out
6. cut off the remaining cap that's exposed (be careful!!)
7. Style your leave out as desired
Watch my other videos!!
How to Takedown your quick weave:
Quick Wweave install with Wiggings hair:
What'S up, you guys welcome back to my channel or welcome to my channel if this is your first time here, my name is diana and in this video i'm going to show you how i do my quick, weaves um, the most important thing when it comes to Quick weaves is your foundation. You want to make sure it's as flat as possible underneath your wig cap. So what i'm going to do is give myself some braids just going straight to the back and i'm going to leave out my leave out in the middle. In my leave out on the sides, now you don't have to do braids if you don't want to, you, can slick your hair back into a lower ponytail. Just for me um. I have like a like a bump in the back. If i try to do a lower ponytail, so i just like to do braids because it just ensures it's flat all over um. If you don't know how to braid, you can also try twists but braids work for me granted. My braids aren't the best, but i do what i can so you can see. My braids are just going straight to the back, and then i have my leave out left out on the top and the sides i'm just going to bobby, pin my my braids in the back to my scalp to make it flat, but i'm going to braid them. First and then pin them up. The next step is going to be to apply your wig cap, i'm just using a black basic wig cap that i got from the beauty supply store. I'M going to use a white eyeliner pen just to mark where my leave out is so that when i apply my tracks, i don't like overstep my boundaries and glue tracks where they shouldn't be. It'S kind of like a guide to help me know where i need to stop when i'm gluing my hair. Next, i'm going to use the morning glory, hair protectant, i'm sure there are other blank brands, but this is just the one that i use and i'm going to put it all where my braids are stopping, where that white line is and then after that, i'm going To go and blow dry it and while i'm blow drying it, i'm going to go in and spray got to be free spray. On top of it, the got to be free spray kind of makes it hard, so it solidifies um and just creates this like hard underlining shell, that i lay my my tracks on top of my step in preparation, is just cutting out my ear holes, and now I'M ready to lay my tracks down, so the hair that i'm using for today's install is from arabella hair. They sent me four beautiful 24 inch, um straight brazilian bundles. All the information for this hair will be in the description box below this hair is so silky and soft. So let's go ahead and start laying down the tracks. So to me once i get to this part of the install, this is the easiest part and it goes by the quickest, because it's so simple, all you're doing is gluing the hair down to your. The one thing that you want to do is make sure you're measuring the hair from end to end, starting in the back. You don't want any cap showing so just make sure it goes to the end you're going to cut it you're going to glue it and you're literally going to repeat until you get to the top to lay down my tracks, i'm using the 30 second glue. I'M going to put it on the track after i cut it, i'm going to blow it a little bit just to kind of make it tacky, because it's a 30 second glue and then i'm going to lay it down. I'M going to use my fingers to kind of like feel where it should be, particularly my thumb. You can't see my thumb, but i'm using my thumb to feel where my cap begins basically at the bottom and then i'm laying my track right. On top of that. All right, so we have one track down and about 50 more to go, so i'm gon na show you those steps all over again. I'M gon na show you about like three times in total because just to make sure you get it, but what i'm doing here is i'm taking the hair and i'm gon na measure it from ear to ear. When you start getting like behind your ears, it makes it a little harder to feel where the track ends, but it's fine, because your ears will be blocking it as long as it goes from end to end. That'S all that matters and then you're going to take your scissors you're going to cut it, and i like to re-measure it after i cut it just to make sure it's in the right position and it reaches from end to end. Then i'm gon na apply my glue. Let it dry a little bit and apply it as i move up to the next track. I'M using my ring fingers to feel where the last track ended and i'm using my thumbs to hold the ends and then i'm laying it down it's really about how you hold the track. That makes it easier to lay it down. If you hold it properly, then you'll be able to feel where the last track ends and where you should be laying the new one. After laying a couple of tracks, i like to give it a little blow dry just to seal everything in place, even though i let the glue dry for 30 seconds, i just feel like this makes it extra secure okay, so one bundle got me almost like halfway Through my head kind of like where my ears are now i'm on to the second bundle, the next thing that i want to talk about is when you start getting to the part where this white line is, i'm actually laying my track a little bit behind. Where that white line is because i can see, that's where my part ends um, i didn't want to go all the way to the white line, because i know i'm going to wind up cutting that off when i cut it in the um. When i cut my cap, so i just wanted to make sure i stopped right there, but once you're comfortable with you know blocking out where you want your tracks to stop in the front, it's the same thing over and over you're, just measuring cutting gluing and repeat. Okay, so second bundle down it got me all the way almost to the top of my head um. So now, i'm gon na lay one more track going from side to side all the way up until when the bottom part of the v meets my track. As you can see right there and then i'm going to start laying my tracks vertically at the top. I like doing that, instead of doing like one long continuous line when i get towards the top, like one continuous view um, i don't know it's just a personal preference for me now, i'm gon na go through and blow dry the rest of my tracks a little Bit and then go through and cut my cap, then i'm just going to lay down the remaining couple of pieces of track that i have until i fill in that white space, then i'm just going to give it a quick blow dry, all right and so the Hardest part of the install is really done now. We just need to go through and cut off that remaining black cap being super careful not to cut your hair because i've done it before and it sucks and then actually i was super happy about this install because i actually laid this down perfectly this time. I did not have to go through and add any extra hair onto my onto my leave out like i laid it like. I laid the perfect amount of hair down, so i was so happy um yeah. So now i'm going to go ahead and style, the hair. So the first thing that i'm going to do is flat iron. My leave out y'all make sure you use heat protectant when you do this, because i did it and that's exactly why my hair is broken off in the front and i'm pretty sure you don't want your hair to break off like mine did and once that's done. I'M going to go through and lay down my edges, i'm using the edge booster edge control um in the red jar. I don't again, i don't know what each of these jars do. It'S just like maximum hold or something like that. It works all right. Honestly, truly, i didn't, i usually relax my edges, but i haven't relaxed my edges in like a very long time and so they're very natural and it's harder to get it to lay down with this edge booster. So i did go through and use spritz, but i did that off camera and, finally, last but not least, we're gon na go through and flat iron. This hair, this hair is already straight, but i just like to flat iron it to make it extra sleek um. I didn't spray any product on it, because i just wanted to see how the hair behaved without product and it behaved fantastically. This hair is so silky and it's very soft. I can't wait to put some curls in it. It'S so pretty, and it blends so well with natural hair. Again, this hair is from arabella hair check out them all. Their information is in the description box below y'all and we are done honey. All of your blood, sweat and tears has paid off, because now you should have a flawless install. This came out so good, i'm so proud of myself. Look at that flat install at the top. We don't have no bumps! No lumps look at them. Lay edges. Look at that silky hair. I give this style a 10 out of 10. Definitely recommend. Look at the versatility that you have in this style. You can pull this hair back into a sleek ponytail and it looks so natural. Yes, this is what we are going for. Anyways, you guys that's it for this video. Thank you so much for watching. If you like this video make sure you give it a thumbs up. If you're new to my channel definitely make sure you hit that subscribe button and again all the information for this hair will be in the description box below. If you have any questions, let me know leave it in the comment section and i will get back to you but yeah. That'S it for this video adios till next time.


Comments
Dee Luther: Great Video as always Super Gorgeous thumbnail tho Beyond Pretty you are Makeup on Point Nice Cheeks Structure Happy Amazing Weekend Too Stay Bless n Be safe always
Yolissa Hair: Dear pls check my email!
Kaiii Prettyfacc: How doesn’t your hair puff up when it’s hot outside?