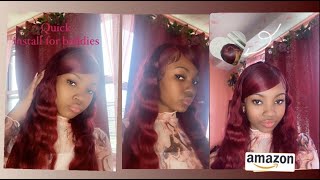
Watch Me Dye And Install This $90 Amazon T-Part Wig ! 31 Days Of Hair (Day 4)
- Posted on 06 December, 2021
- T Part Wig
- By Anonymous
Hey fran !
In this video, I am showing you a video on how I bleached, dyed and installed this t part wig on my 15 year old client !
Enjoy and remember to like, comment, and subscribe!
Social Media
❤️Facebook : London Tayy
❤️Instagram Hair page :@thelondontayy
❤️Instagram Personal page: @londontayysway
❤️ Amazon Storefront : https://www.amazon.com/shop/londontayy...
❤️ Business email : [email protected]
Location: US -Columbia, SC
————-
Hair used:
Products used in the video:
bw developer:
40 volume developer
biosilk serum:
aphogee mousse:
carrot oil:
got2b spray: https://amzn.to/3nMucAP
got2 glue cream: https://amzn.to/3lqJSrI
lustrasilk wax stick:
cajun spice semi permanent hair dye (2)
mocha semi permanent hair dye -just one squirt-
ruby kisses cream foundation:
Hair tools used :
conair blow dryer:
babyliss flat iron:
hot comb:
crochet needle:
elastic band spool:
nude cap:
edge brush:https://amzn.to/2WgCypc
rat tail comb:https://amzn.to/2UHPp3h
tweezers:
------------
Music by Liles Music - Better Days Ahead - https://thmatc.co/?l=44F087C0
Music by Liles Music - At His Feet - https://thmatc.co/?l=AA03EA01
Music by Liles Music - Another Chance - https://thmatc.co/?l=5C731CDC
-----------
keywords:
Uh, so foreign um, hey y'all, so welcome back to my channel. This is londontay coming to you today with another video girl. Today'S video, i'm going to show you guys how i dyed this tea party wig and also how i gluelessly installed it on my client. It'S her birthday. She is 16 years old girl. This is our first time using a wig, and this is what we're using so we're using this eunice wig guys. This is a teapot wig, as you guys can see, it has blonde strips at the front and then it's just like everything else is kind of like that two color number two color number one being the back okay. So i'm going to use bw powder as well as developer, now you've seen the 20 volume developer at the beginning, but guys i end up using the 40 volume developer only because i know it will lift better and then it will look quicker because i don't know If i got time to stay here and wait in hours for a hour or two for this little for this, to lift okay at 20 volume develop per rate - okay, so right here guys, i'm just going to section off a little bit, i'm just going to use Half of the bag - okay. 16. Inches. It'S 180 destiny! It'S not that thick. So i feel like a half. A bag of that bleach will work the bleaching powder, and this is a 40 volume developer, i'm just going to keep pouring pouring until i feel like it's soupy. Okay, until i feel like it's soupy enough for me to kind of you know, stir it around now. I'M going to just kind of put some hot water a little bit of hot water in it, and i'm just going to see if i can go ahead and just mix it really really well, if it's too runny i'm going to add more developer, because i want It to be like a creamy base, you know i want it to be kind of creamy, but still liquidy. You know what i'm saying still movable so anyways um here i am about to put the wig into that um into that bowl guys. I did not put that much of water - i put maybe a little bit more water to make sure that everything is kind of able to submerge when it's like flat to the ground. Now another thing you have to take into consideration or i had to take into consideration. I had to remember that we had the blonde pieces now. It would have been a lot easier if you didn't have the blonde pieces, and i just can lift you know everything at one time, but since she had the blonde pieces guys, i didn't think it was smart to just go ahead and bleach the whole thing, because I feel like the blonde pieces would have broke off okay, so what i did was i just sectioned off the blonde piece and just held it in my hand, and then i kind of just dunked the rest of the wig into that bleach bath. Okay, i'm running my fingers through just to kind of distribute it somewhat um, just to kind of you know, get everything started now. One thing i'm one thing i did have to take consideration, even though the blonde is there, the roots are still dark. So what i had to do is in order for me not to process it. I mean i think it. You know i got on it a little bit, but i didn't want to just completely submerge it, because i just was scared. It was going to break off so and it did not break off guys, so it did pretty well, so i'm just kind of flipping the wig back and forth, getting it on the outside, really good, getting it on the roots where that blonde is okay. Just using my fingers just using my fingers and just kidding trying to get everything in okay and i'm just going to do that for a while guys and then eventually, i'm going to get a comb and i'm just kind of going to comb everything through. But for right now, i'm just kind of piecing everything with my hands: okay, y'all. So after i let everything sit. I just let everything sit for 30 minutes after i combed everything and applied all the bleach and combed everything through i let it sit for 30 minutes and now it's like thick. You know it feels thick um, i'm just going to kind of go through the wig. Again and just make sure everything is coated, coated really really well and i'm going to kind of let it sit for another 10 to 15 minutes just to make sure that it's you know, still wet because y'all when i had the wig, i didn't cover the wig Up and it was cold in my house, so the wig kind of felt cold and i was like uh. I wanted this going to stun the bleaching process. So what i decided to do is i decided to kind of just start combining everything at this point. Um for the most part, like i didn't care about the blonde getting wet, because i didn't know you know it didn't matter about it wasn't going to be in there longer to me so um. I had end up putting it in that that bin and closing the lid just to kind of trap, some heat and then after 10 to 15 minutes. Now, i'm just rinsing it out with water guys. So now it looks so dark y'all. Whenever i got this really wet to rinse out - and i was like - oh my god - this did not work like what so, but it ended up working guys, but i ended up using two bottles of that cajun spice. So what i decided to do is i initially was going to do like a watercolor method. So i just kind of filled the tub up a little bit with water on the sink up with warm water, and then i just kind of put that bottle of that. Cajun spice in there i mixed it up really really good, and then i dunk that wig into it to see you know, okay, what color is going to come up with the blonde look pink y'all. The blonde looks like it looked pink. It must be like hints of pink in this cajun spice color, because the blonde was just like freaking, pink, okay and i was like well. This is not gon na work. Like i don't know, this is not orange like wait like this. Doesn'T look right and guys. You can see, like you see how that blonde you know took or whatever, but everything else just looks really dark and i'll just like so i was like you know what i'm gon na get this other bottle of cajun spice and i'm going to just kind of Just plaster it on there and i'm going to focus more so on the blonde, because i feel like the blonde needs work. So i end up using that using that doing that doing that and um i end up kind of you know just distributing it throughout now. Y'All so since the blonde i was like okay y'all, look at that that just didn't wait like no girl, so i kind of end up massaging it and i just literally just end up dumping the whole bottle on the wig and kind of combing it through coming Through and then i let it sit for like 10 to 15 minutes, and then i rinse it out and it turned out pretty well turned out way better than i kind of expected um since i did have to kind of bleach everything in different times and the Blonde was already there, it wasn't perfect, it wasn't like one normal color. It had like different dimensions in it, which actually didn't turn out bad, as you guys can see from you know the beginning of the video so yeah i just basically you know just doing that. Cajun spice now y'all. So since i was like, oh my god, this is pink. How do i add more like orange to it? I end up getting the color mocha and that's like a dark brown color i'll put a little bit of that mocha at the front where that blonde is because i just kind of wanted to it to be like a rich color like i wanted it to be. A rich color, so i added literally like one squirt of the color mocha and that's that brown only because i had that black blonde y'all. If i did not have that blonde, i would not have added that color mocha, okay, so yeah. So here i am girl. I'M literally just about to slap some braids into her head girl, 10 braids. Her hair was thick. She didn't detangle it. It was oily. I was like you know what we're just going to get these braids as flat as we can get them real, real, quick, just stuff, these braids up in her hair girl and it's going to work out. So i end up putting like 10 11 braids on her head, nothing special and then i put the stocking cap on it so guys with the stocking cap. What i ended up doing was, i ended up doing like a regular stocking cap method. I don't know why that footage isn't in there how i apply the stocking cap, but i end up just kind of uh. You know just putting it like. I was gon na put over a whole frontal, and then i just um cut out the space where i'm going to have this. This is just a closure wig. I just cut out a little tiny box of where the part was going to be just so um everything still looks um scalp, like underneath the wig, so i still wanted that little section that little piece of that wig cap, but i didn't want it over the Whole thing um, but when i entered the brace i did kind of use the crochet needle and kind of crochet the braids, the leftover braids onto the hair. So that way everything still laid flat and everything was just still. You know flat - and i didn't have to put like a wig cap in the back or anything like that, so i'm just braiding her hair down, like i said, y'all, just combining all the braids. This is how basically everything looks. I am going to oil, her scalp with some carrot: oil um, everything i'm using it will be in the description box below and it was pretty much at the beginning of the video okay, so um yes, i moisturized my scalp with that carrot, oil and then, like I said for that wig cap. I only use like a little square of the wig cap and how you do that is you just literally just put the wig cap on and then you use like some got to be glue cream or spray or whatever, and you spray what you want to keep. Okay, so you spray the front and you spray the sides and the back where you want it to be. Okay, i was debating i'll say: should i do a wig out, but i thought about it and i'm gon na she has straight back braids and i'm like in order for it to look more flush. That is how the color look y'all. It was see how it's a little little blotchy, but it's not bad. Okay, it's not bad, especially when you style it. It looks pretty like it looks like you meant to do it. You know um, so yeah, you see how i kind of just put it on. Initially and then she was going to sew everything down, but i was like it's not a frontal like. I don't really need to do that, but right here, i'm just kind of fitting it on her head just to see how i'm going to have it. Now it's a teapot wig, but you don't have to just make it a middle part. You can definitely make it a side, part um, so i end up making it the side part because she wanted a side part all right. So i'm just kind of fitting everything and seeing how i'm have everything: okay, okay, okay! That'S what we're doing that's what we're doing um! So after that um, i'm just gon na brush her edges out the way i'm gon na brush them all back. So i was trying to debate should i leave some of her edges out, but i end up not leaving any edges out end up putting all her edges out up eventually and then i end up using that wig cap you see that wig cap underneath guys. I literally just put that godzilla glue spray at the front and then i sewed the size of that wig cap and there we go as far as that wig i use the ruby kisses contour palette in the lightest shade, and i put a little bit of that. Underneath the the wig lace part just so it can kind of blend in a little better, and i put a tiny, tiny, tiny tiny bit on that wig cap, just to kind of make sure it wasn't like flushed out. You know it just wasn't too too, too light um. So this is a glueless install guys, but what i end up doing is i just use that guy to be glue, um cream. I don't know where all that footage went, but i'm just gon na explain it. I did like uh two layers of that got to be blue cream um, underneath the wig and i just kind of combed that lace into it, and now i'm just kind of cutting the extra lace that i do not need. It looks you know, looks crazy. You know whatever, but we don't we're gon na figure it out, because it's just it just needs a little bit of plucking, so i'm just gon na she want. She wants um baby hairs or she wants. You know full baby hairs all right. So what i ended up doing was i'm sectioning out where you know the baby. Hairs are going to be probably and then i'm going to have her hold it um after i am done plucking everything while i'm plucking, i'm just holding it, and i'm just kind of you know just plucking and see where i need to kind of pull everything out Of so that is what i'm doing, y'all nothing, nothing special but, like i said, i'm going to get her to hold it and then i'm going to kind of install the wig. So while i'm getting her to hold that front down and make sure it doesn't lift i'm going to use that um, i can't remember the brand of that that um wax thick, but i will, i think, oh it's a lustre silk, it's a luscious soap, but i Will link all that and i'm just going to use that luscious, silk wax stick and i'm going to just hot comb everything back away from the baby hairs, just to kind of make sure that everything is going to lay flat. This is very, very, very important guys and i'm just kind of instructing her how to hold that. So that way nothing lifts and everything still kind of lays flat. Now i'm going to use that got to be glue spray and then i'm going to spray her edges and just kind of make sure everything is melted. The way it's supposed to now, i'm going to get like an elastic band, a super thin one, and i'm going to just tie that where i sprayed and make sure that everything is melt, it's like a melt belt, it's like just it's just a girl. You need that belt a scarf or nothing would do it the same way as that milk belt. Okay. So now i'm just going to part ha well part where i want her part to be, but i still have to make sure you know it's a tea party. So it's only one part, you know, so it's still going to be. It'S not going to be like that perfect little side, part, but we're going to make it do to do. I'M going to use that white stick again on the on the part and i'm going to just hot comb, everything to the side. Everything back make sure everything is freaking flat. Okay, i'm gon na do that and then after i am done, while that is melting and everything i like to just go ahead and style the hair. So i'm just gon na go ahead and use my baby bliss a little bit of that bio silk and that baby bliss i'm just going to go ahead and um do some barrel curls on her hair, all right y'all! So now that i'm done curling, i'm going to use my tweezers and i'm just going to plug the um the parting space, that's self-explanatory! It'S just to make everything bigger and everything not so wiggy and close together. So i'm just gon na pluck and kind of pull. Pluck and pull pluck and pull be very, very gentle because you can get holes whenever you do this type of method. After i do that guys, i'm going to plug that part, i'm going to plug the front and just kind of thin that area between the baby hairs and the hair just to kind of thin the hairline and make it look more natural. Okay, i could have done more, but i didn't do too much okay. So after i do that guys, i'm going to take that elastic band off and then we're just going to just start messing with the baby hairs. Now i'm going to use the apple g mousse so guys whenever you do spray and you tie that melt that melt elastic band on it will seem like your baby. Hairs are like stuck like. You can't move them, so i just like to just maneuver them with that mousse i just kind of like to put that mousse on and then you can just move the baby hairs, but everything still will be melted, don't be really rough because of course you will Lift the lace if you're really really rough, so just be very, very gentle whenever you are moving that baby hairs so, like i said, i'm just going to plug plus plug and then i'm going to get some shears, which is some scissors hair scissors and i'm going To kind of cut the baby hairs, i'm going to do a little bit more plucking, you know just you just figure out how thick or how thin you want them and how short and how long you want them and, like i said, i'm going to use that Mousse to kind of soften up everything, and i'm also going to put put that mousse on the side of the part just to have everything flat and just give it just a more more flat. Look okay and yeah after i basically just style the baby hairs um after i move it with that mousse i do get that got to be glue cream and then i use that that cream to just really really just lay that baby hairs and get it stuck. I don't want those fluffy baby hairs. I want them things to be laid she's young. She don't it's our first wig. I want to make sure that they're not going to move anywhere so yeah guys, and then i'm just going to use this kind of long. Two type of comb - and i like to use that after i do this barrel curl, because they really make everything flow and fluff and blend really good, and it makes like layers throughout the hair, and i really really like it so yeah guys. I hope you guys enjoyed this video. I hope it was informative. Make sure you like comment and subscribe, and i will talk to you on the next video love y'all, so much bye. So you
Comments
London Tayy: Happy 4th day of 31 days of hairstyles !! I am behinddd so im doubling the videos to catch up ! Happy 16th birthday CiCi !
London Tayy: How do yal feel about color in young adults ? I think its perfectttt video starts at 1:43
deseraymiles87:
London Tayy: This color very fall-y lol