Start To Finish| T-Part Wig Install | Ft. Hurela Hair Black Friday Sale
- Posted on 29 November, 2021
- T Part Wig
- By Anonymous
Hey girlsss!! This wig is so pretty!! I couldn’t wait to show you
s►Use discount code“hurelaytb10” order Get $10 OFF
►Don’t Miss Flash Deal Every Friday On Website!
●▬▬▬▬ #HurelaHair- Make Every Girl Afford Beautiful Hair ▬▬▬▬●
I'm using 150% density 13*5*0.5 Lace Part Straight Wig 24": https://bit.ly/3rj71jW
https://www.hurela.com/ Top Selling Series☛New Fashion V-Part wig: https://bit.ly/318aebe
Hot Sale 13*4 Lace Frontal Wigs: https://bit.ly/3D6640q
Most Invisible 5*5 HD Lace wigs: https://bit.ly/3p1KCEU
Affordable Lace Part Series: https://bit.ly/32AkmK5
☛Highlight wigs: https://bit.ly/3I3VkDF
☛Bundles & Closure: https://bit.ly/3p5RhxL
☛New products arrival: https://bit.ly/3FPR2gY
2021 Autumn Fashionable #HeadbandWigs: https://bit.ly/3pqWzEv
✿Msnaturally Mary Hot Selling Curly Headband: https://bit.ly/3uGudr3
#HurelaHairBlackFridaySale #BlackFridaySale
★ Follow #Hurela Hair Social ★
Instagram@hurela_hair: https://bit.ly/2DWtBZa
Youtube@Hurela Hair: https://bit.ly/2DVAmue
Facebook@Hurela Hair: https://bit.ly/3hq1zCX
Twitter@Hurela Hair: https://bit.ly/3kfLgdT
TikTok@Hurela Hair: https://bit.ly/31ZeRB3
Wholesale Provided: [email protected]
CONNECT WITH ME
IG: _paeeee https://instagram.com/_paeeee?igshid=1...
SC: PajonMonye
Twitter: @PajonMonye
Business IG: @HouseofBeauxCheveux_ https://instagram.com/houseofbeauxchev...
Website: https://www.houseofbeauxcheveux.com
Have you checked out my recent videos?
⬇️⬇️⬇️⬇️⬇️⬇️⬇️⬇️⬇️⬇️⬇️⬇️
Vlog: Birthday celebrations, Brunch, Halloween & more! | Pajon Monye’ https://youtu.be/8YRIDXUMCA0
Vlog: A PRODUCTIVE WEEK IN MY LIFE | new hair color, taking ig pics, life update & more https://youtu.be/HLBbT8H0Fmo
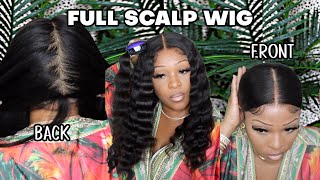
Hey guys welcome back to my channel, it's your girl, peijan monet, if you are new here, welcome, if you are not new here girl welcome back as you all can see by the title, i am going to install this beautiful, beautiful, beautiful, beautiful teapart wig. You guys like this wig is so pretty it's so soft. It was so easy to install. I think it's definitely beginner friendly, so you guys keep watching and we will get into this install hey guys. So i got this wig from harela hair. They sent me over this teapart wig, so i'm going to show you guys what i got in the box. First, of course, the wig, the wig cap, and they also sent this cute little goodie bag. It has some clips which i always need. Also, it has some lashes which these are very very cute y'all, like they're, really cute and of course they sent me like a silk scarf, which is cute as well, because i don't have anything in that type of style. So next we want to move on to the wig. Of course they sent me a tea part in 24 inches, and let me tell you you guys. I believe this is the full 24 inches okay, so the wig came very, very um packaged very good. It came with the net, of course, the styrofoam and also some little pieces to keep the styrofoam in place, but, as you all can see, this wig and the hair looks really good. Okay. So look at the lace y'all, this lace blends pretty well. It came like a medium light brown, so i can already tell that it's going to blend into my skin super good. Like do y'all see that today this is a tea party. Wig, the lace looks really really good. So next i'm going to basically bleach the knots just on this little perimeter of lace they have, and this is why it's called a teapart wig. You guys and i'm going to use my 50 developer and my bleach and just literally spread it on the area that only has lace. So after i let the bleach sit for about 20 minutes. I washed and blowed out the wig, and this is what the week is looking like y'all. I think this looks pretty pretty good, so i'm going to prep my wig before installing just to make it easier for me to install so i'm going to use my even wax stick, and this is in a sense, peach y'all. This smells so good, but i'm going to use the wax stick just to lay down all flyaways and to kind of brush the hair back from the hairline. So once i'd use my high comb it'll just be easier for me to you, know, guide the hot comb through and when i apply the wig, all the hairs will be on my face is oh okay, y'all. So of course, it's time for the install portion. So we're going to take our cap and today we are doing the ball cap method. If you guys don't want to do the balcony method, that's fine, but i just wanted to do it just because i want to show you how literally start to finish steps of me installing the wig. So once you have your cap on, of course you want to cut your holes out and just make sure that it's enough room for your ear to actually fit all the way through so cut your ears out on each side and then i'm going to go in After i cut my ears out and add some concealer, this is some. I really don't remember where i got this um palette from y'all, but basically i'm just using both of these colors to kind of match. My skin tone. Underneath and again you do not have to go crazy, like you would a normal 13x4 or 13x6 frontal, but you do want to put enough just so. Whatever parts of lace that's showing can match your skin as much as possible. So i spray got to be spray along my hairline and just use my blow dryer on a cool setting to just dry everything in, and i just remember to do that, of course on both sides and all around my head. So when i do cut off the cap, everything would be nice and laid so when cutting off the cap, just to make sure you guys are taking your time because from when you do not want to cut your skin and of course you do not want to Cut any hair off so just be careful when you are going around your hairline and just continue to cut off that cap baby girl. You know me, after cleaning off your skin, with some alcohol i'm going to take that same concealer and put it inside the lace on the wig so that it can match my skin a little bit better. I just i think so now, i'm just applying the wig on you guys just to make sure that everything is laying right and lining up right. So i don't have to basically go back in and like cut any extra cap off or anything underneath, but so far y'all. I love this lace, it's very. It looks hd or transparent, but it's really really good um, it's a very snug fit and it lays super flat. So i really appreciate that. So what i'm going to do now is just basically cut my lace into three sections, just to make it a little easier for when i'm applying the glue and starting to actually install the wig baby to install my wig, i'm using the bold hold active, and i Honestly, really love this glue um. If you want a strong hold and you do like different, i'm gon na say, activities are just really active or sweat a lot. This glue is really really good for you, especially um. If you also maintenance, your wig or your, you know lace as well, but i love this glue because it gets really really tacky. But if you know how to work with it quick, then you won't have a problem installing. So i'm basically just putting this glue on all three sections three times and then i'm gon na blow dry and then start putting down my legs. So, as you guys can see, i had no trouble at all melting this lace into my skin. Like look at that, it's really flawless, you guys, i really love this lace and then next, i'm just going to blow dry it all in and basically i'm going to be doing the same thing i did with this section. So the last two sections is is me: now when it comes to cutting off your lace, you want to make sure that you're never doing it in a straight line, which is why i like to use a razor because it never gives a straight line anyway. So you always want to just try to make sure that when you are cutting with scissors or eraser that you still move the tool in a jacket like a motion like up and down - or you know something of that nature, so it'll give kind of a realistic Hairline so, as you can see like this, even though it's not a lot of lace that was on this wig anyway, but it still blends, in my opinion, pretty pretty well, so i'm just taking out my baby hairs and about to basically try to you know make This wig look just a little more natural, so i pulled out these baby hairs and we're just gon na continue to customize and cutting them, and you know styling to lay our baby hairs. Today, we're going to be using the guy to be sprayed on the edge brush and um y'all, i'm not going to lie to you. I was struggling with my baby hairs on camera. So, honestly, when i came back at the end, i styled them a whole different way or like did them over, but um yeah. So this is the look period with the baby hair. So now i'm just going to tie down my baby hairs and get ready to just straighten out my wig is is so now that both sides are straightened y'all. I really am in love with this hair. I'M going to take my wax stick and just further put it along the top of my head, so i can get ready to hot comb, everything, nice and flat right so guys to make my part look a little more crisp. I'M going to be using these two colors and put it directly in my part and a little bit in my baby hair area just to blend everything, to make it super seamless and to get rid of those dark spots, or you know, unbleached knots, baby girl. You know me is so guys, as y'all saw by the video i am done with installing my hair and y'all honestly, this hair is so freaking amazing. Like i love this hair. This probably was the easiest installs. I'Ve ever did with like really low maintenance. Um of like lace from one because you barely have any lace, but to me this is enough to make a wig look natural as possible. So i just you know, straightened it out. It didn't take much to get it back. Super super straight. I really didn't add any extra products to this hair y'all besides just a little oil, but other than that. You guys like this wig is so beautiful. I recommend this way for anybody who is really you know, trying to start doing their hair on their own or just really starting to get into wigs and still want a realistic hair. Look because i think you can definitely achieve this with this wig. Like do y'all see this, this was so pretty. I had so much fun doing this this week. It'S super flat, you guys and if you guys know honestly, i did not braid down my hair at oh y'all. I had i put my natural hair to the back and put it in a bun, so that tells you how well this wig is constructed because it doesn't take much for it to lay flat at all. Thank you to harela hair for sponsoring this video. I really really really appreciate you guys for sending me this beautiful, beautiful wig, like i do not regret this at all. This is so pretty. I think you guys should definitely go shop this week. All the links will be in the description box. If you guys want to keep up and see more pictures and stuff, i post with this wig make sure you guys follow me on my instagram. Everything will be on there from on my story to my post and my feed so yeah make sure you guys keep up so y'all can see the looks that i do with this pretty pretty wig. I love this. I love this, make sure you leave a big thumbs up, make sure you comment below and let me know if you guys like this or not, and if you guys will go, try this wig out and also make sure you go. Follow me on all my social media accounts you guys, because when i'm not on youtube, i'm definitely active on all of my other social media accounts. So with that being said, i will see you guys in my next video and thank you guys for watching you


Comments
Papaya P: SLAYYYYYY