Easy T-Part Wig Install | Perfect For Beginners | Ledii_M | South African Youtuber #Wiginstall
- Posted on 01 April, 2022
- T Part Wig
- By Anonymous
Hi dolls!!
Welcome back to my channel ❤️
In this video, I’ll be taking you dolls on a step by step method on how to install a t-part wig. This is a simple and easy wig to install and is perfect for
beginners.
•
•
Please like, comment & subscribe !!!!
Subcribe , subscribe , subscribe !!!
•
•
•
CONNECT WITH ME
IG: https://www.Instagram.com/__ledii_m
•
•
•
•
THANKS FOR WATCHING !!!!
#wiginstall #wiginstallation #tpartwig #wigs
#hairvendors #hairinstall #lacefront #hairvendors #aliexpresswigs #aliexpress
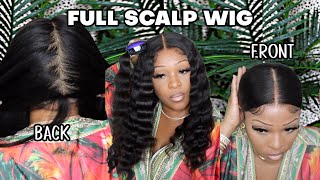
I mean where the should i really even start. I got hoes that i'm keeping in the darts. I got my across the street hi girls welcome to another video. If you are new on the blog, my name is nadidi and thank you for joining us on today's video. If you are returning sabi welcome back and thank you so much for the love, please don't forget to like comment and subscribe and without wasting any more time. Let us get into the video okay guys so in today's video, as you can see from the thumbnail from the title and from the way that i come looking at you with no wig no makeup, i am doing a wig installation. So i'm going to be installing a teapot wig at this moment, i'm sure everyone is familiar with what a teapot wig is or how it looks like for anyone that still does not know. This is what a teapot wig looks like here's, the t, hence teapot wig, and please ignore this purple. Here i got that while i was trying to tone down my wig with purple shampoo. So that's what a teapot looks like it has elastics at the back and a comb which i don't ever use. So basically, a teapot gives you a frontal look, but without the hassle and the admin of a normal 13x4 frontal. So, in all honesty with a teapot wig, you don't have to install it because, as soon as you adjust your straps at the back and you put it on your head, it's already snatched. It'S already snatched like it looks like it's already glued down. So a teapot wig is actually a good wig if you just wanna, throw it on and be out the house. But my problem is that i like to put my hair behind my ear and i get this flap. So that is the only reason i install this wig, but other than that you can just put it on your head and be out the house. So this is what a teapot wig looks like and with a teapot wig. All you need is like 10 or 15 minutes, and you are done with your install. That'S why i do say that this is one of the most beginner friendly wigs that one can get, but you guys can just watch me slay and install this wig and let's get into it for the installation process. I'M just gon na pull my wig back, not too much just a little bit to give you space to put your glue, i'm going to be using these two got to be glues, i'm going to be starting with the lecture glue and i'm going to be using My finger to apply or spread the glue, but honestly, if you are looking for like a one-day installation or just for an event and coming back home to remove the wig, you can skip using the black gel bottle and just use the got to be straightly. And one of the most stubborn parts to cool down is your ear tab, so make sure that you put enough glue next to your ears. After applying the got to be gel layer, i'm going to be using my hair dryer on the cool setting to dry the glue, make sure that the glue is not fully dry, but just a bit turkey, i'm going to need you to do another layer of your Gel glue but, like i did say, if you're wearing your wig for a day or less, you can totally skip the glue part. So i'm going to be applying my second layer of glue and you just apply it right on top of the other one. My next step, while the second layer of the kochubi gel, is still wet, i'm going to be applying the spray directly on the directly on the gel and then i'm going to take my hair dryer and maybe dry it for maybe 30 seconds, not too long. Okay guys and then i'm going to pull my wig forward to where i applied the glue, i'm not going to press the wig down. Yet i'm just going to pull it forward and when i'm happy with my placement and then using my red tail foam i'll press. The wig down now that i'm happy with my placement, i'm going to be taking my red comb and just pressing the wig down and then i'm gon na take my hair dryer so on the cool setting and dry down the wig. While i use my red tail comb to make sure that it's lying flat is like, i did say that the main reason i glue down the wig is because of the ear tabs. So this side is pretty good and glued down, but we have a little problem. This side, so i'm going to be taking my got to be glued and making sure that it's stuck down full speed. So basically, this is what the wig looks like so far, so i'm going to be applying my wrapping mousse all around my friends before i even do my baby hairs, i'm going to lay down the wig right now, just to make sure that it's stuck and melted And then, after, like 10 minutes i'll, come back and then do my edges using my fake melt belt, which i got from the fabric store, i'm going to be laying down my wig actually just got a roll of this elastic and i cut it into small pieces To use to lay my wig, hey and so far, this is what the list looks. Like is foreign i'm going to be taking my razor with a combo, i'm pretty much okay with this, and then i'm just going to be taking my wrap, mousse and putting it in the cap that comes with the bottle, taking my edge brush, dipping it in and Then, starting to mold my baby hairs gon na try and make them look similar, i'm just gon na and honestly i prefer doing my hair before my makeup, because with like doing your edges so many times and not getting it right, imagine if you had foundation on Your face everything would be a mess at this point, so i prefer to do my hair before my makeup so that i can know that i am done okay, so this is as good as i can go with the edges. I'M gon na apply my elastic band again. Please make sure that all your hairs are out and not like squashed with the elastic band, because the next step that we are going to do is straighten the hair. So you need all the hair to be when i did this the first time, but now because i know i'm going to be straightening my hair, i just need all the hair to be out, so i'm going to be applying my serum to my hair and then I'M just going to be straightening my hair and i think the hair's density is low, meaning that there's bundles in the hair. That'S why straightening the wig does not even take that long honestly does not need that much straightening. I'M then going to be applying my work. Stick i'm going to put it in the middle where the parting is and then tell me okay guys, so i'm going to go, do my makeup and then i will be back to show you guys. My final look, okay doll. So this is the final look. I had to put a little bit of mousse and then straighten my hair again just to tame the fly. I don't know what it is about blonde and gray hair, but it always has such extra flyaways, but this is the final look. This is how the lace is looking. I did put a little bit of makeup on it by mistake when i was doing my makeup, but it still looks pretty good, and now i can do my behind-the-ear thing without eating any ear flaps so guys. This was the final look. I hope you guys enjoyed this video, please like comment and subscribe and i'll see you guys on my next video, please


Comments
Khanyi_M.: New subbie in the family
Asanda Ngubane: This hair is so pretty where did you get it?
Nomsy Shongwe: New subbie from Simz