Deep Side Part Sleek Install Tutorial (In Depth) | Alipearl Hair
- Posted on 14 June, 2022
- T Part Wig
- By Anonymous
Shop Now➤https://bit.ly/3rqYn1S
Hair Info: 24inch straight 13*4 HD lace frontal wig 200% density
❤#AlipearlHair Official Store:➤https://bit.ly/3O9r2Ct
1.Join FB Group, Win FREE HAIR➤https://bit.ly/38IHvgv
2.Lace Front Wigs for Sale!➤https://bit.ly/3xtivEj
3.Invisible HD Swiss Lace Wigs:➤https://bit.ly/3rw2tWr
#alipearlhairwig #alipearlbodywavehair #alipearlhdlacewig
Instagram @alipearl_hair: https://bit.ly/34I3Oyd
Youtube @Ali Pearl Hair: http://bit.ly/2H0Gmmc
Facebook @Ali Pearl Hair: https://bit.ly/3aKwxX3
WhatsApp: +86 15890076489 E-mail: [email protected]
My Socials let’s be friends! (literally) :)
IG: @kamanijeann
Twitter: @kamanijeann
TikTok: @manijean888
Snap: @manijean
Wig IG: @wigssoldbymani
Email me for business inquiries only [email protected]
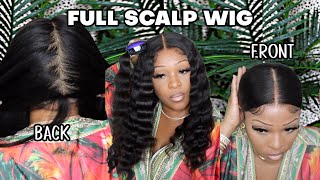
Hey everybody welcome to my channel welcome back if you are a returning, subscriber and viewer. So if you guys would like to see our installed this week and how to achieve a deep side, part with dramatic melted, baby hairs in a silky finish to your wig and install period keep on watching because yeah i ate that hey guys, okay, so i already Did my bald cap because i do it in every video it's like, i don't have to show you guys anymore. So if you guys, if you're new here - and you would like to see how i do my bobcat method in depth - go ahead and check out my other videos, even my last one, because i do it in every single one. But now that this wig is on. I'M cutting off the ear tabs that is first priority when the wig is on, because yeah i wanted to have a comfortable, fit and know exactly how i was going to lay on my wig before i do anything else. So i like to tuck that behind my ear to make sure it looks like a skin finish. If that makes sense, i don't know how to explain it, but it just looks correct when i put it behind my ear. I'M like okay, this is where it needs to lay. I don't need to cut off anymore, but um. Now i'm taking my hot comb because i love taking my hot comb to the hairline before i actually install the wig, because it just pushes everything back and it makes the hairline look a lot cleaner and more visible as well as more realistic. So now i'm looking at the hairline and i'm lifting it up trying to keep a mental picture in my head, where i want the wig to lay and where i want that glue to be placed down that. So i'm not so it's not laying or too far on my forehead or too low on my forehead. You know trying to keep that mental picture, but now i'm taking that acetyl alcohol and this paper towel and i'm just cleaning off my skin really really good, because i want this glue to stick and for this install to last. You know you want to make sure to get all those oils off of your skin, because baby will not stick, but here i'm using this wig dealer extreme hold lace glue. This is my first time trying this glue um, i like it. It'S a white consistency and base, as you guys can see, um and when i squirted it out the first time. Oh my gosh, it went everywhere. I had to clean it up so make sure you guys aren't being too heavy-handed with this glue. If you got, if you guys do decide to purchase but yeah, i'm just smoothing that around and since i don't have any uh popsicle sticks as i usually do. Oh my gosh. I need to get some on amazon, but that's neither here nor there. I'M just smelling this out with the back of my edge brush, which this is a tool that you can use for that, but really just want to make sure you are spreading out the glue evenly and until it is clear, not until it's clear, but you basically Want it to just be spread out until it is like ready for it to be blow-dried, you know either blow dried or until it's clear, because this glue did just get clear, quick because it did dry fast. But i did still go in with my blow dryer on a high cool setting to seal everything in before i went in with the next layer and then the next layer. I did about five layers, i believe or four layers, but i only showed you guys two but yeah as you guys can see. I'M just you know, trying to smooth it out, make sure it's even as well as on my cap and on my skin, because i want it on both not just on my skin, so it can really give that melted. Look that scalp hairline vibe, you know, but um yeah do so. The glue was very, very sticky and i'm like yeah. This is about to be melted. Okay, so i pulled up my wig and i'm trying to melt it exactly where that glue is which it wasn't hard to find one because of my lighting and two i'm staring hard as [ __ ] at this week. Looking at where everything is placed and where it needs to be placed, i'm telling you i'm looking really really hard like for real i'll, be having to be very focused, because i hate when i install wigs and i have to cut off extra lace or i have To put more glue - or you feel it's too high on my forehead or too low like i like it to be at a perfect angle, now that it's placed, though i have my comb here and my blow dryer on a high cool setting still and i'm just Combing, the hair back and really getting that lace melted into my skin and into that glue, and i took this wig diller brand spray as well. This melting spray - and i use it on one side of the lace because it wasn't sticking the glue. Wasn'T sticking on that side - and i know that was my fault, because the rest of the wig was laid, so i just did that and blow dried it and now i have my elastic band on and i'm brushing out this hair. So while the lace is melting, i'm going to take these inspiration pictures that i made collage collage. Oh my gosh collage of on instagram of just you know, pictures that inspire the look in those four pictures. Inspired the look that i was going for today. So i wanted to make sure that i was looking at that picture the whole time i was basically doing the styling part of this hair. You feel me trying to make sure that i mimic the deep side parting that was in those pictures, as well as the parting in the back trying to make sure it's. You know just going to get flat so yeah. Now i'm taking my carrot, wax stick that i finally got my hands on it's way better than the other one that i used to use, and i don't remember the name of it right now, but it's trash anyway, so it doesn't matter, but this is the truth. Okay, i'm taking my hot comb and i'm pressing through these hairs and i'm going to keep pressing it through and pressing it through until i feel like it is flat and yeah until it's flat now that the wig is flat into my liking. For now, i'm going to take my scissors cut directly in the middle of this lace and then take my razor, my eyebrow razor and cut off all the excess lace that we no longer need, and it's important to take your razor upward and basically cut in a Zigzag motion, but yeah this place was getting giving melted like straight off. The bat like it is a process, and i'm going to melt this like twice more but like for the first. You know cutting off of the lace like it looked really good, because ali pearl's lace is so thin and then the hairline comes pre-plucked. So it really was the perfect layout for me to pluck it as well as melt this lace. So i'm just cutting off the rest of the lace and y'all can really just see how melted it was already. I was definitely looking forward to completing this install because i'm like i just know it's going to eat so hard, but um yeah. So i need to comb out the hairs this way for the baby hairs that i was going for. Just from who i follow on instagram, like i follow a lot of hair, stylists, okay and i'll, be watching everything that they do just to learn from them. So really all i'm doing now is trying to figure out how many baby hairs that i want and once that's figured out, which i haven't figured out. I'M taking my hot comb and i'm pressing those hairs through, so they so that they can be straight and lay flat once it's time to do the baby hairs and because we're going to be melting, this lace once more after this. So i want to make sure everything's going to be flat and seamless. So now i'm taking my sideburns and repeating the same thing, i'm being very delicate with this, and i'm also being mindful of how many hairs i'm pulling out. Just because i wanted to give a very natural look: okay, like i wanted to give the illusion of, i just got my hair done. You feel me, so i'm thinking of this lace as if it's my hair, you know what i mean so yeah, i'm hot combing. These hairs as well, and then once that is done, i'm going to be taking this evan wonder: leg spray in the red can and spraying it over top my lace and around the lace on the other side, because i was going to do my baby hairs on That side, because it wasn't it was pointless because i knew it was a side part and it was a deep side part. So all that hair was going to be in my face and the baby hairs didn't need to be right there but yeah, and then i'm going to be melting that spray into these baby hairs as well. That way that that hair can be really melted into the lace and give scalp once the hair tie is taken off and it's time to do the baby hairs. But until then, now that that is melting, i'm going to be completing straightening out this hair, because i already straightened out this hair on the mannequin. I personally like to straighten out my wigs on a mannequin just because it's a preference i mean i feel like i can get it really bone straight when i do it track by track, and i can see the tracks so i'm going to take my carrot. Wax. Stick again in my hot comb and i'm going to be pressing through this hair, and this is because this is the side where the part is well, not the part, but the bang, and i want to make sure that it's going to lay super flat um. I don't recommend using the care, stick on each section that you hot comb out just because it can leave the hair oily later on. So just do it a couple times throughout and it'll, give you the same results but um yeah, i'm just making sure everything is super flat. You know like really sizzling, that hot comb into this product to make sure that it is going through there, honey, okay and i'm going to repeat that all the way through, as well as starting the hair at the same time and doing the chase method so that It can just be super silky and get every strand with heat processed through it. The elastic band is now off, the lace is melted, and now i'm taking my eyebrow razor and i'm shaving off these baby hairs. This eyebrow razor was a little dull, so i was cutting it off like more section by section and strand by strand than i usually would just because it wasn't really like budging, but usually i still would do it kind of section by section to give the baby Hairs, a more natural look, because our baby hairs are never just one straight line. You know what i mean so, if you're installing your wigs and if you have yet to get a little flat iron for your baby hairs. What are you doing make that investment? Because curling your baby hairs with this little flat iron makes them look. Fluffy makes them look prettier and just good, so yeah, please do that. This is the kiss pencil flat iron in half an inch and like to curl my baby hairs like in sections, especially the swoop part, the one that i'm working on now, because it just gives it more of like uh. I don't know it just looks really pretty. I just love the way it looks so i took my got to be glue gel and i'm just swooping these hairs and i'm using my finger to mold. It really well um, but yeah the side of the baby hairs, not the baby hairs. Oh, my gosh, the edge brush that i'm using is the comb because it really helps mold everything together in place and gives it a seamless look. So the key to doing baby hairs like this on a side part wig is really molding. All of that those hairs together, your technical baby hairs as well as the hair that is on the wig. You feel me, you want to mold everything together, so it can look in unison and, like all like, it's one, so yeah, i really make sure to mold. It towards the actual hair and not the baby hairs, the actual baby hair part i'm trying to get more fluffy and swooped, and this is really hard to explain you guys, i'm trying my best, but really the key is molding guys. You really want to mold everything together, keep that motion of swooping it and don't get too caught up in the fact that it's lace or a wig really think of it as you're doing your own hair like okay. How would this look if this was my actual hair? That'S what i keep in mind when i'm doing my wigs that it can look as natural as possible. That'S also a key tip that i would want you guys to use is to don't think too hard about it, as if it's a wig and oh, it has to look like this mimic it as if it's hair, as if it's a frontal, so not a frontal Sewn that's the wrong word as if it's a traditional sew-in you're doing you know, i figured out to be quiet for a second to let you guys watch what i was doing, but i'm now taking this edge control, this edge booster edge control and i'm using the Comb side, as well as the brush side, to continue to mold these hairs together to make it look like scalp and that my hair is just laid the [ __ ] down. You feel me like, i'm being so precise i'll, be so into the mood and so like i don't know, but i was really feeling it. While i was doing this, so i took my blow dryer to really make sure that it was molded and that it wouldn't move, because this is something you don't want to move like. You want this to look molded as [ __ ], and i know y'all just seen how much those baby hairs looked like some real baby ears. I know y'all just seen that, but now i'm taking my ruby kisses cream foundation in the shade 11. The number rd11 in this small pencil makeup brush not pencil. It'S not a pencil. I don't know why. I just said that, but the small makeup brush to define the part even more and then some tresemme holding spray to really mold everything together and get everything in place and to stay flat and this hot comb as well. If you hear sizzling sounds while you do this, that is okay, but look at how melted this looks like oh, my gosh, it was really giving scalp. I was so proud. Oh y'all y'all really want to make sure y'all flatten out the bot, not the bottom, but the back too, because that is what's going to give it scalp. But this is the completed. Look, i loved the way that this came out. Thank you guys so much for watching and to continue to watch me make sure to subscribe and check the description box for all the information on this hair. Thank you, ali pearl hair, for sending me this beautiful unit and i'll see you guys in my next one. Bye


Comments
The Red pencil: I've been subscribed to you for about 2 weeks and bay-be!! You're really good with these wigs, I know and hope these looks take you far! Invest in your skills, you got it!
Jaz Sylve: thank you sm for this tutorial! i've been trying to do these type of edges for the longest
Ali Pearl Hair: Stunning! Thank you so much for your sharing.
Takoahh Ameenah: yup just ordered a wig this video came JUST IN TIME
Shonia Arrington: How long did it take you to get so good im about to try my first one and keep practicing
74 Maya: Hi I’m very new to the 13x4 lace fronts and I’m confused about what you do to the back of the bald cap and the combs in the lace front as well, if you could answer or do a video on it that’d be really nice. I love your videos
Fabulous LifeWithDae: Hey, I love your videos! What do you use to get the hair so silky and shiny?
Woe Skye: I love this soo much
Benae Toombs: HEY GIRL i just watched your other vid on bleaching and you didnt recommend the 40 V developer so which would you recommend? i just ordered my frontal from recool and i dont wanna mess it up
Princess T: Omg!! You are one of the Best on here
Reshine Hair: dear,You are absolutely beautiful!!! love your videos very much ❤️❤️❤️
Christie Joseph: Literally the best !& I wanted to know what company in your opinion has the best quality wigs
Allen: love this video!! can you share the brand hot comb and were you got it please
Conscience Jackson: I’m just going to watch all your videos cause y not ♀️ “can u do a wig install essentials ”
Glo London: How long did the install last ?
Jazs: The wig dealer glue is BOMB!!
Celinabiina: Do this type of side part look on a curly wig
olivene thames: Finally I have been waiting girl nuff love from Ja
Abby Márie: YUPPP I LOVE YOUUU, you’re literally my favorite broo❤️❤️
Red Nox: Girl you put them baby hair to sleep yaasshhh ma'am
Mini DIOR:
52676843: Do these styles with these lace fronts mess up your edges? I feel like they been messing up mine.
12109babygurl: New here ❤
Henny Zaina:
Christie Joseph: I love you !!
Ohemaa Faust: Gorg.
myyoutubenaomi: Yes you ate