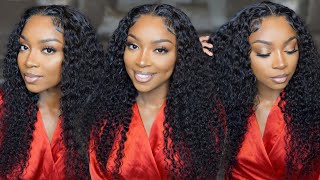
Diy Curly Wig With Bang Tutorial | Affordable Human Hair
- Posted on 14 May, 2021
- T Part Wig
- By Anonymous
Hello friends, I made a curly hair wig with bangs, in this video I made this affordable curly human hair wig with bangs. This wig took about 1hour to finish.
It’s simple and beginner friendly and also very affordable.
CONTACT ME
Twitter: https://twitter.com/beautybyblesyn?s=2...
Instagram: https://instagram.com/beautybyblesyn?i...
For business/ sponsorship and partnership
Email: [email protected]
#howtomakeawigwithbangs #bangs #bang #wig #howtomakecurlrlywig #humanhair #howtomakeawig #wigtutorial #shortwigtutorial #wigwithbang #diy #diycurlywig
Hey guys so in this video i'm going to be using this cup um, you can use any of the copper you want to use. Um some thread some paint - and this is the hair you're going to be using today. Okay, so i'm just going to roll out the coils a bead, and then you start sewing okay, so um. What you're going to do is you're going to start sewing from the very bottom of the cup, okay um. So i'm going to start sewing it line by line like that, so i'm just going to pin it down on the other side so that it's not um. It'S easy for me. You know to show so i'm just gon na keep sewing um until i get to the end. So when i get to that end, that means i pointed now, i'm going to flip out um one part of the egg, because i'm using i'm sewing them in two. In two, so i'm just gon na sew one part down and then once i sew that down properly and then i want to turn to the other, i'm going to turn the other one and then pin it down as well on jt side and start sewing. So what this does is it helps so that um, that part is not swollen and but then, if your weft is, if your weft is very very thick, i think you should use this. Do this pattern, sew it down several times so that it's not swollen? Okay, then i'm just gon na keep on sewing and then just basically keep on sewing this. But if you, if you think it's going to be a little bit um, you know hard for you. You can do some lines on the cap. You know so that just gives you direction on how you're sewing the cardboard. Basically i mean the same does not really matter at all. It'S just the end. Um the end product that matters. Okay, so don't be so content about the hair, the lines and how straight they are okay, um. The most important thing is the finishing look if it's very, very okay, okay, so once i get to that ending i'm going to you know turn it all together, i'm going to turn both of the hair and so and just continue sewing like that. Okay, so um, you can see that there's this part of the cap that has like this extra material, the black material you're, seeing please make sure to sew on those materials so that you don't have space on your cup so that you don't have like um. When you wear your wig, you don't have like the black stuff sticking out so make sure to show your hair up until that part. Okay, so just basically keep on seeing um my boundaries. The boundaries of the hair i use are quite um. I think it's like um 280 grams, so i had enough because it's a short curly hair and i knew it was going to be full. So i was throwing mine in shoes, okay, but if your hair is not too much, you might want to start throwing them in one. You know using one single um double sorry, one single bundle of the one single bond of the hair. What am i saying english is hard okay, but you understand what i'm saying so um. When i got to that part you can see. I turned i didn't do that much what i did initially. I didn't um tone it individually, so i turned the both of them and i continued showing why? Because the weft of this hair is really really light, which is why i was even sewing them. You choose okay, but if your weft is very very thick, i think you should go. Probably the method i showed you earlier. You know turn the first one slow it down and turn the second one and swing down several times that way. It is not bulky at that end over there, okay and make sure to get pins to always secure the other parts like on the other end, so that you don't have issues with struggling on how to hold your hair while you're sewing. So the paint just helps you to hold it down until you get to the point where the pain is okay, so um see now i got another part make sure you sew, like i said on that black material. So on that part, please, and when you turn it make sure to zoom several times, okay, so that that part where you turn it, when you get to the extreme edge, it's not swollen. If that makes sense, okay, so just basically sewing um. All the way turned all the way keeps doing all the return, and then that's basically it it's very, very simple: it's not complicated, it's very, very simple, okay and then so when you keep sewing and swinging and um you're, not getting close to the part where you Have on this line up there, you know you're going to start. You want to start turning. You know, you're going to turn to start coming to the front, so that will start creating the fringe. Okay, like you see what i just did now, so i turned it and instead of turning and continue going to the other side, so i turned and continue going on on the front like i turned to the front and kept on swinging so once it finishes, i Attached another one and kept on staying so now, you're gon na see that i'm having something like. Oh it's going around now! So that's how you just gon na use it you're going to continue sewing round and round and round and round until you get to the very middle, you can see that um pin i put in the middle just to help me. You know like your direction, so yeah, i'm gon na stop, saying. Okay, so continue to show your week until you get to that meeting with this week. It'S not there's no closure, there's no flop frontal. Okay, i'm just showing it i'm going to keep sewing it until i'll, get to the very middle and have like a very tiny. You know full stop um at the middle of the week. Okay, so i'm just keep sewing it's very very simple. I mean it's beginner friendly. This is the second time i'm showing a week, and i was i was proud of myself. Okay, so you can do you can definitely do this? Okay, so you can see that this circle conjunct was becoming tiny and tiny and tiny. So if you want to use your closure at this point, you can cut it up and then just to like fake your closure, but i didn't do that because um i wasn't perfect yet so i kept on sewing and swinging onto. I got to the point where i couldn't see the circle you can see. It is now very tiny, so i'm just going to grab the pin and the thread and then tie it very well and then you know cut the remaining muscle, hair that is remaining and then just tie the um, the thread to secure it, and there will be It'S basically so now i'm going to create my fringe, depending on how full you want your fringe to you know, be so, create your fringe and then once you're done in the front, just trim the back a little bit. So the hair is short. So i didn't trim it too much because i didn't want the you know, hair to be very short, so just apply um your leaving, conditioner water and your spray, and it wasn't recorded when i did that and that's basically it apply some oil and that'll. Be it for this video? I hope you enjoyed this tutorial. Thank you for watching and i'll see you in my next video bye, guys


Comments
c yavelle: I love the way you closed the crown and defined the curls. Well done!
Happiness Kingsley: I'm proud of you my girl and so much love the woman you becoming
Deborah Balogun: Really beautiful, but did you double the hair up until you finished?
{{{{Ké SiNGS}}}}: Best tutorial!
Chelle Booy: That stitch you do, we call a French knot....xxx
Chelle Booy: You look like Queen Cleopatra..... so beautiful and elegant xx
Naliaya Whitley: What’s the name of the hair ??
Samantha Pearl: Thank yoouuuu
Rachel Mertilien: What is this texture?
Chelle Booy: Arrrgghhh I love this video, looks hot on you girl xxxx
Stephanie Amos: How many pack did you use please
Louisa Eshun: Pls the name of the hair pls