Everyday Curly Human Hair Ombre Wig! | Beginner Friendly! | Jessie'S Selection | Ibeatthatface
- Posted on 27 July, 2020
- T Part Wig
- By Anonymous
Hey, loves.
Thank you so much for watching!
** C L I C K F O R M O R E I N F O ** Thank you Jessie's Selection for sponsoring this video! Jessie's Selection #JessiesSelection #ombrecolorwigs #curlywigs #waterwavebob
Hair Information:
Ombre Blonde 1b/30 Lace Front Wigs Water Wave Bob Wigs For Black Women
Hair length: 12 Inches
Density: 180%
Link to hair: https://bit.ly/32YF84b
Wig Page: https://www.jessiesselection.com/
Use my Discount Code ''lacey20'', 20% Discount OFF !
Highlight BOMB Bob
4 by 4 Kinky Curly Hair Unit
Affortable Blonde #613 BOMB BOB Wig
Hair Straightener Hot Comb➤ https://bit.ly/3auhfTa
Trendy Highlight Wig ➤ https://bit.ly/33Tp42s
Follow Jessiesselction on social media
Instagram @Jessiesselction https://bit.ly/2Unx1JS
Facebook: https://www.facebook.com/jessiesselect...
Twitter: https://twitter.com/JessieSelection
——————————————
❤️ S O C I A L M E D I A
Instagram : @ibeatthatface
❤️ C O N T A C T
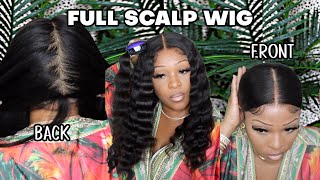
Hi, you guys, i am back again this time. I am back with the unboxing slash hair tutorial on this beautiful hair. This hair is from jessie selection and it is the 1b slash 30 color, and it is a 12 inch bob and it's the water wave curl, which the curls are so beautiful. This hair is not stiff, it all is so bouncy and it looks so natural. So if you want to see how i got this install, please keep watching and i will have all the deets to the hair in the description box, all right. So for today's video, the hair is coming from jessie's selection, hair and it's 100 human hair wig. And let's see what i have in the box, so of course you get the wig and they sent me some lashes, a beauty blender a wig cap. I'M excited to try these lashes because they're magnetic and they also sent me this. Let me see what it is. So i thought it was a bag to store your wig, but it is actually a bonnet. I'M super excited because it's so cute she bought a be styling in her sleep, okay, okay, all right! So when the hair comes, it comes with the bag and it comes with the paper in the bag which i really like, because i just put my wigs back in the bag after i'm done using them. So you get four clips in the cap and you also get this adjustable band, and then you get the regular adjustable bands in the back, which i really like. The color is a sorry. I'Ve been playing with it. The color is a 31b such a pretty color. For this summer fall too really this color is so gorgeous um and the hairline actually looks really natural. I don't know if y'all could see, but it's not really a thick hairline i'll show y'all when i put it on like my head, but i'm excited to try it so keep watching, and you will see how i install it all right. First, i'm going to be starting by cleaning off my hairline with the alcohol, and this is going to remove any excess makeup or dirt or oil from the skin. Just so, the glue sticks better and you have a better, lasting install. Now i'm going to use the skin protect. This is going to protect your skin from the glue if you're sensitive like me and help prevent sweating. So i'm going to saturate a cotton pad and dab that into my hairline off camera. I added about three layers or two layers of the skin protect letting it dry in between each layer. Now i'm doing the bald cap method, i'm pretty sure you all know how this go. I'M using a brown bald cap because i feel like it matches my skin tone better and i'm also using the bed head um hard head spray instead of got to be just because it was closer, it was nearby so yeah and then i also added the god To be gel with the spray, and then i alternated the blow dryer with high heat and cold air, and then this was not supposed to be a voice over you guys. So if you see me talking is because i was originally gon na talk through the video, but my audio was so bad that i had to do a voiceover and then you guys probably didn't see it because i added a lot of parts out. But my scissors were so dull: they were so trash you guys it was not even cutting the bald cap. I was really struggling and then my eyebrow razor wasn't working either. So i was a little pressed now. I'M just trying to show you guys that i bleached the knots and tweezed the hairline, but you probably couldn't see so sorry about it. I'M gon na get better with the next video, and now i'm just trying to see where i need to you know cut off the extra for my lace. Then i went ahead and cut the ear tabs off off camera because i did not want to mess up the wig. I'Ve messed up, wigs before cutting them too high on the side. So i did that off camera, so i could really really see and then, when you cut the lace off, you want to just um, be real careful when you do it and not cut in a straight line kind of cut in a zigzag or like in the Shape of a hairline just so the hair looks more natural and not like a box or a circle or anything of that nature. So you just want to carefully cut it. Like i'm doing here and then on this side, i just cut it in sections and then cut the lace off just so it was easier because i couldn't really see in my you know, mirror trying to do this on camera, but i made it work now we're Going in with the bold hold active and you want to do well, i did three thin layers of this and then you may see me go back in with the glue um on my first layer, because when you try to apply it on the bald cap, instead Of on the skin, it doesn't glide as smooth, so i went back on the cap and added more, but it was still thin layers. You don't want to do too much, or else your install will not last the glue will be entirely too thick. So i did the middle, then the sides just so you know it dried instead of me, waiting for it to dry all the way across, which is cool, don't waste time, but yeah, and i let the layers dry. You know clear before i did my three layers and don't forget the sides, because that's what lifts first and we don't want that. Now we're just going to be carefully placing the lace and just watch where you put it, because you don't want it to be too far ahead of the glue and you don't want it to be hot uh, be behind the glue either and sorry again. If i got out of frame because i was really just trying to get in my mirror and see, i will work on it in the next video you know and i'm not a hair stylist y'all. So if y'all see me doing weird things like i just like doing my own hair, i'm not a hair stylist, but look it's melted. What is that scalpiana? Now we gon na tie it down and i tied it down for like 30 minutes boom. Look at that! Coming from the scalp now, i'm just gon na part it out see where i went my part and yeah, but doesn't this hair look so natural, you guys so natural and it's so soft? I really did not have to do much to it now. I'M gon na be sectioning off my hair that i'm gon na have for my baby hairs and trying to lay my baby hairs on camera. I don't know if it was the angle or what, but this was struggling, i'm not great at baby hairs in the first place, but this was struggling today, but we made it work. We just gon na section it out. First, i lay it with mousse, and then i went in with the bold hold liquid gold to just kind of set them in place. It was my first time using that product, so i kind of like it. It dries real, quick, though, so, make sure your baby hairs are set with the moves before you go on with the liquid gold, because you might have a little bit of trouble, but it's nice though so yeah you can see that my eyebrow razor was not really Cutting the baby hairs good. It was like sawing into like a tough piece of steak or something because it was not going well but yeah. I did one baby hair for y'all and then popped off to the side burns because you already know what happened. Y'All already know the deal, but yeah now we're gon na be laying them sides down and i'm happy because my sides came out real nice today. She cute there go that boho, liquid gold, i'm just gon na make sure everything is perfected. Now we're going to style the hair, i'm just going to be wetting the hair down making sure i get those curls nice and juicy. You see how the brush just glides through no tugging, no tangling, love that then i'm gon na be adding the organics curl cream to my hair. I'Ve been using this for some years. It'S been working for me. Let me know in the comment section: what's your favorite curl cream for y'all curly hair, i like to switch it up a little bit, but you can see the hair is so smooth. Curls are nice and juicy and then after i styled it, i just kind of let it air dry we're just gon na brush that curl cream in and yeah. That is the install. I hope you guys enjoyed watching please like share and subscribe comment down below. Oh yeah and i sprayed my part with some spray wax because i do not have a wax stick, but it works just as good for me. So yeah look how sleek it is smooth baby, yeah silky. I don't know why it turned white right there, but it dried, but that is the final look for y'all. I will see y'all in the next video

Comments
Fitness Fun Flows: lol you said you were struggling but you definitely made it work in the end. Looks good
Jessie's Selection: You are great❤️ Thanks darling
Tanisha McDaniel: The unit is nice, but it’s that beat for me. That makeup is so pretty!
AnaujLen Pierce: Love this Video ‼️‼️❤️
NeyaWasHere: Go bestfriend