Detailed Sew In Half Up/Half Down With One Bang Tutorial (Step By Step)
- Posted on 30 April, 2021
- T Part Wig
- By Anonymous
Welcome & Welcome back ! Watch as I complete this CUTE half up/half down with bang style. The products used are down below. Total service duration was about 3 hours. I hope you enjoy and subscribe to our channel :)
Instagram - @endlessbeauty_bypaige https://www.instagram.com/endlessbeaut...
Instagram - @paigeshaian
Location - Pennsylvania
#HalfUpHalfDown #Ponytail #SwoopBangHalfUpHalfDown
Edge Tamer - https://amzn.to/3gLgUBA
Got2B - https://amzn.to/2Ra1Q5Q
Beeswax - https://amzn.to/3u78593
Hair - Spray https://amzn.to/3e5fxfd
Black Neck Strips - https://amzn.to/3vzn0Jc
Rubberbands
Nano Babyliss Titanium Flat Iron
How to BRAID FOUNDATION - https://youtu.be/ixg8QMjFQ8I
Braided PONYTAIL - https://youtu.be/0_YKFOw7NGY
How to SILK PRESS ON Natural hair - https://youtu.be/CkWODvncWYE
Music by Ryan Little - Lovesick. (Nomad's Heart) - https://thmatc.co/?l=644C7ACD
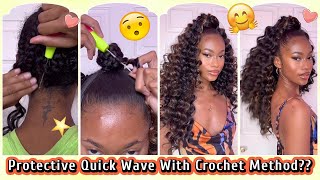
I took a couple you know. I took some time off to rest and now it's game time. You have no what's up y'all, it's paige cheyenne, welcome back to my channel if you're new, just stop by don't go too soon. Okay, the love is definitely being shown on my channel and i really really do appreciate it. So today we are doing a half up, half down with a side, curl spook, bang, really cute style for date, night for girls weekend for prom or just because you want to get cute and be a bag. A baddie, okay, um, so yeah we're just going to jump right into it. I am sectioning off for her swoop. Bang, you want to make sure you have enough hair out because we are going to add tracks later. So you want to make sure you have enough coverage if your hair, if your client's hair, is thinner or thicker just be mindful of that, so whether you are gluing in the back or sewing in the back, you want to make sure that those tracks are covered. So this part that i'm sectioning off right here is going to be braided out the way, but it is enough hair, so we can make sure that it is covered back there. We are doing a sewing today. We are not glowing in any hair, so i'm going to go ahead, just break this off and get it out the way y'all y'all gon na have to forgive my voice. It is allergy season for me and i have the worst allergies, so i'm probably really stuffy right now, and it just is what it is so bear with me. Y'All but again don't talk about how i braid, if y'all didn't see my best braid foundation of 2021 check that video out but y'all know my hands is a little crazy. I got little spider fingers, so yes, just go ahead and breathe out the way and we'll start the back section when you are doing your foundation in the back. The braids do not do not have to be super duper, tiny, okay, yes, they need to be flat. Yes, they should still be neat, but they don't have to be super tiny. You can do a medium to large size, braids or just medium. That will be fine, so just like in a traditional sew-in foundation or a closure sew-in foundation, you are going to connect this braid to the next braid. So you'll see that i will take my medium-sized braid start braiding and then connect this one to the next. I want to do that up until i get to about the middle of the section and then i'll start on the opposite side. Do the same thing until i meet back to the middle and then i'll have one braid tail to sew down. Okay. So now it's time to sell one y'all in the back, i use a total of two bundles uh. Both were doubled when i was sewing them in so you'll see right here that i am starting my first row. I am sewing through the actual weft just to ensure that it's nice and secure, and i'm also going to use my flip method. So, there's really no need to cut at the ends until you get to the top continue to save those bundles. If you can, this is our. I think our second time reusing these bundles when you're doing your flip method make sure it's nice and flat when you're at the actual flip and then sew down about two times before you continue when i'm sewing my tracks in, i do sew my tracks, pretty close Together, the only times that i don't sew them super close together is at the very beginning. So after my very first track that i'm sewing in, i do leave um a little bit of space just so it's not like super bulky right there, but then also right at the top, where the leave out may be. Because, again you don't want it to be bulky, you want to be nice and flat. So you'll also see how i throw my thread over my needle and then give it a good tie right there. That is another way to secure your bundles and secure your thread. Um, my tracks don't go anywhere. My clients have to call me like page. Please take these out and it's not that it's it's not tight. It'S not tension, but it's just to ensure that you know, as your hair is growing, as the brains are growing out, that the tracks are still going to stay and they're not going to slip. So after this y'all i just put in the second bundle again. It was doubled, finished off the rest of the section secured it at the ends, and that was that so i then just left that to the side until it was ready to be styled, but coming up now we are going to do basically her ponytail part. So you want to go ahead. Give enough a nice silk press press it out very nice to get it as flat as possible, so kind of like if you were doing a ponytail. If you didn't see my braided ponytail video go ahead and check it out i'll leave the note card at the top of this video and in the description below um. If you need a detailed tutorial on how to do a silp press, i also have that video too so check that out so for her ponytail. I'M using murray's, beeswax and i'm also going to use, got to be freeze spray i'll, go ahead and put the beeswax. You know longer edges and stuff go ahead and comb it down. You'Re also going to use your blow dryer at this time, because once you put that um got to be, you want to make sure you mold it and set it in place. This is the side that the bang is going to be hanging from, so i didn't do any baby hairs or anything like that on this side it would be really pointless just because it's going to be covered anyway, but that's your preference, that's your client's preference um On, if that was, if you want that to be done, as you can see, on the other side, we are going to leave some baby hair out, do a little cute little swoop. You know your little baby, hair y'all like oh, and do that on that side, y'all, don't forget to like comment and subscribe to the channel. I should have been that day, but listen we're eight minutes into this video at this point just subscribe to the channel. Okay, leave a comment down below if you made it this far, leave me a orange heart. That'S my favorite color leave me an orange card. If you made it this far in the video y'all, so i also just used some edge tamer. I think that's what it's called: that's in, that purple um little bottle right there edge control. I also use some of that to just give it some nice shine and another. You know um good firm hold for her, but use that for her baby hair. So i want to go ahead and braid down her hair. That'S in a ponytail jazz did tell me she wants her ponytail to sit pretty high. So that's why i ended up putting it in this bun that i did so that the ponytail can sit higher than you know it normally would we are gluing her ponytail on. So, in order to protect her hair, we are going to wrap it with the neck strip, the black one uh. This is like a jumbo size yo. They do have the smaller ones, but this this just kept going and going just go ahead and secure it with the rubber band and just cut off the extra you don't need to wrap it all the way to the end. So i started gluing the ponytail from the top of the bun work on my way down to the bottom of the bun, where her natural hair would be the one thing, though y'all want to be careful, make sure when you are wrapping around that you're not getting Glue on the actual hair, that's hanging itself, because that's going to be a pain when you have to go and comb it out and actually style it. So what you want to do is pull all the hair. That'S that's going to start hanging in the ponytail and then wrap it around like you'll, see i'm doing right here, just pull it tight and then just continue to wrap around you'll need both of your hands to do it. For those of you that don't know this is the famous 30 second glue, you can find it at your local hair store, i'm pretty sure, they'll have it, they have it in the small sizes they have in the big sizes. I don't use glue that often so i was like trying to get it out that thing um, but yeah y'all. It'S it's in a hair store if y'all need it i'll, probably leave a link down below, so you can probably get on amazon as well. Okay. Now it's time to do the bang yang yo so go ahead and flat iron, your first section um! You want to take it on the diagonal. So when you measure out your track, make sure you take it on a diagonal and make sure it's not straight, but it also depends on what type of bang your client wants. She wanted her bang to go to the side. If your client wants a straight bang to cover their full for full forehead, then yes, you would take it um straight across so just measure it out. When you measure it out, make sure you leave a section um, basically at each top. So it's make sure that it's covered, so you don't want to you. Don'T want it to be too long where it's not covered fully uh. You can take bigger sections and go ahead and add another track. I only added like three tracks um, to give it like some light fullness. You don't want it to be too thick. You want it to be like nice and natural, so you want your bang to be long. So when you go to curly with your flat iron, don't hold it too tight just turn it once and let it literally fall off of your flat iron. If you turn it twice or three times, your curl is going to be tighter, so now we're about to style the back blend. The back. I just put this hair in a bun for now, which actually would have been really cute. I had asked her. Did she want a knot button? She was like girl now, but we're going to go ahead and take away. Remember that braid we separated with to cover the track we're gon na go ahead and take that out and blend it um. I did not show the part where i styled the hair in the back, but basically what i just did was i just curled the back. I just curled the ponytail and it was done so we are coming to the end of this video. I hope you guys enjoy look at the style, isn't it so cute nice and flowy nice loose, curls, she's, actually taking pictures with kai kai's turning one y'all so comment like don't forget to subscribe to my channel and i'll, see you guys in the next one. Look at here so you

Comments
Chanel Flowers: I was looking for a video exactly like this! My daughter wants this style and I'm her personal stylist for life lol
Mariah Bost: This definitely about to be my baby shower hair I will be the first one in the hair store today!!!
Jonnae Jones: This probably the best tutorial I watched for this hairstyle I wanna try to do it on myself for my baby shower and this was good
Nikeisha Simone: gonna attempt to do this on myself
michelle lay: That looks sooooo goood!!!
Kiya Keeks: Needed this
Stacey B: That bang was so beautiful and satisfying to watch you do lol
Clarissa Lucas: Pretty!! & thanks for the tutorial. I wonder how many bundles are needed ?
Frankie Love: Amazing vid! Do you glue tracks on the scalp or on hair? xx
Lowky's World: I want to take a break from wigs. looking for a style like this to do at home
Tayo Orenuga: How long can you leave this style in for?
ZhakirahM: I love this
VlogsByYeeun: Beautiful! God bless
Stacey B: This video was great. Perfect length
Garjew: Dope!! Great job!!
crownedbycori: this is so nice but never in my life have i seen anyone braid like this lol
Milan B: New subscriber.... I’m going to try this on myself lol
Zyanna Perkins-Goode: Birthday style
Revamped By Shaday: Day 2 of binge watching your videos
Shannon Hawley: Did you use two bundles in back part or three ?
AmirahAmóur: How long do you think this style can last ?
Ebony williamson: What bundles did she use it could help me because I want the same hairstyle for my sweet 16 that’s coming up
Itss Riahh: what inch bundles did u use in back and
Artryssa Glam Tresses:
Het Heru:
jaz hamiliton:
Shy's LifeStyle TV:
Lifewithiysisdanae:
Anniee Seals:
Chelsea Rolle:
Essence Campbell:
Santisha Ottay:
Alesha Barrett:
alyonnabeauty:
Rina Cakez:
LetsTalkBeauty:
Princess:
Cynthia Johnson:
Anniee Seals: ❤️
AlsbeanNaturally:
keatrice beacham:
Angel Lynn:
Nikkiamakeup:
China’Nycole Speaks:
Shazity Welch:
Au'branee A.B. Thomas:
Charmain's World: To cute
Keshawna Cheatham:
Corinne Washington:
1Angel Eyes:
Barbz Da Barbie:
DeNae Hamilton:
Pretty Tb💕:
NinaMarie:
Jenay Brown:
ALYSSA AUGUST: This is super cutee Where’s the hair from
Ri:
justys xo:
Revamped By Shaday:
Talasia Brooks:
Dantae Dingle: What kind of is that