$8 Quick & Simple Crochet Wig | Half Up Half Down Crochet Style | Sharronreneé
- Posted on 19 March, 2020
- T Part Wig
- By Anonymous
hey y'all!
please be sure to LIKE, COMMENT & SUBSCRIBE!
I used 1 &1/2 pack of Marley hair
crochet needle
crochet wig cap
♡ 'All Things Beauty' has JEWELRY now! Click The link to shop
https://www.shopallthingsbeauty.com/co...
• Use code 'YOUTUBEFAM' for 10% off your jewelry!
♡ Need WIGS, LASHES & more? Click the link below to shop
https://www.shopallthingsbeauty.com
• Get 15% OFF LASHES when you use code 'ILOVELASHES15' at checkout!
• & All HUMAN WIGS have FREE U.S SHIPPING when you use the code 'WIGSLAY' at checkout!
FOR BUSINESS INQUIRIES EMAIL: [email protected]
♡ SOCIAL MEDIA ♡
• Instagram: @Nuudekisses
https://www.instagram.com/nuudekisses/...
• Snap: Sharronrenee
♡ Keep Up With ALL THINGS BEAUTY ♡
• Instagram: @SHOPALLTHINGSBEAUTY
https://www.instagram.com/shopallthing...
• Facebook : SHOPALLTHINGSBEAUTY ❤
And lastly make sure you're subscribedddd!!
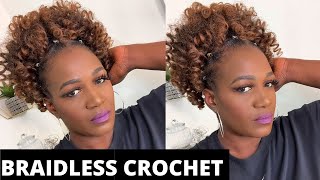
Hey y'all, so we're gon na be going from dusty and crusty to lit and lovely um. So if you wants to see the style, then just keep on watching well, first and foremost, let me just say he says: what's up welcome back to my channel, but today we're gon na be doing this quick, very quick and simple crochet style. So what you're gon na need is a mannequin head. You'Re gon na need some Marley hair of your choice. I just got this because it was like four dollars a pack I mean I got it in a color Ford and you're gon na need a crochet cap. Well, I got a wig cap that has the holes because I wanted it to be a bit more flexible because I was gon na be pinning it in and I needed it to move how I wanted it to move. So I got that was like a dollar just a cheap wig cap with holes in it and you're gon na need a crochet needle as well, which I forgot the show, and I got these rods just because I didn't really use them. But if you wanted to add like more of a curl to the end, you surprised so I'm going to be cutting the hair in half, because I do want it to look a little bit more natural, like my hair, is definitely not this long, so cutting it In half and I am going to fringe off the ends because we did just cut the hair I have so it does have kind of like a blunt end, and we don't want that so we're just gon na fringe, it out a little bit and then separate The other side - and you know it looks more natural like in comparison to like just a blunt in and that it just looks much more natural. So what we're gon na do is literally just crocheted it here into the cat. You, I think everybody knows how to crochet by now, but you open a latch hook. You put the hair on you close the latch hook. You pull it through in the you notic, it's really really simple, but what I'm doing is trying to map out the half wig portion, because technically this is like a half wig. So I am crocheting like around the perimeter of the half wig and then I'll go back in. I thought to do that and fill in the inside, but I wanted to kind of map out where the hair on the outside was gon na, be so that's what I did because I needed it. I wanted to make sure it was gon na, be the right amount of hair and fit on the part correctly. So now I'm just gon na go and crochet the inside off camera, I'm literally just crocheting in hair and filling it up on the inside, but not making it too too twofold, because I still wanted to look like a natural density, okay. So after you're done, this is what it will look like and it really does look like half of your hair right like that's what I wanted it to do. So that's why we did the perimeter first and then we inside so now we are going to braid the hair, because I wanted to look like a braid out so literally just taking a hair braiding it nice and tight, I'm not like combing the hair out or Anything like that, I don't think that's necessary, I'm just trying to make sure that the ends are not super tight together, because otherwise they won't current we're not crimped. You know taiks are like the the braiding, so I'm just gon na literally braid the braid I'm trying to do it nice and tight so that it really forms that crimp that we want. So then, normally when I do this, I don't use rollers, but I want it will rise, but I wanted to show you all that you could, if you wanted to. I just think it's not really necessary because I just wrapped the end of the hair around the braid itself and that forms a curl on its own, so the rods are not necessary, but I got them just to show you that you could kind of do either. Oil and they really do endow end up looking the same, but now that I'm to the end, I'm going to take the ride and just wrap the end around the ride and I'll show you coming up that, like you, could literally just wrap the hair around the Braid, if you want it to and like I said it ends up looking the exact same, so those rods was like a dollar. You don't want to get them. You don't have to save yourself, your dollars um, but yeah. Now that we to the end, I just want to show you that literally I just wrap the hair around the end like so to make a curl and it will stay because the hair is coarse and you know it'll say, and it's literal I'll leave it like That and I dip it like that, you know anyway, so off-camera I did um grate some hair onto a little rubbing because I'm a crochet that into the top of my hair later. But now it's time to dip the hair, be careful with this hot water says. I'M doing a braid, that's gon na go in the top of the head for, like the you know, half-up half-down portion, I'm dipping that first and literally just dipping the herring and then putting it in something to dry it off and then lean in to the side. I'M saying false true for the manikin head, just be careful with this hot water like it's hot, okay, um and then yeah, then we're gon na, let that dry overnight and then the next day. This is how I have my hair parted off, like they have like the back portion, I'm literally just going put a cap over it and put the half wig on and then the top portion. I did some twist in the middle of my head and that's where I'm going to crochet the hair into I put it onto that bow. So that way I could crimp everything at the same time. So it has time to dry so the next day I could just literally take it apart and then crochet it into my head. So that's what the braid out is looking like. So I was just trying to make sure it was matching my hair color perfectly and it did like. I said I got the number four um so yeah, I'm just gon na crush a tie in and fill it up until. It'S full enough. I didn't want it to be O default, but I did want it to be full enough and it was so much easier for me to like dip the hair and braid it and stuff. While it wasn't on my head and then put it in. But I was gon na try to like leave my hair out, but my braid pattern was just too tight in comparison to the other pattern. I mean I did leave it out, but I kind of tucked it in with the hair and it all blended nicely. But this is the half wig right here they have crochet wig like you, definitely are able to take it off and put it back on and I didn't cut the cap or anything I'm gon na show you. I literally put it on like that, because I needed to keep the elastic in like the band of the way cap, so what I'm doing is taking the XS and then pulling it over and I'm pinning the hair more so into place. So it looks like it's literally coming directly out of my scalp, because it is a part right there so, like I said, as you see, I'm taking a hair and I'm kind of pinions and hair down. So it looks literally like oh, I can see yeah yeah growing I'll, just go cute. You know that kind of vibe but yeah, so I needed the elasticity to stay in the wig cap. So, that's why I didn't want to cut it and that's why I wanted to get a cap that was more flexible, opposed to like the more Stern crochet caps, but yeah you see what I'm doing literally taking in hair and in it in place. So it looks like it is growing out of my scalp and I'm just gon na pin that all the way around just like like the top portion cuz, they didn't really need it to mean it didn't, really need to be paying in the back. So that's what it's looking like! It looks nice and full. You can't see any gaps or anything like that. So now I am just going to pick it out and fluff it out and stuff, so it's full and beautiful. So for the front portion. I took out the twist that I had not the ones that I crocheted the hair into, but the ones around it and I'm just going to brush it up literally like that's all I'm gon na. Do I'm gon na brush it up and then put a rubber band on it and you can wear it in a bun or you can wear out in a ponytail like how I had I like it best in a ponytail, because it just looks so cute and Girly so yeah, that's literally all that I did and then I'm gon na put it in the ponytail and then I kind of did tuck. My hair, though, because my braids out like it was kind of tighter than like the hair. So I kind of tucked it under, but because the hair was so like big, it was easy to disguise and then I went in and I'll just cut any like excess pieces off. That was just a little bit too long. So like see, you could award in a bun or York. Where were like this, you see I'm just literally tuck him out here under and that's that on that and I'm gon na pick a little bit and call it a day. But I love how it looks like that: oh yeah, I'm also gon na fix my edges. Yeah fix my edges and then that's pretty much that on that. This is the final look. I love this so much and what I love most about it is like you could take it off. It'S like lowest key, a wig, oh well! You can't take off the top portion, but anyways. If you enjoyed the video, give it a thumbs up and feel free to drop them in the comments. If you have any questions, I will definitely get back to you and subscribe if you're not already, ok enjoy the rest of your week your weekend, whatever it may be, peace, and I see
Comments
beedeepresents: See this is the texture I wish the sensationnel half up half down kits had! You did an amazing job! Very creative and I will be trying this out like...this weekend lol thank you for sharing!
Gypsysilver: This turned out really cute! ❤️ good job
PetiteMe: I absolutely love this. It’s really simple, quick and so versatile! So pretty!
omenkahelen: Looks SO beautiful and natural!!! I can’t wait to try this thank you!
Tikorya: Thank you sis! This turned out so beautiful.
A W: Great idea! This has the potential to be very versatile. I'm loving thus! Thanks fir the tut!
Diarra Janae: Thank you for the idea
SharronRenee': I love y'all! I hope y'all are staying safe, calm & sanitized ❤
Milan Emaj’: This is soo cute I may recreate this style on my channel
Ms Belinda: So cute
Aja S: SUPER CUTE!!
At this moment: looks incrediable so realistic-
Candy J: You go girl
Dewana Johnson: You give get instructions. I like it really cute.
Emma Atato: Can you make one for me ?
Aaliyah Harriett: I know this is old but im hoping you'll reply anyways. How secure is this? Im a dancer and don't want it falling off in class x
Anita Brown: Where are you did your thing all that it’s gorgeous