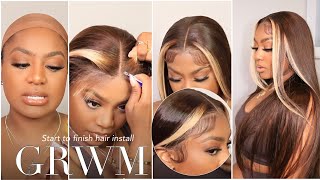
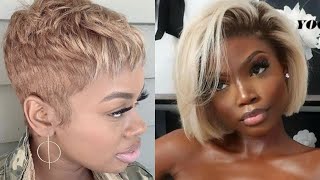
Half Up Half Down Braidless Quickweave| Perfect For Short Hair
- Posted on 10 July, 2019
- T Part Wig
- By Anonymous
DON’T FORGET TO SUBSCRIBE!
HEY GUYS! This video is pretty lengthy & chatty. I’m no professional hairstylist. I’m just a girl who likes to switch up here hair the easiest way possible, but I did want this to be as informative as possible. Hope this was helpful! If you found this video helpful give me a THUMBS UP!
Hair details: natural wave 22 24 24
Get This Hair Now ➤http://bit.ly/2KxqQ1l
★ Alipearl official hair store ➤http://bit.ly/2KxqTKz
►Use code:“alipearlyoutb”to save $10
Recommend natural wave lace frontal wig➤http://bit.ly/31eWRky
Top selling natural wave 3 bundles with frontal➤http://bit.ly/31lEaMq
Email: [email protected] (Provide Wholesale)
WhatsApp:+8617719937661
Get to know our latest promotion ? http://bit.ly/2H0Gmmc
#AliPearlHairAliexpress Official Store:
Deep Wave Lace Front Wig: http://bit.ly/2IsoIWe
Body Wave Lace Front Wig: http://bit.ly/2IobhX5
Amazon store hair link:
Deep Wave Hair: https://www.amazon.com/dp/B07CZGTLCH?t...
Loose Deep hair: https://www.amazon.com/dp/B07BJZHXWT?t...
Body wave Closure with bundles:
https://www.amazon.com/dp/B0783MNYML?t...
Straight Frontal with bundles:https://www.amazon.com/dp/B0786YRGQJ?t...
Follow @"alipearl_hair" on Instagram:https://goo.gl/SjMrzq
Follow @"Ali Pearl Hair" on FaceBook:https://goo.gl/GFnwNk
Follow @"Ali Pearl Hair" on Twitter: http://bit.ly/2Wb7J08
FOLLOW ME & STAY CONNECTED
* INSTAGRAM: @tashawashaaa
* TWITTER: @tashawashaaa
———————————————————
BUSINESS INQUIRES:
* EMAIL: [email protected]
All right guys, so my hair is wet. Okay, all right so many graders, but yeah I just washed and conditioned my hair. You want to start with clean hair. If you do this because I mean why not you know, but I did use excuse my hair. I did use this shampoo and conditioner from formulate from formulate so far you guys I've been using this now for for about three or four weeks now so another three and a half weeks, so um as you can see, but I just still our little sparks. They honestly look WAY worse on camera. Then they do a person but they're really growing back. So I've been using this formulation shampoo and conditioner. I wash my hair once a week and I've been applying the wild growth to my edges. I don't put it throughout my hair because, smoother than that but um, I just do it on my edges and it's been helping a lot. So Michael is saying make sure you hear it's completely dry. So now the first things to do, which is honestly the hardest part to me of this whole hair process, is going to be parting, your hair, so there honestly, and it just kind of section off like a little area, and at this point you determine if you Want like the whole thing to be half-up half-down. If you just want like you know, some people do like this little midsection. You would determine that, but I like the whole thing, because I'm well can't shake your hand so like if I do just the middle part. I'M gon na have to be trying to blend all this into the weave and that's not fun for me, so you're just gon na call this, like a rough draft of where you want to come, I mean where you wan na part and then you kind of See from there you'll call them like you're part right there and then just sort of follow it. That thing yeah, that's fine, so just part off wherever you want, and it can be a little bit. How could I swim is so you can part okay, so in this you can part this a little higher than you actually want it to be, because remember you're going to need a little bit of hair to cover the track. I don't very minimal leave out when it comes to this part. So that's why I'm just parting it exactly where every because it's obviously not going to make that much of a difference. So I'm just a struggle with parting and I'll be back, but you guys get the gist of it literally part your hair and have it's hard to see. But you wanted to find you. You just want to get it as straight as possible, but it doesn't have to be super straight because this is not going to be your final part. This is just me parting off where you want. You know the half up half down to be if that makes sense. So now I'm gon na mold, my hair now is take some too. So now I'm going to take a elastic band, the ones that I like without the little metal ring around it. I would use a rubber band, but a rubber band obviously has too much tension and might possibly break your hair underneath and you don't want so I'm just getting a nice grip on that and I'll just tiny little. Obviously, this only really works. If you have short hair, if you have longer hair, I would recommend bringing it, but I always cut my hair, so I never had that problem like this is even too long for me. So they're going to have take two because two is gon na protect the blue from touching your hair. If you use one you might possibly seep through, if you use two you'll be for sure good to go so before my cap, I'm gon na use this I'm going to use this protective shield, it's a quickly protective shoe. So what this is gon na do is gon na adhere the cap to my head and keep this flat. So this is like ideal for shorter hair. So if you don't have hair to braid, this gives it something to grip to or if you don't have a cap, some I've seen people. I literally just use this. Let it get hard and then put the glue over this, but I'm not doing that. So technically, I'm gon na have three layers protecting my hair from the blue and the cap. So that's what I'm going to do? I'M going to just apply this and you guys this literally just comes out with warm water. Okay, so do not fret my pet! I'M just gon na apply that I don't I used to do it all throughout the hair and have my whole head be hard, but now I just apply it around the perimeter where I know the cap is going to grip too. I really don't need a lot of that. I'M gon na go get my first cap and now we're going to put our second cap. So now it's good basically adhere to the cap. So now we are going to have to apply some of this. On top of the cap, so you're basically gon na, have to feel and see where you're applying that get on your part is make sure you got a little too high and just kind of run that down, because I just don't like to put too much on My hair, but like I need this and at this point you can let it air dry or you can go under the dryer, which is what I'm about to do. That takes only five minutes to dry like five to ten minutes or you can use a blow. Dryer but I'm going to the dryer, because I'm the names day so now that this is completely dry but I'll go ahead and cut off the rest of the cap, Inola people and try not to cut your hair off. I know a lot of people keep the cap on while they do this, but I'll eat. Take it off, because I can see what I'm doing and where I'm gluing, so I'm just cutting off this excess cap then again be very careful to not touch your hair. Please, and thank you alright, so this is the hair that I will be installing today. This is by Ellie pearl and it is there naturally, and it's also important chips, so this is literally been just washed conditioned, and so this is what you're getting looks nice. I I think I know I love like an effortless way. Like a body wave, I like a natural wave water wave, loose wave versus like curly, hair or deep wing or straight straight, and have to keep straight curly hair. You have to keep curly stuff like this. You can kind of just fluff and go so yeah. This is that the bundles are hopefully enough. I typically use 3 when I do this style, so we don't think it should be more than enough, especially since it's a lot fuller. They just had it rolled up. Pretty good, let me show you guys what the back looks like it's literally just covering what I need it to you see that cool. Oh now, we're going to apply apply how we're gon na put in our weed - and I don't apply it straight like this. You want to do it out of curves, because when you do it at a curve, it actually makes your hair look fuller. So you want to do it like this that make sense. So, instead of going like this, you want to go like what that and do it upwards guide good. So the trick to this is to measure blue cut measure blue cut and I'm going to pack two bundles back here. That'S a lot with it! You don't do it. You know start from the very bottom, so it's measured it and allocate, and whenever I do my blue I'll spray like spritz or got to be spraying on the track, so that the glue dries a little faster. It sticks better to my hair and it lets longer. So, oh I don't want me who's ahead. I freakin hugger I'll just apply that right there and just place that right. We'Re supposed to do. You can use a blow dryer to dry this, but I don't I'm not doing that after every track, because it's just not necessary so from here on out it's going to be pretty much it from here on out. It'S going to be pretty much repetitive, I'm going to be doing the same thing until I get to the top. So when I get to the top, I will be back and I'm pretty much gon na just be packing the dumb hair on top of each other. I'M not leaving any space in between because I have two bundles so they need to fit, and I want mines to be nice and full, alright, alright. So so far, that is one bundle, as you guys can see. I still have enough space to pack at these half of the other bundle. If I spaced it out, I could have you just one bundle and it still would have been very full at the bottom. Is not gon na be sparse at all. You know smart, sparse, sparse at all, but I just like lots of really big and I like to have it a super sleep button situation, so I'm gon na go ahead and go in with this second bundle. I believe we're coming up on our last track. This is how much I have left of the second photo, so a pretty decent amount, so everybody's head will differ, though, because everybody's head size is different. So I'm just going to measure this last piece and the higher up you go. The smaller your tracks are getting. That'S why you curve them. You curve the track so that they like curving. The tracks covers them so like, instead of up straight across and you having all these little like tracks, sticking out behind your ear and out here, they're, all laying on each other. On top of each other, so it's all just like really flat weight. You go this little bun situation in the back of my head. You turn around. You want this little bun situation, it's still pretty like decent. You know so this is going to be the last piece. I think it doesn't have a little weird gap. Everything is just flowing and naturally layered. Oh, that gon na work some magic on the top of my head and we're gon na see how this goes because, remember my edges, as you guys can see. My part is not crisp. It'S looking a little weird. So what I'm going to do is part off my hair to cover that track. So I'm just going to take a little slither and because there's not much trying to show like there's literally no track showing here, it's all being covered by the hair, because we did the curve method, the only track that is showing. This is a small one right here. I probably look so crazy, but it's a small one right here, so I just have to do like a party alright. So now the thinnest part of to my life jeans, I'm gon na, go ahead and show you guys you guys can see that it doesn't match the hair at all doesn't match the texture, so we're gon na have to flat iron this just to match a little Bit more but yeah, so now I'm actually going to flat iron this so that my ponytail is just a lot easier and yeah. Before I starts licking my whole ponytail, I'm going to take out the baby hears that I had left and any sideburns I'm going to be using the stuff back there at Easter and put them up all my hand and just go like so I'm taking my brush And I'm just living that through the air - and I don't know why. But I like to do my baby here after I do this. It'S just a preference, but you know do what you please so now I'm going to take some of that spurts and I'm going to spray right over that, so that it stays in place and I'm going to take two rubber bands, I'm taking two fur security and While I'm doing this, what's probably gon na pop, so it's not left a little easier. So, just like any time upon telling you guys do wan na make sure it's nice and smooth, there's no lumps and bumps so the place that whatever you're comfortable, if you want it further back do so. If you wanted more on the top do so, I'm gon na do my Bund, which I'm doing, but I'm doing it more towards the top. So this is really the thin side, but alright guys, so you guys saw in the last clip. I did the quick weave and that bun was a struggle bun. So today's a new day, I'm about to do my makeup and head out, but I just want to show you guys how to do the ponytail part, because I think a lot of you are still gon na ask regardless and it's pretty essential you can. This bundle was just too thick to put as a bun for me what I did was made a little struggle braid, as you can see, and um I added some braiding hair, but that most people have more hair than me on the top of their heads. So you know just braid your hair. This is just something y'all, I'm so ratchet when it comes to my hair, like I don't know how to do here, I just know how to get by okay, so this is the bundle I washed it again, because when I did it in that blood, it kind Of made it um lose its pattern because I had I just kept twisting it and twisting it so yeah I just rewashed it, and what I'm gon na do now is take this needle and thread me guess this thread is blond or yellow or whatever. This is actually hair, I mean like sewing thread, but I couldn't find my hair. I know I have a big ol thing of sewing. I mean of hair bread whatever, but I just can't find anywhere, and it's just really not that deep, because this part is not that essential. So what I'm gon na do now is at the end of this. At the end of this, braid is a hair tie. So I'm gon na like go through the hair, tie one of the loops, and I hope you guys are seeing this. I really don't know what I'm doing either and I'm just gon na like make a little knot, and this being not black might be actually better because when it's time to take it out I'll see what I'm doing so now, I'm gon na take my bundle and I'M gon na take the end of the bundle and I'm going to pierce a hole through that. Please. I hope I don't put myself that and I'm gon na - oh my god now this attached - oh my god, and I'm going to go through it again, just so that it is secure. So now that that is on and you as you see, I didn't use a big piece of thread because it wasn't necessary. I'M going to cut the end, so that is now locked in and you could feel it too much is in there so cut your thread. Make sure there's no hair in there we're just gon na cut the ends of that and pray. It doesn't come out so now. At this point, it's pretty easy. All you're doing is wrapping around and you're just wrapping it like on top. If that makes any sense. So you're wrapping the track on top of each other, and this is gon na give like a layered effect as well, when you do that, instead of it just all being one like. I just hate when it's all wrapped around the base of my ponytail or my braid whatever, because it just it's too thick and it just looks very unnatural and it has a higher chance of falling off. This is not gon na fall off at all. Make a little knot to end this off you're, just gon na want to sew this a little more time just kind of security. So nobody won't worry about this peeking through, because once you have this whole bundle wrapped around. That is definitely going to be covered. So I'm just going to be wrapping this around and making sure it's flat. Now you got ta want to make sure your life combing through as you go, because if you just I've done that before I just kept wrapping wrapping wrapping and then I had a huge tangled mess and that you guys are just no fun okay. So now we're getting to the top and, as you can see, we have a pony tail. This is how much I have left, so I'm just going to start wrapping. It spread it out because we need to cover this little base now, and this is why I love this because it lividity looks like I just put my hair in a ponytail. It doesn't look like. I have a thick band wrapped around it. I just hate that so much so now I have this much left and I'm just gon na take that and I'm just going to wrap that around to secure it. This is not going to be my final wrapping, but I'm just taking that to secure see my homie, I'm so proud. You can leave it like this, but I think I'm gon na take another section and wrap it around. Well. I guess I don't have too much yeah, that's pretty much it and it just looks so much more natural. You want to make sure the last time you wrap it it's as smooth as possible, so kind of stand, the hair up where you want it and just wrap that baby over and I could have probably put more hair around the base. But I don't really care for that, so yeah now that you're ending it. You want to make sure that that is nice and sealed you just wrapping it a ring and then the ring and this bridge gets really sticky. I'M just gon na take that wrap it up so now the trick is like Bobby pitting this, so it doesn't look so like limp. You kind of want it to stand up, but it's so hard to hide the bobby pins. So you just kind of feel them to nurse. Oh, I should probably do it in the backpack I'll make the most sense, but I can be hurt, see the difference already. I'M gon na have another one and you guys this pretty much completes my look as you can see. You grab the edges. It'S coming back okay period and this is the hairstyle haven't added any product to the hair. I like it like this. I might win it now, just so that when I do leave out it has a little bit more bounce. But honestly I don't know I didn't want to leave it like this yeah. I love how my hair came out. It looks super cute, so yeah. I hope you guys enjoyed this tutorial hope it was simple. I know I ramble a lot like I said I met the mess of explaining things. I'Ve shown you better than I can tell you but yeah. This is pretty much in boys and again thanks. So much for watching do not forget to check out Ally, pearl hair, I'll list everything below and yes, it's perfect hair for this season. Okay, claps, look at my hair, guys! Look! I did you

Comments
Mzimsosupadope: That's me "I dont know how to do hair, I just know how to get by!" This looks simple, think I'll try it.
Monique Jackson: You have become one of my favorites! Loving the consistency! Continue to slay girl
alishia white: I had got a sew in and the girl who braided my hair snatched my edges, idk what you’ve tried but I tried rice water and the wild growth oil and my edges came back fully in 3-4 months how they were before not as long but the thickness❤️
It's Silver Madallion: Thank you Jesus for this video! I need help!
Shay Banks: I recently subscribed to you and I live for you already!! Yesss sis really motivates me to start my channel thanks for the consistency
Madison Senior: Lmao I can’t part my hair to save my life. Definitely the hardest part!
N҉I҉T҉A҉ G҉: Yassssss! Love the look.
Ellle LoveLee: Thank you for sharing this!!!!
Precious: girl i’m about to try this. pray for me lmao
Kimberly Anderson: Love it
Linda Hartsfield: Hi. Babygirl your hair is always on point. Girl it looks like it takes so much time. I love ponytails. I do the drawstrings. I use the drawstring to do a twist bun - that man bun look. I get compliments a lot I have the bang going on with them. Girl you always slay. Great job Everytime. Love,love,love your videos. . YESSSS..
Boba 209: Makeup tut on this look pls!!
Sequoia Ridgeway: This helped a lot an I have the same length an type of hair like you !!
RosaLyNNTV: <333 thank you for sharing!
Ali: Great job
Mercedes Mariee: Did you space the hair out when gluing?
Kinteh's Kitchen: beautiful
Brittany Perkins: You did a great Job. I am over hair stylist . TY MAMA
Sherica Service: whats the name of the glue you use to hold the wig cap
Ayola O: Loving your channel !
Lyfeofbee: “ I’m low key a chicken head” made me choke on my drink
Abi Ykk: Is it just my hair or does the spritz burn? Sometimes
Life with Chiquita: First! Does putting powder on your face first really help with sweating in the summer?
Camia B: Mad cute
Shamika Boyles:
Tykeria S:
Forever Nayy: so when you put tht liquid on your cap it just sticked on ?
LaShawnda Cooper: ❤️❤️
Theetamrivera: Have you been told you really resemble “Taylor Coleman” ....just a mix of caresha “yungmiami” and Taylor
Vash C.: I Been Waiting For A Video !!!
Chynna Dol: What music is in the back