Kim K Bob: Start To Finish | U-Part Wig, Lace Closure Prep, Cut, Color, And Style
- Posted on 02 September, 2015
- T Part Wig
- By Anonymous
*WATCH IN HD*
Hey everyone :)
In this video i'm showing you how to get a Kim K inspired sleek long bob.
Check out my makeup look that I'm wearing in this video!
Enjoy!!
Let me know some videos you would like to see in the comments below :)
Watch in 1080P!!!
Hair Info:
Link to hair:
http://www.aliexpress.com/item/Brazill...
Link to closure:
http://www.aliexpress.com/item/4-4-bra...
All product names listed in video.
*Purchased by me*
This video was not sponsored.
My Kylie Jenner Inspired Makeup Tutorial I'm rocking in this video:
https://www.youtube.com/watch?v=HpwQBl...
----------------------------------------------------------------------------------------------------------------
See what i'm doing!
Personal IG: http://www.instagram.com/chibuz
Beauty/Style IG: http://www.instagram.com/itschibuz
http://www.twitter.com/chithegee
Snapchat: chibuz
____________________________________________________________________
For anything regarding any product reviews, sponsorships, business inquiries, etc. contact me at:
MY ONLY BUSINESS EMAIL!
____________________________________________________________________
AWESOME YOUTUBER OPPORTUNITY!!
Are you a Youtuber who's looking for sponsorships and free products review on your channel??
Check out these great sites and sign up!!
https://famebit.com/a/ItsChibuz
http://grapevinelogic.com/creator/?ref...
____________________________________________________________________
Music by www.audionautix.com/
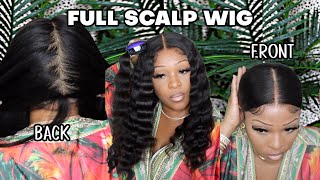
You you so I leave the hair out to dry, so I'm gon na it's late, so I'm going to just leave it to dry overnight and then I'll come back for scrap, ok guys. So the hair is dry and now we're going to start making our our unit. So as Felix don't cap, my own little stone five styrofoam head and a wig stand, which i really recommend, because it really helps you be, like you know: Ben hey, like a real person, so it's easier makes it easier. So the don't kept I have today. I went to a different view: supply store, so I didn't see the cap that I normally see with the man on the on the cover just a girl on it, but i'm pretty sure to work just fine, so I'm just gon na use. This line to mark is like where I want my part to be so I'm going to make it so I'm making it for a middle part. So I'll show you how but yeah so you want your thread, got this big bed, which you know doesn't really run out fast and thread your needle and get ready. So we're going to start off with our first bundle and I want to be able to wear my unit in a ponytail if I choose to so I'm going to take the first track and I'm going to lift the cap up all right, analista cap up and Take the first track and I'm going to thread underneath I'm going to poke the needle through the left like through the back side. I know people say don't do that, but whatever I want to do that, so I poked it through the back right. So you take it underneath going off this and take your needle. So now you see the track is underneath so hold it. There pull the thread through. I want to throw it cuz. I don't feel like writing my needle too often they're going to pull it through. So yeah there you have it so you're going to keep going that with the first left and I'll speed up for sure. Ok! So now back so this is going to be one of the few times where I'm actually gon na cut the wet, because in this um, when I like to make my wigs, I like to do the fold-over method. So since we're done here, we just we don't need off, we don't need to go all the way around. So I'm gon na cut this one good cuz, this whiff and they had it. So you know we want to put in point el aire get up. So now we're going to come out and do the rest of the link um. I don't know if I told you guys this already, i'm using three bundles of 14 inches, because i want to long bob. So i wanted some leeway so you know play around when i cut it so three bundles of 14-inch. Normally I like to use like four bundles for hair, but it's I wanted to be a really sleek bobs, so you can smooth and flat Bop, so imma leaving three bundles and I don't no, I'm going to use all three and a happy 12-inch closure, and this Is all proving here, as I told you earlier - ok so I'll come to you guys when I finish ok, so the wig is practically all done. I just want to come back. I'M on the last bundle like I have quiet. Actually, I basically had the whole third bundle left, but I want to come to show you what I do at this point. So now, i'm at the front and as you can see like, there's not really much space, there's like no space to so anymore. So i want to fly some secure. This last track right here, i'm going to cut it all right and now, which one do at this point. Is you take your truck and you're gon na kind of lay it you're going to kind of lay it as your closing piece you know, so how you want to close it you're going to forget all this like leftover, all this space, that's left, you're, going to Forget that for the time being, but you're going to kind of close it off like this and then you're going to sew it okay, basically you just do it like you normally do bring this track here. Put it through be careful of like if you get this kind of cap like I got be careful, this metal part make sure you're still getting the track secure and what this does is. Basically, it helps you to have an easier time and closing off the wake. So if you just do this part before finishing it makes it smoother. So, like your top part, is smooth and look seamless and then afterwards you just go whatever tracks. You have left and you feel the rest in, but this makes the top load nice and clean and helps us stay flat, all that good stuff. Okay, so basically you get the point, so you have all this fulfilling. So when I finish that out snip it when i get to the front slip it and then just fill it it to him de and i'll, come back and show you guys: okay, you, okay! So I'm coming here to show you that completed wick! It'S all done and don't mind the it looks bumpy like on the sides, but it's the curl so promise it's very flat, closed and ready to be installed. So just going to cut down the middle straight down the middle and I'll be back showing you how to prep the closure. Ok guys so basically really have about this. Much of the bundle left much very little bit so we're gon na start prepping our closure. So you take it, you want to have your mannequin to take my mannequin on my dining table, so it'll work, but a long story short we're going to prep it for a middle part. So you take it and you want to have like two pins like these. Like um, are they easy for the easy for something fabric canvas whatever, and you want to pin both sides of your closure down? When I mean I cancer that doesn't move all right? Okay, so you have that next. Will they take? Your coma? Came from a rat tail comb. So when did you choose this and you want to make a middle part? It take your heartburn from our brush down side yeah! You can tell this is really fresh clothes really fresh, so like it's not really laying any one particular way cuz. I just watch the after. I died it little partner right now we're going to take some mousse. So I have this little motions: moose rack and lotion film, a poacher we're going to take some we're gon na. Take it I'm going to put it on the part both sides see of the closure. All right. You can already see this already starting play a little flattered now, flip it down bernie's it now going to get a little tighter gets more moose and Chris parts might meet super paraphysical, i'm going to plug in all that, but i do want. I would like to be somewhat close to the real part. I'M going to use. Ok now go blow dart, ok, so that was, I didn't, take too long. So now I'll take the flat iron and I'm going to go over the part like this. It'S already pretty flat like right now, but you want super flat. You'Re gon na run it. So I did this to the other side. Also, so it's pretty flat last thing: we're going to do is just gon na take a piece from both sides, all right. It'S kind of like a little. You know together because of the movie sorry, so we just want to flatten this huh anyway. It looks pretty good to me. Do the same to you, I invented something: that's it honey, get it flat for your install. So right now my hair is conditioning, so I'm trying to wash it and read it and then I'll come back and show you when i install it. Ok, ok guys! So I'm back so i installed the closure and the apart and now it's time to cut it. Styling and strain it and I'm looking all good so um. What i would do first, is, I know, a good way to like cut hairs, to put it put it in like a rubber band, and then I cut in it. But, like I don't know, I'm gon na do that. Actually, first one we see how long my money I want to at least be like, like this long yeah like this long so gon na use that I'm gon na. I wouldn't you start cutting. You know what that's what we do. Actually you know ok, so I'm gon na put in a ponytail. Let'S see, ok and now i'm going to cut sure. That'S what I want good point out and now I'm going to cut above above it, okay, okay, yeah! You get the point, let's see. Ah, it's not even ok, ok, the real good we're gon na fix. It isn't first time I'm kind of about, but I mean how are you gon na know how to do something? If you don't try, you know so all right. This, I is more of the link that I'm going for so let's see I'm going to just start cutting it. Let'S see now, let's try and get into mad how about that pretty even no spirit back. This is still just a bit longer inside just a tad. These are cutting shears, so they're really skinny. So I think they're about good um and regard sit back. I just bring it forward. You know. I see that getting long pieces i'm going to like this looks pretty good for me. I want it. I don't really want any layers and all that good stuff, so I like how it is so now I'm going to straighten it and then after it, okay guys, I love it. It'S so flowy and soft and straight now, it's time to get it. Don'T get all this right? Okay, oh yeah! It'S one more thing! I got to show you, so you want to take a black eyeliner and you want to go here where the lace is, and you want to cover it black, just so that you know me pull it back. You don't see all at least just what all looks like here. You know you just do the same for the other side, so we go back. You don't see what police okay is. Then I'm done so. Thank you so much for watching, oh and if you are interested in this makeup, look I film this before I did this, so you can check it out. I put the link below see you next.


Comments
Sadia Deen: Where did you buy this closure? Honestly one of the most natural closures I've seen!
Jas B: Yassss Your Bob looks BOMB and what lipstick did you have on?
Sadia Deen: Where did you buy this closure?
ItsChibuz: Kim K Bob: Start to Finish | U-part Wig, Lace Closure Prep, Cut, Color, and Style