Luvme Hair U Part Wig Review | Wig Install For Beginners.
- Posted on 11 June, 2021
- U Part Wig
- By Anonymous
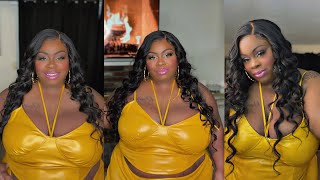
Hi everyone! In this video, I will review + install a 20 inch U Part wig from Luvmehair.com, if you are interested in a quick and easy hair transformation that looks natural, this wig is what you need! In this video, I will share the easiest install possible and two hair styles for inspo. U part wigs work for all hair types.
GET THE LOOK!
USE CODE: ( KERENO ) FOR 20% OFF
YOUR NEXT LUVMEHAIR.COM PURCHASE
---------------------------------
PRODUCTS USED
U Part Wig: https://bit.ly/3csFMuU
Buy it on amazon GET IT ON PRIME! : https://amzn.to/3pAcpfB
OTHER WIGS: (fav)
WET AND WAVY AFFORDABLE HEADBAND WIG (GET FREE TRENDY HEADBANDS)
https://shop.luvmehair.com/products/we...
MIX BROWN COLOR CURLY GLUELESS HIGH DENSITY LACE CLOSURE WIG
https://shop.luvmehair.com/collections...
UNDETECTABLE INVISIBLE LACE GLUELESS 13X4 FRONTAL LACE WIG | REAL HD LACE
https://shop.luvmehair.com/collections...
Rattail Comb: https://amzn.to/355stwu
Hair Gel Wax: https://amzn.to/3w7ZnZf
Elastic Hair Mesh Net Wig Caps: https://amzn.to/3v4UKxz
Heat Protection Spray: https://amzn.to/3w3uKnD
Professional Ceramic Hair straightener: https://amzn.to/3pEi7gA
*Please note the amazon links are affiliate links if you use them
I will receive a small commission*
Music-Production
Mama- Emmit Fenn
Rose- Lukrembo
You & I- Matthew May
STAY CONNECTED!
Follow me on Instagram: https://www.instagram.com/okkeren/
Business Instagram: https://www.instagram.com/sereneandbel...
Tiktok: https://www.tiktok.com/@sereneandbelle...
Pinterest: https://www.pinterest.com/vivalaagrace...
LuvmeHair Website: https://bit.ly/3giMwwC
Instagram: http://www.instagram.com/luvmehair/
Facebook: http://www.facebook.com/luvmehair/
YouTube: http://bit.ly/2OCjZrr
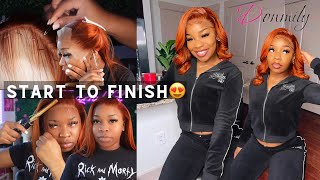
Hey guys welcome back to my channel today i will be unboxing and installing a u-part wig from this company called love me hair. They were kind enough to send me a wig that is very natural. Looking and it's perfect for beginners me being inexperienced with wigs. It is so difficult to have to deal with the lace just laying it flat and just dealing with all of the baby hairs. All of that, so i'm really happy to be trying out this wig. I have looked at some of the reviews. Every single person looks absolutely amazing. Today, i am going to show you the easiest in style possible, and i am also going to do a quality test like in all of my reviews. I will share the pros and cons of this hair and let you decide if you think that the product is worth the investment, so we have a lot to cover, let's go ahead and get started so before i start, i want to give you some general information About this company they sell affordable, luxury hair. That'S supposed to be a hundred percent human hair. They have a large variety of wick types, so they have the 360. They have the undetectable lace, they have the headband, wigs, the u-part wigs. They have absolutely everything. So i'm going to be linking down below the website, for you guys to check out all their options. They have, in my opinion, one of the largest variety options for just hair types and hair length. You will see all kinds of hair textures. They even have a search engine where you guys can google, your local hair stylist and you guys can get your hair installed if you need to which is just so awesome. One of my favorite things about this site is the shipping. I got my tracking number on a wednesday and that same week they try to deliver it. On a friday. I wasn't home to receive the package, but it was just really nice to see how quickly they delivered it. This is the box that it came in very professional, so pretty i love that they gave me a nice box for me to store my wig in there. If i'm traveling, if you get a upart wig, you are going to get a free flat iron. So hopefully they gave me the one in here, so i can review it for you guys, but i just want to submit to show you guys the packaging, because this is very pretty okay, so we have the wig okay, this is the gift bag. So inside we have so we have a scarf to lay down your edges. We have some bobby pins, it comes with this elastic band. You can sew it into the back of your wig in case you need additional support and tweezers in case you need to plug any pairs edge. Control brush, which i love, because i needed one and last thing here. Is this really cute love me, hair pin? So the last thing i have here is a wig cap. We'Re not going to use it for this install, but it's always really nice to have, and this is pretty much what comes with every single purchase. It is so convenient to have all of these things. To just make your install easier, there's so many times where i need a wig cap or some bobby pins. I really appreciate that they thought about me for this. This is very sweet. I'M a little bit sad that i didn't get the flat iron. I would love to include it in this review if you end up getting the part wig and you need a flat iron, just kind of remind them through email to please send it with your order. Overall, the fact that you're getting free items is honestly just really thoughtful. Okay, so let's open the hair - and this is how it looks. I got the 20 inch in body wave and this is in the natural black color. This honestly feels a little bit longer than 20 inches, which is great in terms of how thick it is. It feels like you have in here about two and a half bundles, which is always great. I don't want to have too much hair on my head. I want it to look very realistic and then you also have to keep in mind that when you get a new part wig, you want it to lay as flat as possible. So if you have way too many bundles, it's just not going to look very realistic. Now the hair seems to be very, very smooth, i'm struggling a little bit to comb through it, but i have to detangle it first with the comb overall, it's very nice and shiny feels clean for the inner fabric. You have one clip right here and two on the top for the parting on the bottom. You also have one clip and two clips to secure the hair. Even more so far everything looks pretty clean, i'm very, very impressed with just the overall like inner fabric. Everything seems to be quality stitching, which is always really nice, so first impressions on this hair, i am honestly very, very happy with it. It looks really nice and shiny. I don't see any like hair coming out. Let me just pull it as hard as i can, and i have like two or so strands coming out, which is pretty normal, no crazy shedding, but i'm going to do more tests. On that later, i did see a few reviews where people were saying that the head cap was too big for them honestly feels just about right, which is really nice. There'S some stretch to this right here to this inner fabric, which is going to nicely adjust to your head size. That'S pretty much, my first impressions on the hair so far so good! Now, let's go ahead and do the install okay guys. So the first thing that i did for my install was wash the hair. I wanted to test it out, so i just shampooed conditioned it. I tried and comb it with my fingers just to see how the quality of the hair was like and honestly it was so smooth super soft and almost no shedding so the first time i tried combing it with my fingers after the shampoo about one to two Strands came out, and then i used to comb with the conditioner. It was way more smoother than with the shampoo overall, the hair came out really nice very shiny, and it was super easy to handle during the washing process, and there was very little to no tangling. Now for the install, we are going to need a few things. First, you want to start with clean and detangled hair, we're going to need a rattle comb in order to part and separate the hair, we're going to use a edge control brush for the end. To lay down our edges, some edge control, gel some hair pins, a hair net and the last thing we are going to need either a butterfly clip or a few hair ties. So the first step is to separate the part. All that i'm doing is putting the wig on top of my head, and i am measuring to see where the, u part, starts and ends, and i'm just setting aside the hairs that are going to be loose later on. I am going to use the comb to make the lines more clear. One thing to keep in mind when choosing the hair. For the part you want to make sure you have the right amount. If you have too much hair, it's just going to be a lot harder to lay down, especially if you are going out during humid weather, the least hair that you have on the part, the more natural it's going to look and the more it's going to blend. It with the wig the next step is to secure the hair that is loose. You can easily just do one braid or like me and do multiple separate braids. The hair will be a lot thinner and easier to just put away after that. You are going to take your hair net and you are going to paint it in place securing all of the hair that was previously braided. This is especially important for people that don't really know how to braid hair like myself. This is going to really allow for a cleaner surface, and it's just going to be a lot easier to install. The next step is to apply the wig. All you have to do is clip it on and adjust it in the back. Make sure that the part lines in the middle and all that i am going to do now - is flat iron, the hair i'm going to use this heat protectant oil. It helps my hair come out smoother. So while i'm styling the hair, i want to share with you guys the pros and cons of this hair, the hair, barely tangles and it handles products really nicely applying heat was very easy. I noticed that the hair it didn't smell bad, it didn't burn the ends. The only downside that i noticed after you wash it you are going to have to apply some heat or some product, because the hair, as is, is going to look a little dry. One suggestion would be to leave a little bit more conditioner in your hair. Maybe that way it would look more hydrated. Earlier in the video i mentioned that a few people were having issues with the head cap, i found it to be the perfect size for my head. I did notice that there were a few spaces where the head felt a little bit too big what i did to lay down the wig as flat as possible. I just added a few french bobby pins when i added the pins, it really pulled down the extra space that was coming up and it made the hair look flatter okay, so i'm finally done ironing the hair - and at this point i am absolutely in love. It took about five minutes for me to fully flat iron. It looks so good and i am very impressed with just overall how it blends. I also love that, with this u-part wig, the opening is big enough, where you can switch from a middle part to a side part, and you don't need to do much to switch the style. The last thing i want to do before i go is show you guys how the hair looks curled. This is going to give you a better idea of how the styles look with this wig. That being said, if you guys are interested in trying out this wig for yourself, i'm going to be linking it in the description box as well as some of my favorite wigs. You can use code karen o for 20 off for next purchase. This code does not expire and you can use it as many times as you would like. Okay, guys, i'm pretty much done curling the hair, and this is the final product. I am so so happy with the way that the curls came out. They lasted about five hours. Here is a shot of me standing in front of the window so that you guys can see how natural this looks. Anyways. Thank you guys so much for watching. If you enjoyed this video, don't forget to like subscribe and comment. You guys have a great day you


Comments
Keren Ortiz: hey girls what did you think of this hair? curly or straight ! don't forget to checkout the description box for the items used in this video. if you want to buy this wig for yourself use code( KERENO ) FOR 20% OFF ANY PURCHASE from Luvmehair.com. for those who want to jump right into the install portion of the video it begins at 5:56 THANKS FOR WATCHING XoXo
Colleen: Looks great!!!
CiearraB: Love this.
Elisa Alcantara: Omg loved it how much it cost
NAJIRU S3: does this work for goblinbois too?