Easy And Detailed U-Part Wig Install With Leave Out Ft. Unice Hair
- Posted on 05 July, 2022
- U Part Wig
- By Anonymous
I'm showing you in detail, step-by-step how to install a u-part wig. The hair I'm working with is from Unice Hair. Watch to see how it turns out!
Within 30 Days NO Reason Free Return Only for My subscribers Place Order
●▬▬▬▬▬▬▬▬▬♛ #UNiceHair ♛ ▬▬▬▬▬▬▬▬▬ ●
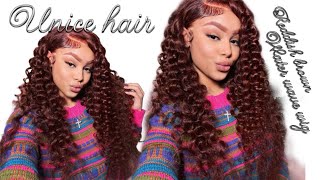
I am wearing 24inch boduwave U part wig in video: https://st.unice.com/asmdt
https://www.unice.com/ ➤ 50% OFF Free Robe: https://st.unice.com/asmds
More Affordable V /U part wig available now: https://st.unice.com/asmdn
Extra 5$ OFF Place order ON “UNice” App on your phone➤
https://link.unice.com/appdownload-you...
Using Special Code To Get 10% OFF:myunice
AfterPay & Klarna & Quadpay & Sezzle PAY 4 Equal payment Within 6 weeks!
Can Not Miss!!! Invisible HD lace Wigs available : https://st.unice.com/asmdp
Zero Skill Throw and Go head band wig : https://st.unice.com/asmdk
Recommend human hair bundles with closure: https://st.unice.com/asmdl
Bargain Now! To Get FREE HAIR on “UNice” App➤
https://link.unice.com/bargain-ytb
Exclusive Price Hair ONLY for “UNice” App Users ➤
https://link.unice.com/exclusive-youtu...
Aliexpress UNice Hair Store ➤ https://s.click.aliexpress.com/e/_pvse...
Amazon UNice Hair Store ➤ https://amzn.to/2zxP2gm
Instagram @unicehair: https://www.instagram.com/unicehair/
YouTube @UNice: https://www.youtube.com/c/UniceHair
Facebook @UNiceMall: https://business.facebook.com/UNiceMal...
UNice Fans Club Giveaways:https://bit.ly/3702QS6
Want To Promote? Order Problem Contact: [email protected]
#UNicehairstyles #unicehairwig #UNicehair
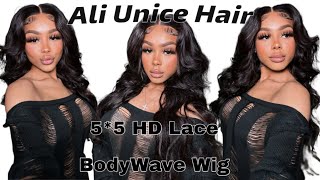
Hey, what's up you guys welcome back to my channel or welcome to my channel. This is your first time here. My name is diana, and today i am in my closet right now, because this is the only place where i'm getting the best lighting, and i really just wanted to show you guys this hair for real. I actually recorded this video like in my bathroom, but the lighting like was not best, so i just like wanted to step in my closet and show you this hair. This is a 24 inch body wave. You part wig that i got from you niece all the information for this hair will be in the description box below. If you decide you want to order this hair or any hair from you, nice. I suggest downloading their app because when you order like through the app you get five dollars off your order and you can also track like your shipping information and everything like that also uni seems to have like a whole bunch of flash sales like on their sites. Like every day, so definitely check that out, so you don't miss any savings but without further ado without any more talking. Let'S go ahead and get into the video and i'll show you how i install this week. First of all, look at this long, luxurious wig that they got me installing it's either 22 or 24 inches, but it is beautifully constructed with the clips at the top, the clips at the side and the clip at the back along with that lace, that i suggest That they stop adding, because that is a waste but anyways. Let'S go ahead and get into this install i'm going to show you how i do my base on my hair y'all! Don'T talk about how stiff and dry my hair is hey. What my hair do like that anyways, so i'm going to start by combing out my leave out at the top with the v part wigs. You don't have to leave out a lot of hair. Thank god because my hair is broken off at the top anyway and i don't have a lot to leave out um. So i'm going to comb out my leave out at the top i'm going to leave out my edges and that's all i'm going to be leaving out i'm going to be braiding, my hair going straight back because i don't know how to do nothing else. All them! Fancy zigzag braids i'll be doing. I can't do that um. I can barely do a plait, but you know at least i can make my hair flat. Okay. So after that, i'm just gon na braid down my leave out to get it out my way. So i can focus on the rest of my hair and then i'm gon na be parting out. My two anchor braids in the front on the sides. This is very important because those two combs that i showed you on the sides of the wig in the front. They need something to grab onto um. I have like done my hair before, where i didn't make the anchor braids, but honestly, it's just better with the anchor braids, because it makes the wig more secure and more sturdy. If you don't know how to do braids. Do some flat twists do what you can, but they just it needs something to grab onto, because those combs will slip right out your head and then you will be looking crazy and it will feel uncomfortable all right now boom. This is what you got so far. You got your leave out. You got your two anchor braids and now you got the rest of your hair in the back that we're about to braid up, like i said, we're just gon na be doing these braids straight to the back honey, make some parts and braid back. You could do like two large braids, probably going straight to the back, but i kind of i kind of wanted this to lay kind of flat. Because, honestly, if you do two big braids, sometimes you can see the lumpiness through the wig. So i said, let me not be lazy and let me just make at least four braids. I think i did like two on each side, two or three on each side, something like that um and just braided. It like. I said straight to the back, headed straight to the back, and there you have the finished product. You got your anchor braid on the side, your braids, going straight to the back and your leave out at the top um. I should have braided my anchor braids into the uh into this into the back, but i didn't so now. I'M just gon na bobby pin the braids in my back to my scalp so that it can lay flat and then you should have something that looks like this and after all that now it's time to install the wig. This is the main event which you came here for so the first thing, you're going to do is go ahead and cut them two little pieces out in the middle. Why? I honestly don't even know why to do that, because it's just a waste of fabric, but you know what whatever we got to go ahead and cut that off and then we're going to go ahead and try to align this wig with our head to make sure It fits comfortably so as many times as i've applied a v-part wig. I honestly just found it easier to start by applying the clips at the top first and then adjusting the clip at the back and then applying the the combs on the sides right. Just because your wig needs something to hold on to and then as you're doing this, you can of course loosen up the clips at the top and readjust as needed, but it needs some kind of leverage it needs something to hold on to while you're you know Adjusting the clips towards the bottom, because if you try adjusting the clips at the bottom first without doing anything at the top, the wig is going to slide all over the place. So yeah, it's just my little helpful tip tip whatever you know you can do. However, you want to, but that's just how i find it easier. The next thing i'm going to do is go ahead and style. My leave out i'm using my bio silk that i'm going to put on there because my ends look a little crunchy and i need some support. Um, so yeah after i put on the bile silk, i'm gon na go through and flat iron. My flat hiring my leave out and provide more heat damage. You know, but hey hair grow back right all right and for the style. I decided that i wanted, like the big um. I don't know like the big wave. Look like the big full voluminous. I hate the word bloominess. I always say that, but like the big full hair look, so i'm just taking my handy dandy, hot tools, um curling iron. I think it's like a one and a half inch barrel and i'm just wrapping my hair around the barrel kind of like i would, with a wand, so kind of like wand curls, but with a curling iron, um yeah and then, after that, i'm gon na go Ahead and shake it out just to give myself like just a little wave in there, just a little body wave, you know a little some something just just so. The hair like wouldn't be in its natural state. I just needed to put some type of heat to it and i didn't feel like flat. Ironing is so yeah next, i'm going to go through and add some layers to my hair. Only because it helps my hair look, fuller and it just helps it look more flowy and it just it just makes the layers not the layers, but it makes the curls pop more. So i'm doing it by taking sections of my hair, small sections and cutting away from my face and i'm doing it as i'm moving up towards the top or the crown of my head and i'm going to do the same thing on both sides. Now i'm right-handed and not left-handed, so one side always usually comes out looking better than the other, but um yeah and i'm sure there are other like methods and ways to cutting layers in your hair. But honestly, this is just what i find easier for myself, um and again, i'm not trying to add like nothing crazy when it comes to layers just something simple, to kind of just like frame and shape my face. So i like to style my edges kind of last, because i usually sweat them out, while i'm trying to style my hair, so just to kind of like preserve my edges, so i have to keep doing them over and over. I do it last and i'm using the um edge booster, of course, the red edge booster. I'M sure there are better products out here because honestly, i'm tired of that product and it's all right, but my edges are so natural, like they wind up poofing back up within like an hour or two, especially if it's like a really humid. It really just depends on the humidity um but yeah, so i'm just going to go ahead and sweep my little little edges a little sweet swoop and be on my merry way after that, i'm just going to bend my head forward give my hair a little shake And then throw it back up that helps give my hair, like this extra boost of volume. That'S like my little secret there, even though it's not a secret, because a lot of people do that, but yeah it just makes it look voluminous and boom. Look at that! Now, i'm just gon na make sure my leave out blends with the top, but we have some really cute body waves going on here. Like i'm, really feeling this vibe, it looks like your girl got a sew-in and this is a whole v part wig boom. You would never know you would never know, but yeah, so just something about this hair um. I just want to talk a little bit about this hair. Like i said um, it was from you and niece all the information for this hair will be in the description box below this hair is so uh thick and full, and it's very soft um as you. You can see it through the camera like clearly it's some nice soft hair like this is some really good hair. I did not have any issues with shedding, of course, tangling like, of course not younis is a replicable company. I'Ve purchased from them in the past. I love their hair so much and this wig is amazing. It'S so simple to just put on and go, and i know i just i did braids and everything to install the hair, but you honestly don't have to do all that, like you really can just like put your hair in a ponytail to the back, make a Couple of anchor braids and slap it on and go is very convenient for a person on the go um but yeah. That'S it for this video. You guys! Thank you so much for watching um and we'll see you next time. Adios

Comments
Aleisha Collins: Love it❤
Alisha Brown: Just ordered from your link. Great video
Ashley Chanel: Can you please provide the name, brand and size of the curling iron you’re using?
Timberly H: Very nice
Dee Luther: Good Video as Usual Lovely thumbnail tho You Looking So Pretty Nice Cheeks Structure Happy Magnificent Week Be Bless n Stay safe always