How To Make A U-Part Wig| Amazon Nadula Hair Co
- Posted on 05 October, 2018
- U Part Wig
- By Anonymous
In this video I will be showing you #HowtomakeaUpartwig with my tips and tricks! And I am using hair from #AmazonNadulaHair
5% coupon code: NADULA08
Store Link: https://amzn.to/2N4tkCo
Hair Link: https://amzn.to/2QLjgkC
Brazilian Loose Waver: https://amzn.to/2I6c2Gl
Brazilian Body Wave hair: https://amzn.to/2mGZgl4
Brazilian Body Wave with Closure: https://amzn.to/2Kw1JcI
Brazilian Straight hair: https://amzn.to/2HJqiFz
Nadula Hair Sales Manager Instagram: http://bit.ly/2NJzqsl
Nadula Instagram: http://bit.ly/2A9jNZ9
Nadula Youtube: http://bit.ly/2v2f9q5
Email: [email protected]
Whatsapp/phone: +86 183 3903 9787
Own Nadula Hair, Enjoy Natural Beauty!
WATCH IN 1080P HD! New Videos Every Week! Hit that notification Bell by my username to get updated whenever I upload a video!
♡ Show your love by sharing this video! #SlayLikeChina
Are you a Youtuber and want to get free beauty products? Join me on Octoly! It's free! https://www.octoly.com/?cref=hat4o
-----------------------
♡♡♡♡♡♡♡♡Stay Connected WITH CHINA ♡♡♡♡♡♡♡♡
♡ My Wig & Clothes sale on Poshmark: https://tinyurl.com/yaco8z56
♡Facebook: https://www.facebook.com/melissa.latha...
♡Instagram: http://www.instagram.com/blackchinabea...
♡ Snapchat: Blackchinabear
♡Twitter: https://www.twitter.com/Blackchinabear...
♡ Business Opportunities/Sponsor: [email protected]
---------------------
*REQUESTED VIDEOS:
-How TO Every Makeup Routine: https://youtu.be/PAShnRj7SyY
-How To Ponytail w/Bundle Hair: https://youtu.be/_NeWsMkYr4w
-HOW TO Grow Youtube Channel: https://youtu.be/SJ9FRB4QKZs
-How TO Apply Liquid Eyeliner: https://youtu.be/LnJHiTTXqxs
-HOW TO MAKE CUSTOM WIG: https://youtu.be/ie7CPTWRVtM
-HOW TO Fill in Your Eyebrows: https://youtu.be/mIFQFeCsn5g
-HOW TO Cut Bob Hairstyle: https://youtu.be/QRtQlLQJzUo
-HOW TO Apply EYESHADOW: https://youtu.be/zxlN0Bmwz24
-HOW I LOST 150lbs- https://youtu.be/51eRMxjPMAQ
-HOW TO Clean Beauty Blender: http://youtu.be/S-Z6G0Ep4Kg
Special Discounts for Blackchinabear's Subbies
Shop my site for beautiful Human hair: https://blackchinabear.mayvenn.com/
Use coupon code slaylikechina for15% off
https://www.2chiqueboutique.com
Use my promo code: CURVY20: 20% off anything, https://www.curvysense.com
Use code OFRA30 for 30% off your purchase at
Save 10% with discount code TEREZA10:
Save $$ with discount code: CHINAXO
Charlotte Lacroix Website: https://goo.gl/pWs1NN
15% disocunt code for my Cubbies BLACKCHINABEAR15
10% Off code with discount code: BLACK
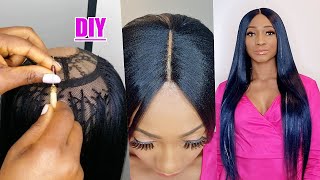
Hey cubbies, it is your host, your girl, your DJ, blac chyna bear and I'm here to bring you guys my wig making tutorial - and this is my monkey sock friend - it's gon na help me with my wig, so I'm using a u-part wig cap. I just got this from a local beauty supply store and they charged me $ 5. All that is a no-no boo-boo anyway. This is what it looks like it. Has this lace trimming on there, which is completely useless? I don't know why it's on there actually hate this, but whatever I'm it's lightweight, it has adjustable straps, it is stretchy, so it fits a lot of different head sizes and it's gon na be for a you part cap, and I have these needles. Are I thread it already has some t pins to help keep my wig cap in place in my West in place. I have a different branch in case anything gets tangled. I have my mic cliping case. I need to bunch up any hair. I have some scissors to cut hair and West, so I have the nozzle on 100 % virgin hair. I have the Brazilian deep wave hair and I have three bundles. I have a 12 inch 14 inch and a 16 inch bundle. The hair is so cute. You guys look how cute these bundles are like. Oh, my gosh, there is so springy bouncy. The bundles are so full on the shorter lengths of hair. You get the longer the bundles are gon na be, and vice versa, with the longer length bundles. But the hair is so soft and springy and it smells so good like they just got shampooed or something like it smells really really nice and they're SuperDuper, soft and shedding has been minimal. I thought the whole process and I cut my bundles. You guys anyways, I'm putting the wig cap on the mannequin head. My mannequin head is smaller than the size of my actual hair grab a big head, so I'm putting a pair of fuzzy socks underneath the wig cap and then I'm pinning it down with some t pins, and this is just gon na make sure that the wig Is gon na be big enough to fit in my head after I sew on the bundles of hair, because when you start filling the bundles of onto the cap, it will shrink your cap. It'S like you always want to measure your mannequin head and your actual head before you start sewing on your bundles of hair, so I'm gon na start in the back on the bottom part here and sew a track back here because like if I do want to Pick my hair in the updo or something like that. I don't want this back piece to be showing and I'm making sure that I do not, I repeat, do not sew on the adjustable band part because you don't want to show that piece down and they continue. You will not be able to adjust the band. Is that right? You will not be able to adjust the band and tighten your wig cap, so don't so there, so just beneath that, I'm just sewing it down now. Also I sew through my web. Some people don't do that because it can cause shedding, but I like to have a very secure hole when it comes to my web. So I sew through my wife. If you don't want to do that, you can go underneath your left, but I don't like that technique, so I always sew through my web. I'Ve been doing this for years. It'S how I prefer it it's totally optional. So I do a blanket stitch. My show, through my wife and I pull my needle through the loop that is created once I sew through my webs. I don't know if I'm describing that correctly, but maybe you'll see it as you sew, but as you go through the web, a circle is created, and I just dragged my needle through that circle and it creates almost like a t-shape and it's called a blanket stitch. Like you might want to look it up online cuz, I'm not really sure my camera is picking it up. I'M trying you guys, you can't you, you don't believe how hard it is to sew a wig and try to make sure your hands are not blocking the camera. Try to make sure you're in the right light. Try to make sure your body is not blocking a camera, it's extremely difficult, not only that, but trying to make sure you're recording the whole process, it's extremely difficult, so I tried my very best: try keep this on camera, for you guys so bear with me. Just bear with me, but anyways I just secured it once I get that bottom piece on it's, it's a lot easier. So on the next part, I go up a little bit higher and actually pin down the weft. So that way, I don't have to hold it with one hand and makes it a lot easier and a lot quicker to slow down. So I pin it down with that T, pin and I'm able to just quickly sew across to get that wig to get that weft attached to the wig cap. Now guys, when sewing these wigs, it can take a while, like I'm, showing you guys, hours of work condense down to a 16 minute video you guys with the socks being inside the wig cap. The reason why I chose these fuzzy looking flaps is because they're easy to pull out once I take the wig cap off of the mannequin head. If you use a regular socks, they're actually gon na be sewn on to the wig cap. You'Re gon na have a heck of a time getting them off of the wig cap. So if you had these fuzzy kind of socks use those instead, because otherwise you're gon na be really mad at yourself that you used regular socks. But when I get to the end of the web, I go through the end of the web multiple times to really lock it onto the wig cap. So that way it won't lift off easily. So I go to worry about maybe three times and then I cut the weft. If you want to you, can fold the weft over and start stitching again um cuz like once you cut the web. Sometimes you can get shedding and if you want to avoid shedding, you can just fold the left over. I don't do that. I like to have a really seamless bumpy list, wig application, so I cut my webs and then I started sewing again trying to make sure I keep all the same other hair flowing in the same direction. So I find out where I want my track to lay and then I go ahead and pin it down and I make any adjustments that I see fit and I start sewing again now guys what I'm doing in this video I'm cutting out pieces of the video. I'M not going to show you guys me sewing down every single last weft cuz the video would be ours, so I'm just chopping it up. So you guys can get a general sense of the technique that I'm doing, but you guys can pretty much tell you just slapping that weft onto the mannequin head, pinning it down with a t, pin and then going head and blanket stitching it onto the weight cap. Not normally when I do like a regular wig with a lace, frontal are a lace closure. I use a dumb spandex cap and I saw the closure down first and then I go ahead and sew the bundles on. I did a different video for that. I watched how to link it down below. Actually, I did a video for the lace closure and I did a video for the lace frontals, so I will link those down below if you guys come and check those out as well, but right now I'm doing a you part win. I wanted to go ahead and show you guys in case you were interested in knowing about how to do this technique. So again is going up the way cap pinning down the weft where I want it to be at and I'm gon na go ahead and start sewing it down now on this part of the wig, I'm getting close to the ends of the thread on my needle. So I want to keep stitching till it gets really really short and then once it gets too short, where I feel like I'm running out of thread I'll, go ahead and lock down the stitch just reaching over and over, in the same spot, to lock it down And then I will cut the needle off and then I will tie it off in the night and that's just to make sure that West, it's not going anywhere, it's nothing worse than wearing a wig and a weft just starts coming off. Like oh, my gosh. That'S the worst feeling, oh my gosh, so as I'm getting near the top of the head, I'm just trying to figure out how I want to place the tracks, so I'm just gon na keep looping them as I get near the top to close it off and While I'm doing this, I'm thinking of how I'm going to get to the top of it right, so I have one last bundle left to coil at the top of the head and what I'm thinking about doing is just letting some of the tracks just to get A balance cut, as you guys can see one part of the top of it is - has more space than the other part. Oh, it's so hard to describe this stuff kudos to those that are good with detailing everything. So I'm just showing you guys how much hair is on its last bundle. This is the 12 inch bundle I used about. I want to say almost the whole last 12 inch bundle. I have a little piece left, so what I'm doing is just Criss crossing a few of the tracks. I'M like not Criss crossing, I'm slanting a few of the tracks just to sort of balance out the top of it. I'M learning about three different slanted tracks. Just try to get both sides equal and then I start doing that. You shape again I sort of wanted to have a little bit more volume on the right side, then on the left side, so I'm putting more hair on that side. Of course, where there's more space as well, of course, you know guys, please forgive my ashy hands like yeah. Let me take out something working on this wig for hours and then washing my hands washing my hands because, like I was doing other things in between breaks, so my hands are so ashy. When I start out the video, I was good at this point in time. The ashes taking over so forgive my ashy hands. My intentions were in the right spot, so guys what I'm gon na do now. I have a bag of clothes. I got from eBay and it looked like this. I want to take them and go around the lace here is so boring, so I pipe it three one right here and then one on each side towards the front. I put one on both sides, so I have one right here, one right here and then one right here, I'm not gon na pick, one of them back, because I had the adjustable straps right here. I made sure not to sew on this spot. That way, I can adjust the straps as I need to so I can still adjust the straps on both sides. Now with these? U part wig if you're not sewing them down. You honestly wouldn't need combs all around it, because I'm not gon na lie to you by the time I got done making this wig. I was too tired to even attempt to do that, so I'm gon na be using some bobby pins on the side to help keep the wig down cuz. I'M not gon na show this down on my hair, like I just I'm not about that so down life, but some body pins will help keep it down. I did wear it out today and the bobby pins gave me no problems at all. You can definitely sew this down with no problems like it's made to be sewn down, but it worked perfectly fine with just using bobby pins and a comb from top. It'S like. Oh my gosh. It was so freaking cute. You guys it's like. Oh my gosh and it would've rain today, like the day I choose to have some leave out the day I choose to have some leave out, it would pour down rain. You guys, I still don't own the door to leave. It was just pouring down rain, but my hair was cute, though my head was poppin, so this is not a little hair. You guys this is their Brazilian deep waves. I have the hair down below in a description bar with links to it. Please go check it out the guys, it's beautiful! It'S absolutely beautiful it blends in great with our own natural hair bible, because my hair, if not relaxed right now and you're gon na see I'm going to be using two different edge controls. I'M gon na using an actual edge control in a gel because my hair is 4c and it's not relaxed and it's very hard to control. So I have to use two different styling products to hold my hair down and it still blend it in better and I in this video, my hair is wet and when it dried, curled up really really well - and it looks so great you guys, oh my gosh, But anyways the hair is beautiful. It'S definitely worth purchasing. I will link it down below in the description bar. Please go check it out. It'S so beautiful, but I'll teach you guys enjoy this video leave me a comment down below like it share with your friends. You know you guys your cubbies, you need to share like come on. You, girls come on guys come on, come on, I'm some being absolutely ridiculous. You guys, but please share this video. I love you guys so very very much and check out Nautilus here because they have some great hair. You guys know I've worked with them before in the past actually a couple times. I think I've worked in like three four times: yeah we'll check him out, but I love you guys. I will catch you the next one until then stay fierce stay fabulous by China, beer

Comments
Phenomenal_Purseonality: I need to find that wig cap. I might be able to do this. You did a really great job explaining your process . TFS
Bdeezy1953: Hi SweetPea - just had to let you know I rec'd 4 pair of shoes from 'Shoe Show' you recommended and I am very happy. Ordered a pair of booties w/the fringe and 3 other pairs of casual flats and they are gorgeous. Thanks much from your new subbie!
T T: You did that!! You are so talented and gifted! Your make up is on point!! Just beautiful as always!! :-)
Clara: Absolutely beautiful really suits you!!
Hourglas39 aka Fee Fee: Very cute wig. I am not brave enough to make my own wig just yet, but when I do, I will refer back to this video. Thanks for sharing.
vivian panek: Wow girl you did a tremendous job making that wig, I am impressed. Not for me, I cut all my hair off. lol maybe later on next year. And by the way you look beautiful like always
Annetra Johnson: Love it!!!! Especially your makeup
Erica Tyler: soooo PRETTY! I don't know how I missed this one! I don't get some of your videos! Youtube "gone stop playin wit me!" I can't be missing any of your videos! AWESOME, Sis! It looks so very natural. God bless you!
alisandra archert: My Co-worker use that cap to make a lace front wig Great Job
Cheryl Jennings: I love this look
MukbangJamrock: Great job!
MARGIE DANIELS: Gurl....u know u r an ARTIST...LOVE THIS VIDEO...OMGOOOOOODNESSSS
Ilse Reyes de Belle: Very Lovely Thank you for sharing it gracias
Latasha Rice: Too Cute!!
qtbeddecor: Girl, you so FIERCE!!!! Love the makeup!!!!! xoxoxoxoxoxo
Poohbaby44: I really enjoyed the video and been really enjoying your channel
Bel França: GOSTO MUITO DE VOCE!!!
Living Life With Me: Did you try using tape on your mannequin? Wrap around until it measures your head size
passionatereader isme: pretty!
Marion Jackson: Nice!
Nida Simmons: What's that ending beat? Oh yes beautiful video on that hair!
Tracie NotStacie: Wow! I wanna try but I'm so scared.
Tiamac Pherson: Girl I love it! I so so love it hunny.jamaican subbie here.plz email me your address I have some Jamaican stuff I would like you to review sis.
Tiamac Pherson: Ohh congrats on 40k subbies
Lavonda Houston: Hi Melissa! "Black China bear LOL as DJ Khaled says " And another one !" Another wonderful video! You're my girl, you're my favorite don't ever leave us Melissa , don't LOL oh yeah this your other sistah !LOL Love you Stay fierce, stay fabulous , Black China bear!
Lisa Wimbush: Ur eye makeup cute.