U-Part Wig Tutorial (Very Detailed Step-By-Step Twist Out)
- Posted on 29 January, 2021
- U Part Wig
- By Anonymous
Hey Sis!
Let's talk about how simple and easy it is to wear a U-Part wig.
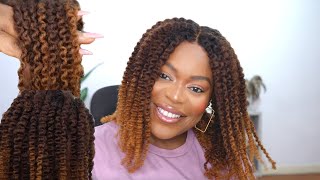
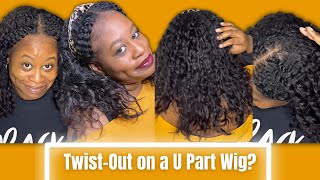
I'm using True and Pure Texture's Jasmine Coil U-Part wig to create this look. It doesn't take much so I'm showing you how in this step-by-step tutorial on how to create this look. Hope you enjoy!
Here are more details about this Wig:
Length: 24 inch
Cap Construction: U part, mesh lace stretch
Hair Density: 150% density
Features: 4 combs - one on both sides with one front and one in back.
Color: Dark Brown
(2) Adjustable Straps
Disclaimer: This is a paid promotion
CONNECT WITH ME:
Email: [email protected]
Website: https://www.cricketsnell.com
Instagram: https://www.instagram.com/cricketsnell...
*This video is sponsored by True and Pure Texture.
Uh hi there cricket here i am going to show you how easy it is to create this twist out on trim pure textures jasmine coil, u-part wig. You ready the very first thing that we're going to do is shampoo our unit, and we are going to make sure that we shampoo in the downward direction, basically the direction of our strands and making sure to also rinse in that direction as well, making sure to Also get as much of the shampoo as possible out of the cap and then we're going to also again in the downward direction of the strands we're going to squeeze all of the excess water out. Okay, so i actually just also shampooed my hair as well. We are going to kill two birds with one stone and, while my hair dries, i'm gon na grab the unit, and i'm gon na show you how i like to do a wet twist for a twist out style. Okay, so i want to show you just how easy it is to twist the hair um for a twist out, and i like chunky twists that i don't necessarily like you know, a really defined look. So i really like the chunky look. So one of the things that i do is before i twist i make sure that the hair is saturated. Then i apply a leave-in conditioner and not too much so not too much i go in with my fingers. You know to finger detangle and then i actually grab a brush and i detangle with a brush and it detangles pretty easily, which i love by the way and not much shedding either. So that's a perk, definitely a perk and then i am going to actually section her off. So to me this is a large section. So what i want to do is i actually want to divide it into two sections and then i will take some jelly and i don't take much. I take a little bit not a lot at all and then just to make sure that that jelly is evenly distributed throughout. For that twist you know i brush it again again, just to make sure it is evenly distributed, and then i go ahead and i twist my section and so with my ends again, because i really love a natural look and i want the hair to resemble my Hair texture, i don't normally rot my ends when i'm doing a wet twist out. I would normally brought them if i would have to dry, but for the wet. I basically just take the ends and i coil them like the ends of my hair coiled, and it does the same so we're going to finish off the rest of this hair. Take some jelly again, and so one of the reasons that i use jelly instead of like a pudding or anything, is because it's on wet, hair and typically from you know, my experience with working with puddings and jellies and things on my type hair is when you Are doing something on a wet set, you want to use like something that is wet, so jellies foam those types of things and then, if you're doing it on dry hair, that's when you would use like puddings and things i'm going to take my hair a long Time to dry, if i decide that i want to use foam um now, although i can use foam, i probably wouldn't use a lie. I wouldn't like saturate, my hair with it. I would probably only use like maybe one small, you know, half of a pump or something to really get the end smooth, but for me, jellies work a lot easier because it'll allow my hair to actually dry a lot faster versus me. Trying to you know complete it, and i've got to sit under the dryer for three hours, because my hair hasn't dry yet so again, adding some jelly making sure that that jelly is evenly distributed throughout that portion. And let me re-clip this this one that way it stays out of the way, and so i am going to take this section and split it into two. Then i am going to twist uh and she is done all twisted up and i am excited to see how she turns out. So what i am going to do is i am going to put her under my hooded dryer and not allow her to air dry. Mostly because i actually have plans, so i'm going to need her to dry a little quicker, but you can always let you know your unit air dry like say, for instance, you're doing this at night. You can allow her to air dry overnight, but i am going to stick this beauty in the dryer so again killing two birds with one stone. I decided to go ahead while she is under the dryer and prep my hair, which means that i braided her down and put my stocking cap on. Let me just show you how this looks and for those of you who don't know i actually had some damage here at my leave out again. Let me show you i'll take this off. I had some damage here at my leave out, so i actually had my leave out part chopped off um. So like a big chop, and so it is definitely growing back so much so that i actually can apply it now um. But i have braided down the rest of my hair and um made sure that i've slicked her down what i love doing is leaving my ends out, as you can see, and the main reason is because i like putting leave-in conditioner in my ends. Every single night um, i just feel like it, really helps my hair retain length. So i typically always leave my ends out so that i can make sure when i take her off every single night, that i can do something with my hands. But in the meantime this is how i secure them. I just fold them this way and i take my stocking cap and i place it on as such and just make sure that she's secure. So what i'm doing now is, i am wetting my hand. So what i want to do - and i really don't like having straight parts - i would prefer there not be many parts. So i just part with my fingers and then i take some hair and i twist it and i'm gon na do this all over the front of my hair and again, i'm gon na. Do it just like. I do the ends of my hair again because it coils on the end just like that unit. So now i am finished with that and i am going to also allow this to dry, while my unit dries looking forward to see how this turns out stay tuned. Alright, so we are back um, she is finally dry and my hair is dry, so we are going to add some oil to both these twists, as well as my twists to make life easier for myself. I'M honestly just going to take her off and put her on my head, secure her and then i'm going to start to unravel the twist. That way, i can like form them to the way that i really want them to look. So let's do that now. Okay, so you know what i really love about this, like it kind of already looks like my hair is twisted, like this really looks like i twisted my own hair again, i really love the natural look of this, where it really resembles my hair, so we are Going to start from the back and start untwisting foreign now is where we separate a little bit more and one of the ways that i do. This is again i pull and where the hair kind of already separates itself. That'S where - and i kind of do it with my thumb, because it kind of separates again, like i said on its own and you just twist and there you have it. So i am going to continue doing this all over my head and if i need some more oil like if i find that it's getting a little bit more frizzier than i wanted to, then i will add a little bit more oil uh. So, as you can see, i still have not blended my hair in yet, but this already looks like my hair. So now we are going to start with the blending process. Okay, so first i want to make sure that i'm blending, so you see where this lift is. I don't want that to be seen. So i take one of these pins and i take some of the hair from right here and then i just pin it like under so you can, like barely see it going to take a little bit of edge control and again i don't use a lot, but We are going to just put that on my edges because again i like for this to look like it is growing out of my scalp, we're gon na take our edge brush and we're just gon na brush this like so, and then i kind of just you Know run my hands like so again through this and if i want it to be a little bit bigger, i just take my pick and i make it a little bigger. So again i like big hair, so i'm okay with you, know frizz as long as it's not like too much, and i like to pull my hair out and i do it from the root. So i go to the root and go in it's basically, just like the pig i am loving this. This is so pretty. Oh, my gosh, so i have created her a faux bang here. I wanted to see what else she could do, how much more natural looking. I could get her to be um. I really hope you love the style, i'm loving this hair. I love the way that this hair really holds the pattern. Even you know it being. You know not my real hair, but it really. It really looks like mine, so i'm loving it and i hope you do too. If you have any suggestions on you know how you want me to style her next. Make sure that you comment below and also remember, to like and subscribe to this channel. Alright have a great day

Comments
Pia Jackson: Love the videos sis. The wig is not in the budget right now but its on my goal list. Thanks
Aaliyah Hall: Absolutely loveeeeeee ittt just waiting on the restock
Aaliyah Hall: Your hair loooooks amazinggggggggg