U-Part Wig Review & Tutorial | True + Pure Texture Tru Part Wig | Island Curl 24 Inches
- Posted on 23 May, 2022
- U Part Wig
- By Anonymous
This is a 1-Day review & tutorial on how to install True and Pure Texture’s “TruPart Wig” ✅
CHECK OUT MY LINK TREE
https://linktr.ee/ArtasiaOlivia
__________________________________________________
Hey babes
SUBSCRIBE to my Channel ✨
FOLLOW ME // Let’s Connect
IG: @sweetest_impression
TV/Film IG: @aos_now
Twitter: @fiine_asia
TV/Film Twitter: @ArtasiaOlivia
TikTok: @sweetest_impression
Clubhouse: @fiine_asia
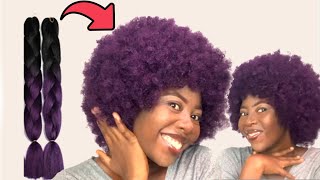
Hi guys welcome back to my channel, it's artesia olivia here. How are you guys doing hope you guys are great so today, i'm coming to you guys with a tutorial on this true and pure texture, u-part wig. So, as y'all can see, it is looking great it blends in with my natural hair on the side and at the top. This is the island curl 24 inch and, as you can see, it's very very thick, very voluptuous. So i don't know the exact density, but i'm sure it's at least 180 or so um. This density here is great because you can use it for years to come so as it thins out over time, because you know curly hair does thin out over time. Um. You can still have great volume, and this is the natural volume um today, i'm going to show y'all how i installed it and then also i'm going to talk a little bit about the hair um. This is a one day review. This is my first day wearing the hair, and i had went out to an event, and this is the look coming back from the event and the event was pretty hot. So, as you can see, there's no frizz. The curls are in great condition um. I was pretty much. The event was pretty much, i guess technically outside um and you can see, there's no frizz, there's no matting. This is um, really good here guys and it was worth every dollar. So, let's get into price, i paid um, including shipping. I paid close to six hundred dollars for this hair um, but it's definitely worth it because, as you can see, um it's a u part and when um i show y'all how i install it. It looks very, very quick. This is like a built-in sewing pretty much built-in sew-in with leave-out. That'S why i feel, like you, part, wigs, are, or you can say, quick, weave or whatever, but how i did. It was pretty much like a sew-in because i braided my hair down and i love it like it's so cute, so fun, um perfect. For summer time. I was actually thinking about dying. This hair, like a honey blonde color, but that means i'll have to dye. My leave out and right now, i'm filming a movie, and i have to have the same kind of hairstyle that i had so we're going to hold off on dyeing it. Maybe for fall cute auburn colors for fall, but summer um, i'm gon na just leave it black for now um, but yeah y'all can see this get into this new part wig and stay tuned and i'll show y'all how i installed it exactly so. This is the hair straight out of the packaging. True and pure texture, island curl, true part wig 24 inch. There are some do's and don'ts, and then it came in the hair net, and that is the curl pattern straight out of the packaging there. I first start by shampooing and conditioning the hair. I use my shampoo and conditioner of choice with a wide tooth comb and powder brush to detangle. This is my braid pattern. I leave some hair out on the top and the sides and plait the hair down in the back. I love the stitching of the actual. U part - and there are five clips in the front - and there are two clips on the side and one clip at the bottom and also a drawstring to tighten the band of the wig next, i unclip the clips at the top and i place them in position And the u-shape around my leave out once those are in place. I then move on to the big jumbo side clips and put those in place as well. Then i snap the clip in the back in place and voila you are done. You are done. Putting your u-part wig on and now you're just going to worry about the leave out. Look how easy and quick that was so i'll! Show you how i do my leave out as well. I start by combing the hair out and then taking a spray bottle filled with water and conditioner mixed together and spraying that on the leave out to activate the curls next, i take some lotta body wrapping foam and place it on the hair. Then i add some eco styling gel and place that on the hair as well. I take a demon brush and brush through the leave out and then i also take a soft bristle brush and brush through the leave out as well and with the soft bristle brush. I brush the hair back towards the u-part wig in place. Next, i grab a portion of the weave and brush my hair and the weave, together with the denman brush, to help with the blending process and for my hair to seamlessly blend with the weave. Now, while i got that denman brush in my hand, i'm going to just run the denim brush through my hair and the ends just so, the brush can um define the curls a lot more, and i just added a bobby pin to the back of the hair And the? U part wig just to secure it a little bit better and then i start brushing um. My leave out a little bit more back towards the u-part wig. So that's how the sides of the leave out is looking so far and now we're going to get into the middle part, leave out and we're going to do the exact same thing as we did for the sides. So we're just going to use the spray bottle again with the water conditioner and then the lotta body foam and the eco styling gel. So we're going to brush those products in with the soft bristle brush and also we're going to brush the products in with the denman brush as well. And when we do that. We'Re going to take some of the weave and brush the hair and the leave out together. So this is how the hair is looking blended before we even do our edges and it's looking pretty good. So far, everything look seamless and blended. Already now we're going to take some got to be styling gel, which i like to use, because it's pretty strong compared to the eco styling gel and it lasts pretty longer. It has a stronger hold and we're going to put that on our edges and style, our edges to our liking and, lastly, we're just going to wrap our edges and we're going to keep our silk scarf on for a minimum of 20 to 30 minutes. The longer the better, but if you can't leave it on overnight, just leave it on for a good 20. 30 minutes. I really like the wet look so before i move on to the next thing: i'm just going to take some more foam and some gel and brush the weave a little bit more just so it can. You know stay with the wet look and i'm going to spray with some more water and brush it and just touch it up before i move on to the next stain. So it could really be drenched and have a lot of product in it to define the curls better and we're back, and i just actually did my makeup for about an hour and a half. So that's how long the scarf has been on and everything is looking pretty good. I like how it blend with my hair um, even though my hair is a little bit more curly than this. You part wig curl pattern, but it still blend pretty nice. I'M going to take some lighter body foam to just touch up the hair, a little bit more to puff out the hair and give it a little bit more volume. And then i also took a eyebrow archer to cut some layers in the hair. Just because i kind of like the layered look as well, you don't have to do that, but i did and everything is looking pretty good. I'M spraying some more water on it, just dialing it to my liking, because the scarf did have it like tied down in certain spots, so i'm just kind of giving it a little bit more volume, but yeah. That'S how the hair is looking. I hope you guys like this video, if you can like subscribe and comment and see you another time you


Comments
True and Pure Texture: You and the hair absolutely beautiful! Thank you! ❤️
London: It turned out so good. I have clip ins from this company. I may order a true part