Making A U-Part Wig| Sewing Machine| Ventilated Mesh Dome Cap 2022
- Posted on 20 July, 2022
- U Part Wig
- By Anonymous
#upartwig #customwigs #howtomakeawig
Hey everyone. Today I am making a u-part wig on a sewing machine. I had a few of my clients ask about it so of course ya girl had to learn.
I first tried to make it on a mesh dome cap and it didn't come out as good as this one. So I do recommend making u-part wigs on a ventilated cap.
We have reached 700+ subscribers, a big thank you to everyone that supports this channel❤️
As always we hope you were able to take something from this video to help you along your wig making journey! Practice makes perfect guys, so keep at it!
____________________________________________________________
Affiliate link:
Sewing machine: https://amzn.to/3uWEtO5
Sewing machine thread: https://amzn.to/3B1c4dw
Wig combs: https://amzn.to/3OhbRG9
Shears: https://amzn.to/3B1CewU
Canvas Head: https://amzn.to/3vT3MQU
GEX wig stand: https://amzn.to/3LC1U5p
Cheaper wig stand: https://amzn.to/3F3znDv
Connect with us:
https://linktr.ee/Ihairyoushop
____________________________________________________________
Thanks for watching!
Please like, comment, & subscribe
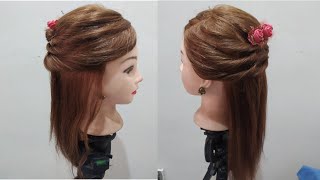
Hey everyone welcome back to our channel and, if you're new here, thank you so much for tuning in today i am going to be making a u-part wig, and i have here some raw indian hair. This is a natural wave texture. The bundles are nice and thick, and i'm going to be using three of them: 16, 18 and 20 inches. So i'm going to be using the mesh, ventilated cap. Of course, you guys know now from my last video that these are my new favorite caps and i'm going to um start by drawing the lines for the leave out in the front. I already have everything pinned down: i'm using a 22 inch circumference. So i'm using a medium sized cap and i'm going to use an inch parting space across and four inches to the back. I'Ve watched quite a few videos and i see that you know people draw some people draw an inch, an inch and a half two inches. I even seen someone draw um three inches across, but today i'm going to be using an inch across. So i'm just showing you here that i'm using my ruler to do that. And, of course, i have the middle, which is the center right going in the center of the cap, because you always want to be symmetrical, and i want this to be even on both sides and i'm going to use my marker to make the line there. So mark off the edge and then i'm going to use the ruler to go four inches back and mark that off as well. Okay! So now i'm going to connect the lines i'm going to draw them back to four inches and then, when i get to the back, i'm going to um connect the two lines with a u-shape okay. So now, once that's done, i can go to the back and start drawing out my my lines. So of course, i'm going to start above that band. I don't want to sew on that because that's where the adjustable band goes into and you want your customers to be able to use it um. So i'm going to start above it just like. I showed you guys in the previous video and i'm also going to look out for the tabs on the side. I don't want to sew that down so you're going to see that my lines um it's going to go below that and above it i'm sorry that i'm out of the camera, i didn't even realize i was out of the camera like that. So i'm drawing my lines an inch apart and i'm going to do that for about the first five or six um lines, i'm going to draw them an inch apart and then, after that, i'm going to start to draw them in half an inch apart and i'm Going to do that all the way to the top the half an inch. I want to make sure that i fit all of the bundles and i do apologize. I thought i recorded me um drawing the lines of on the whole entire cap, but i didn't um. I missed the part where i'm at the top, but i am going to show you guys how it looks at the end and what you want to do. Is you want to just draw your lines across like you normally do, but when you get to the top, you have to start going in that new shape gon na bring it back in front of the camera. So you guys can see. I didn't realize i was so off, so you see there i'm making sure that that line is above and below that tab. I don't want to sew that down because the adjustable band goes in there and then i want to make sure that my next line goes right at the end of the um. So i'm pretty much drawing my lines the same way i did in the last video, except that when you get to the top, you have to draw your lines in a new shape, get ready okay. So this is how your line should look and then i'm going to get started, um, making the wig i'm going to double two of my bundles and i'm going to single the last bundle. So i'm not going to talk too much during this video. I'M gon na put a little text in um. Just so you guys know exactly what i'm doing and then i'm gon na chime in um. You know at parts where i think i need to. I think it's time for the comeback cause. Everybody got problems everybody this morning, living my best life and if it isn't at least i gave it my best. Try, i'm just enjoying the moments, cause ain't. No next time trying to slide with my people on the west side, yeah moving different than all the rest cause, i'm by doing a different new vision and no regrets man. I used to be a victim repented of all. My stress now. Excuse me, i'm just bitten and getting it off my chest yet, but leaving one day we all bob and once you get your shot, just don't turn to a ball hog. That'S right! That'S right! Can'T control it, but that's life! That'S life! Yeah! That spends time more than we spend cash. You only got one life and it doing. If i go all everybody, everybody, everybody, okay, all right! So i'm like in the middle of the unit right now and i'm just still, i'm sewing across i'm just making sure that my cap is laying flat and i'm not sewing with it. You know lumped up or anything like that. The same rules apply and i'm doing i'm still doing the zigzag stitch on the mesh and the straight stitch on the plastic. So now that i'm getting closer to the top of the unit, i know that um. I have to make sure that i slow down and turn this cap, so i can make sure that i'm hitting those corners and making sure that my track is going all the way around um in a u-shape. So when i get up to these parts, i just make sure that i take my time and maneuver the cap to make sure that i'm you know my tracks are shaping in that: u shape so everything lays nicely um when i get up to the top once I'M off of the plastic, it gets a little bit easier because then i can just stay on my zig zag stitch. I don't have to switch back to a straight stitch and then i can just concentrate on maneuvering the cap to make sure that my tracks are going all the way around in that u-shape. As you see here, i'm all the way at the top and you'll see me turning and maneuvering the cameras. Okay, oh starving, all right, so she's. Looking good i'm going to go ahead and sew that last track around the parts where the leave out is going to be, and then i'm gon na add my combs, so i'm gon na add uh four cones, i'm gon na add two at the top one in The middle of the part, and then i'm gon na put one in the back i'll, show you after i'm done yes this morning, living my best life and if it isn't at least i gave it my best. Try, i'm just enjoying the moments cause ain't. No. Next time trying to slide with my people on the west side, yeah moving different than all the rest cause, i'm by doing a different new vision and no regrets man. I used to be a victim repented of all. My stress, all right, so my combs are on everything is looking really good, i'm so happy with the way that this unit turned out um. It turned out really really good. So now i'm just going to go ahead and take off the plastic, and i showed you guys how to do that in the previous video um just cut the um, the thread, the color thread, whichever color on the thread is on your cap. Mine is red, so i'll just cut that, and then i use my tweezers and start pulling it out, and then i'm gon na break up the plastic and just pull it off. Of course, your girl was better. This time i didn't do any zigzag stitches. So everything came off, you know nice and easy. It was a breeze and then, after that, i'm just gon na i'm gon na take this unit and i'm gon na wash it and then after it dries of course, i'm gon na um style it. So if you guys want to stick around - and you know see that part - you can um of course feel free to see how the unit turned out i'm gon na i'm throwing how i curl the hair as well. You can see that, and i want to thank you guys so much for watching as usual. Thank you so much if you're new here um go ahead and subscribe to the channel. Of course, i'm gon na be dropping more videos. You know my whole point of this channel is just to help other wig makers out um, i'm pretty new. At this myself, i haven't been it's not like. I'Ve been in this game for years, so you know i want to share my journey with you guys, and hopefully you can learn something all right. Thank you. So much for watching got problems. Everybody'S starving this morning living my best life and if it isn't at least i gave it my best try, i'm just enjoying the moments cause. They know next time trying to slide with my people on the west side, yeah moving different than all the rest cause, i'm by doing a different new vision and no regrets man. I used to be a victim repented of all. My stress now. Excuse me, i'm just venting and getting it off my chest. Yeah believing one day we all bob and once you get your shot, just don't turn to a ball hog, putting my team on. If i'm higher we all tall just know, i got your back. If you down, then we all fall. That'S loyalty, baby! That'S right! That'S right! Can'T control it, but that's life! That'S life! Yeah! Everybody!

Comments
Monsie babe2: Thank you for sharing we’re learning a lot from you. I love the way the unit turned out
Ms. Shy: Right on time!! I wanna get back to wearing these but without hand sewing like I used to back in the day. Thanks for sharing
Richie-Rich: This video is 2nd to none Love it
BJ Simms: beautiful wigs