Let'S Make A U-Part Wig||Curly U-Part Wig Tutorial
- Posted on 11 September, 2019
- U Part Wig
- By Anonymous
LET'S MAKE A U-PART WIG||Curly U Part Wig Tutorial
CONNECT WITH ME ON IG:@dbreezybeauty
________________________________
Products Mentioned/Used (SALLY BEAUTY, LOCAL BEAUTY SUPPLY, AND AMAZON)
HAIR - EVER LUXURY (LOCAL BEAUTY SUPPLY)
QFITT CENTER PART U-PART WIG CAP (AMAZON)
NEED & THREAD (AMAZON)
GEX BLOCK HEAD (AMAZON)
HYOUJIN Wig Stand Metal Adjustable (AMAZON)
This is a quick simple beginner friendly tutorial on how I create a U-Part Wig at home. Find easy tips on how you can achieve this look. Be sure to THUMBS UP & SUBSCRIBE PLEASE!
_________________________________________
SUBSCRIBE TO MY CHANNEL - https://www.youtube.com/channel/UCbeI...
Please visit and SUBSCRIBE to my VLOG channel for entertaining vids - https://www.youtube.com/channel/UCvZQ...
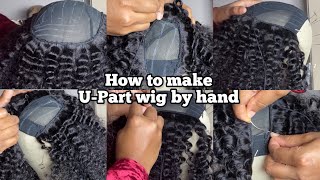
Hello lovelies and welcome back to my channel in today's video I'm going to be showing you how I hey guys can see I'm starting in the middle of the year but honestly and what I did at the beginning. It'S very repetitive as as for what I did at the beginning of the way, so the hareton I'm using in today's video came from the beauty supply and I'm not sure if they sell this brand but I'll be sure to drop it in the description box. So I lost the footage starting at the beginning, like I mentioned, but that's okay, you guys and taking a look at what I'm doing now. Honestly, it is very repetitive. I cannot stress that enough. It'S the same, so you just want to follow these exact steps, but if you guys are interested, then just drop your comments below and I'll be sure to create another wig, including the beginning to it. Alright, so um a couple of things that are gon na need: hair. Okay, now you do get what you pay for you guys. So if you do go to the beauty, supply and purchase an expensive hair, the quality may not be as good as something you were purchase at a different hair store like she's happy here or at Lieber lapies like that you're also going to need needle and thread And, as you guys can see here, I am doing the fold-over method you're going to need some t pins to hold those tracks in place. So, while you're sewing down to here, it doesn't move okay. So you want to do the fold-over method, all the way to your likes in my to the top, and then at that point you want to go ahead and cut the wet okay. So that way everything lays seamless and smoothly and we're good yeah. Alright. So I hope that's it. Okay, you guys. I don't know if you're already doing this, but if you're not, I would highly recommend you do it guys. So I mean not so sorry thread some needles before you start it before. You start creating the wig thread. Some needles, you guys it is raining so bad here. I hope you guys don't hear the Thunder too much and but yes, ringing really bad but helpful tip once again is thread a bunch of needles and like maybe five to ten, so that way, you're not stopping in the middle and having to re thread a needle. So that's what I did before I started creating the way I did so about attending. I mean why don't you think so, oh my gosh. I thread it about ten and needles and I only had to go back and read thread about like two migos, so that was very helpful. So, as you guys can see, I am sewing down that track, so I am going under and then I'm going over, and so you want to just keep repeating the same step. Make sure that you're stitching down your wig, nice and flat. You don't want any bulkiness. Okay - and it's just get repetitive, so I am speeding through the video you guys, but once again I'll, be sure to include everything I use included here, where I purchased, the? U part wig cap, which was Amazon I'll, be including also where I got the block head and the wig stand. Okay, so I'm gon na, let you guys take this all in and I'll be back, okay guys, so we are pretty much finished almost with the wig. We just need a few more tracks to complete this unit. You guys, I really love you parts. It is so easy. Needless to say, you can put it on and remove it whenever you want. It is a go all the time if you don't feel like a pain for your hair, to be done all the time or to you're in a rush, and you have to get it going. You just pop this thing and put a few curls within your leave out and it's good to go alright. So, as you can see you guys, I did go ahead and cut the left here, so I am sewing down that track right now and I kind of got it stuck between the c-pen, so you're gon na see that I'm having to kind of play with the Threat to try to get it to lay in pull through, because I did not want that so cut it rethread, the needle that just would've been way too much, but coming your thoughts below. Do you guys, like you parts, and what do you feel about you part? Would you wear a you part yourself, or do you like lace front score or do you like? You know like a sewing? Look because before I got into wearing lace front I would always get my hair, so it and that's kind of expensive you guys. That is really expensive. Actually, and this, u part, wig, is very similar. The only difference is, you can take it off and you can put it on, but it has the same effect as when a sewing basically is sewn down to your hair, and some of your hair is out, but the only difference is you can't take that sewing Out right, and even if you wanted to have the the wig you for our wigs sewn into your hair, you can do that and so now we just kill time and we just provided a quicker process. So I mean it's a win-win, but this does give we're kind of you guys, so I am just going under that was and through the cap and I'm pulling it through making sure my stitching is nice and flat when I was a amateur actually anyways, I'm still Fairly new and that's granted, but when I first started I was always pulling through in the web, but in mourning with creating my wigs, you don't always have to go through the web. You might want to go through a couple times just to secure that lid to the cap, but after you do that you can just go through the through the between the hair, the the web and the hair, but not like through the web, about making sense. I hope I'm making sense it's kind of hard to explain, but what I'm basically trying to say is you don't have to always go to the web and you'll see what I mean when you actually start sewing down. You'Re awake. Well, your tracks, okay, and so like. I mentioned I'm gon na go ahead and speed up this part because it does get repetitive you guys, if you have any questions or if you're confused about anything so far, please drop your comments below I'll, be more than happy to address your questions. You guys, and I am working to get a better wig stand that is going to be very essential. I think I mentioned this in a couple of videos before, but I tried to like save money by paying for it inexpensively Stan but baby this list. It makes my blockhead move so much so please buy us 30 licks and I would use this leash then, for the time being, until maybe we can afford a better quality wig stand, but I would recommend if you can survive a durable, quick stick and you can Find those on Amazon I'm free too much for a fairly decent price? Okay, all right! So I'm gon na! Let you guys go ahead and take this in and I'll be back! You, okay, you guys, so we are nearing the last few tracks. Thank you, Lord Jesus. The Lord is good, a man you guys I poked my finger so many times, it's not even funny, so we are now finished with the. U part wig: this is how she's looking so far. If you don't want it to be too full, I would recommend using less tracks, and this is about actually it's 3 bundles of hair with it, with the exception of like maybe one or two tracks, but it's damn near 3, so yeah. But this is where you will leave your leave out, and this is how she's, looking after we completed it and that string right there that you guys are seeing. We don't need that you can cut that off, it's not needed. So after you complete your work. You are going to want to, and so on, Eclipse which can be purchased from Amazon and Sally. This is how she's looking on the inside. It also has adjustable straps for you to adjust it, and this is how she was looking at the back. I really love what I completed here, I'm very happy with it. I'M happy the way it came out so now we're gon na move over to me all right, so I'm gon na go ahead and show you guys how I put the slip on now. I do only so one tip on and I do the other one off-camera, but I didn't want to show you guys how I put the clip right, so you just want to go ahead and cut any excess string. All that you don't need. So that's what I'm doing here, I'm just going in and making sure everything is nice, and so now it's ready for the clip. So here are the clips that I used and I actually got this from Sally's. I don't remember the price, I think that's about mmm. I want to say maybe five six dollars but guys. Please don't quote me on that because I'm not sure, but it's not too expensive and again you can probably find this on Amazon, so you're going to need a needle and thread to sew down your clip and I am using a needle threader guys. This is life. Oh my gosh, when, when I tried to put the thread and the needle, it would take me so long like maybe like 10-15 minutes, and that was so annoying guys. Oh my gosh! So when I found out about this needle threader, it literally only takes me seconds so I'm showing you here exactly what you do you put the needle threader inside of the small hole of the needle like such and then what you're going to want to do is Take that thread and place it through the needle threader holes, which is much wider, you'll see then the actual needle, okay and then you'll just pull it back like such and it's there and that literally took. I don't know what two seconds all of two seconds guys. Yes, the needle threader is live, and this can be purchased on at Amazon as well, and you must be able to find it like at Walmart or even maybe, a beauty supply. So what I'm doing now is actually I'm going ahead and tying a knot in the thread so that it is available for me to go ahead and sew down that clip, so I'm gon na, let you guys go ahead and watch and I'll be back. Okay, you guys so this is the completed. Look we're looking real classy. If you enjoyed this video, please be sure to give me a big fat thumbs up. I really loved the way that everything came out. I'M looking really classy. This is my outfit you guys, so I wanted to show you. I got it from exactly and if you enjoyed this video, please be sure to subscribe and share. If you can drop your comments below of how you feel about the classes on Facebook and I've really loved everything, it looks seamless, I love the curls. I love. How short it is. It just looks perfect. I am so excited. I look like a baby boss, business boss, but I love you guys so much. Thank you guys for watching bye.


Comments
Therrol Sanders: The hair is pretty it looks like a body wave
Therrol Sanders: Pretty
Therrol Sanders: Them baby hairs laid hunny