Detailed | How To Make A U-Part Wig With A Lace Closure | Ann Mode Hair | Aliexpress Part 1
- Posted on 04 July, 2019
- U Part Wig
- By Anonymous
HI Everyone,
Welcome back to my channel. In todays video I will be going over how to make a U-PART Wig with a lace closure. Please excuse the ashy hands lol.
**Subscribe and turn on notifications so you do not miss anything.
ONLY POSITIVE VIBES.
PRODUCTS YOU WILL NEED
-Hair
-Thread
-Curve Needle(s)
-Sheers
-Canvas Head
-Dome Cap
HAIR DETIALS
Link to Hair shown in video(Aliexpress:
Link to AnnMode Hair Vendor(Aliexpress):
Mannequin Canvas Head(Aliexpress):
Watch more videos:
Work from Home Opportunity:
Interested in learning more about working from home email me at [email protected]
Nutritional/Supplements:
HERBALIFE - SHOP PRODUCTS: takishawrigwht.goherbalife.com/en-us
—CONNET WITH ME
Instagram: http://www.instagram.com/takishawright...
Facebook:http://www.facebook.com/takishawright
BUSINESS OPPORTUNITIES
Email: [email protected]
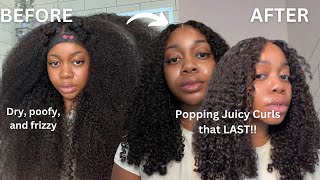
But those who hope in the Lord will renew their strength. Isaiah 40:31 hi. You guys welcome back to my channel, so this is like my fifth time: recording this intro. So I'm trying to make this short and sweet. So I'm doing a hair review on this lovely hair. You can see here. This is kinky curly, hair from n mode on Aliexpress. So I purchased. I placed two orders with this hair company. I purchased the 4 pack and the 4 pack was basically three bundles and a closure, and when I got the bundles I realized oh, I may need an additional bundle, so I purchase the fourth bundle. The first order I purchased on a Thursday I received on a Tuesday and the second order I also purchased on the Thursday, and I received that the following Tuesday, the crazy part about the orders, the first order. The bundle pack came through FedEx and then the second order, which was the single bundle, bundle that came through the post office, so FedEx required a signature, but the post office just placed it in my mailbox, so just be cautions. Be cautious of that. When placing your order, you may want to be very detailed and asking them for signature, because you don't want your hair, your bundle, snatched. No, we don't want that when I received the bundle pack. It came in this clear duty key here, this clear plastic. So when I received my package in the package, there wasn't a card or anything else in the package, with the exception of these these lashes. So I'm sorry, this is not showing you the actual texture, fiber texture or whatever these lashes. I don't know what is it's plastic fibers I don't know, but I'm not gon na be wearing them but appreciate. It though appreciate the gesture wish it has some type of care card in there each bundle was cover and a hairnet, which is cool, so wait. But these are going to need to meet this wig. You need at the rate of your choice. I choose cotton, you can also choose nylon, you want a needle, I'm using a curved needle. I wouldn't recommend straight cuz you're gon na have hell. So a little trick is to purchase you, you know anywhere from three to five needles. I think I actually have. I have seven so I'm a pre thread all seven of those, so I'm not going to need to rethread them or read thread a needle during this process. So you need the thread of your choice. You need pair of shears, you need your push pins because I'm using a canvas block head, if you're not using the canvas, blockhead well you're, going to need pushpins anyway or whatever technique you use to keep your head on your mannequin head, your styrofoam head or your Camera'S head whatever, so I also have this to anchor my canvas head to a base I'll also link in the description of this canvas head. I believe that, probably you have 13 or 15 dollars on this canvas head and it took like a week for it to cut and, lastly, you're going to need you gon na need your dome cap. You can use a neck cap, don't cap whatever your preference is. I like to use a dome cap so and get you some music and you alone drink drink. Why, whatever juice me I'm about to go, make this energy T and we bout to knock this out. So if you want to know how to make this wig real easy, real, real easy, I suggest you keep on watching. Okay, so here's the hair, so I basically marked off all the lines that will have a track. Add it to it, I decided to do an off-center part and my very first track. I'M actually going to place it under the band, and this will allow me to pull it up in a low to medium ponytail. When I work out, I just finished putting in my first track and I did cut this one track so, but all the other tracks images do the fold-over method. But if you look see yes, so this allowed me to put it up yeah. So now I'm gon na just keep going around so the two more tracks I'm going to go all the way around from the closure to the closure will do two more tracks like that and then the rest I'm going to start down here going around until I Become until it becomes a horseshoe and then once it becomes a horseshoe and I start wrapping around the actual closure, so you guys, I want to show you guys something. So when you first start your tracks off, when you first start your tracks off, some people will take the track right and they'll go up under the track and start placing the tracks. However, you still have this little piece. That'S still hanging so a trick. I learned from a real OG is to actually thread it through the track. This is the only time you're, actually gon na thread it through the track, all the other times that you're gon na sew your tracks, all you're, going to go under the track. So to make sure the in state act and that it doesn't come out thread it ashle through the track, see how it's through the track versus me, going under the track. Now I can go under the track and keep going over it like two or three times to cover it. But why do that when I could just thread it and it's it's tacked in and some people like, oh well, you're, going to worry about Shetty your hair's gon na shed any with this curly hair, it's no regardless! So that doesn't matter just the tip! All right finish the tracks around that's to be clear. The two are they short, three trucks, hmm three trucks, so the three tracks around I actually cut the will. You don't have to you, can fold them over. I just don't like that. Bulkiness at the top of my head and in front of my head, so these will be like for real for real. These will be the only tracks I will cut, except for when I get to like right about well right here. That'S where I'll start cutting the tracks again. So all these other tracks, I'm actually gon na - do the fold-over method. So this is actually a u-shape with the tracks family needed a line. Yes raise that up in here yeah. Let'S keep going so now we're almost halfway done. You can see now I started going to the bottom, I'm doing the u-shape at the bottom, so it has started going up. U-Shape. Sorry, I'm kind of still trying to digest my tacos bit mm-hmm so far. This is what we looking like and then we keep going. I just want to say we are placing the last track. Let the closure and attract touch each other, don't lay it on top and with your frontal, you want to leave pile a third, maybe a half, an inch out from the actual wig cap, so I pulled a little of it out. So when I do place it, this will be a delay right above my hairline. Ok loves. So this is the final product a and we are done yes. So now I can take a break, walk my dogs and yeah just rest. So I hope this video helped. You in some way, if not please, let me know in the comments I'll definitely do another video to explain a little more. If you guys, don't if you have any questions, if not please like this video subscribe and I'll, see you guys later with a part 2 on my style in this lovely piece of hair, see you later


Comments
Bianca Eunoia: What inches did u purchase?