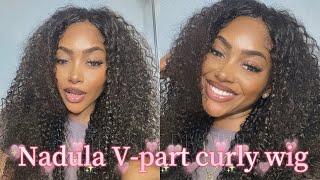
How To: Easy Colored V-Part Wig Install With 2 Braids| Wiggins Hair
- Posted on 11 November, 2022
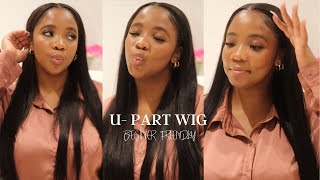
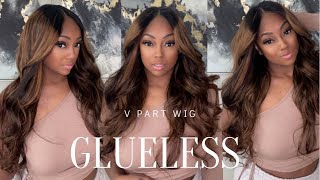
- U Part Wig
- By Anonymous
Hey y’all! I hope everyone enjoyed this V-part wig 
Installment….Turn on your post notifications, like, comment & subscribe.
Hair details: 1B/4 24inch straight V part wig 250 density
Direct Link➤https://bit.ly/3W1X72U
#WigginsHair Official Store:➤https://bit.ly/3VWKCpr
More coupons!Join In Facebook Group➤https://bit.ly/3pzwi8e
You may also like:
1.Skin Melt HD Lace Wig➤https://bit.ly/3N4EEyI
2.Top Selling Lace Frontal wig➤https://bit.ly/3su83bU
3.NEW V part wig! More Natural➤https://bit.ly/3N76zxW
#wigginsloosedeepwave #wigginscoloredwigs #wigginshdlacewig
Follow Wiggins Hair On Social Medias:
Instagram @wigginshair ➤https://bit.ly/3ILWwdL
Tiktok @wigginshairbest ➤https://bit.ly/38krOfq
Facebook @wigginshair ➤https://bit.ly/3xBqvmj
Wholesale WhatsApp: +86 18339906150 Email: [email protected]
Follow me on my socials
* Instagram: https://instagram.com/me_heavenli?utm_...
* TikTok: https://vm.tiktok.com/TTPdMgf2s9/
* Twitter: https://twitter.com/me_heavenli?s=21
Email: [email protected]
*Intro beat by Mindz*
Shop my Amazon favorites!
http://www.amazon.com/shop/influencer-...
Hey y'all welcome to my channel if you're new, you're gon na love her and if you're returning what's up as you can see by the title, this is another her tutorial for a V part wig. It took me no time to install it. It was very easy. Very simple: so if you would like to see how I achieved this look, keep on watching foreign, let's get started, so this week is from wig and her in the silk baggie. I received two wig caps and an edge brush an elastic band with their logo on it, a cute headband and a pair of lashes and, of course, the 24 inch 250 density V. Part wig in the color 1B slash 4.. As you can see, the inside of the wig has six Clips near The Parting area, and three large cone Clips in the back here is a close-up of the wig. You can see that the roots are 1B and the rest of the wig is brown okay. So let's get this Bonnet off! This is my braid down I'm using the same braids that I had with my previous hairstyle, because I'm not redoing these braids and I left the small section out for my leave out. Unfortunately, the 1B color doesn't come down long enough, and I knew I wasn't gon na like how my leave out blended with this wig. So I found some old hair that I had and I decided to add this to the wig. I literally didn't even use a full track, as you can see here, I am measuring the track up against the opening of the wig. I just wanted to add one track on each side, just to help blend my leave out a little better. Once I measured out the piece of hair that I needed, I sectioned off the top track, because I don't want to lay the track directly on the top. I use my hair glue. Um, it's dried up. Of course, my hair glue is always dried up, so I have to use a comb to apply the glue, but it's okay, I'm gon na get the job done and then I'm going to add the track in and this is how it's gon na look. I only added one piece on this side because I don't want it to look like a highlighted wig. I'M only doing this to help blend my leave out so here I am just showing y'all me adding the track on the other side and then that's it. I only needed two small pieces for the front, because this slight adjustment makes a difference. Then I use my blow dryer to draw the tracks down foreign back off now, it's time to actually put on the wig here. I am just putting it on and clipping it in. It is very easy, very simple. This literally takes less than a minute. It kind of looks like I'm struggling, because I kind of am the braids that I have in are very small and very thin. I do recommend doing thicker braids, not too thick, but not as thin as mine, because the clip has to clip to something. You know what I mean now that the wig is clipped on I'm brushing through it about to work on this leave out. As you can see, the foundation looks nice and neat. Yes, I love it. My leave out is oily enough, so I didn't use any product on it. I sectioned off small pieces and then used my mini flat iron to straighten it all out foreign. Thank you now that everything is straightened. I'M using the end of my comb to fix my part and, as you can see, my leave out is blending better than before. I love using my soft brush for my leave outs and I'm using the wax stick to help tame these flyaways. I know that I said I didn't want to add any product to my leave out because it was already oily, but the top of my head was looking crazy to top it off. I use my hot comb to get it as flat as possible. My hair looks pretty nice like this, but I honestly felt like it looked kind of boring, so I decided to add two braids. I sectioned off a small piece in the front and braided as close to my roots as I could not too close foreign foreign braid. All the way down, I made sure to leave some hair hanging. I used a small black rubber band to secure it, so here I am kind of spreading the braid apart, as you can see, to make the braid look more wider and Fuller foreign is complete. I'M going to repeat this process on the other side. Thank you, foreign, for more details on this wig from Wiggins, her check my description box down below and before I show you all the final look. I would like to thank you all for watching this. Video. Don'T forget to like comment and subscribe, see y'all in my next video
Comments
Angela Jimenez: Beautiful hair! Where is your skinny flat iron from?