Hairvivi Install Ft Jasmine Wig | Grwm Wig Install For Beginners | Unsponsored Hairvivi Wig Review
- Posted on 26 January, 2023
- U Part Wig
- By Anonymous
Welcome Back loves! In this video, I share how I installed my first wig from Hairvivi! Beginner friendly :) Like, Comment and Subscribe! Enjoy xoxo
WATCH IN 1080
Products used:
Hot comb
Blow Dryer
Barrell Curling Iron
Hair wax stick
Clips
Link to Hair:
https://www.hairvivi.com/collections/b...
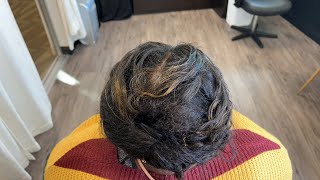
Foreign guys, so here we are starting with freshly washed hair. I am literally fresh out of the shower. There are no products in my hair and I always start off every install with freshly washed hair so that my hair is protected. Underneath I am moisturizing with the Aussie detangler and Royal Crown Grease for this install. I decided I wanted to blow dry my hair because it would be easier for me to cornrow the hair and I plan to keep the cornrows in for at least a week to two weeks wash and then redo. So here I am just using the Remington blow. Dryer getting my hair all straight and ready for the cornrow y'all. It may look like I know what I'm doing with these cornrows, but guys look at this. It kills me every time. Don'T judge me anyway, we're going in with the sweet almond oil to moisturize my scalp, and we are good to go okay guys so now that my hair is prepped and ready for the application of the wig without further Ado hair is the unboxing of hair BB. I love the minimalistic packaging and, as soon as you open the box, it just has a quick instruction card of how to take care of the hair, and here we go opening the package foreign. So once you open the package, you'll see that it comes with a true scalp medical grade tape, which I thought is pretty awesome because you know like if you wanted the scalp of your wig to be brighter or just to look more natural, you can place the Tape inside of the wig cap and as you can see, it comes with six different options to use, and the majority are in the color that I selected with my purchase, which was the cappuccino color. And so I'm just showing you guys how it looks and for first time users like me, it came with an instruction guide of how to install the true scalp tape. I was really surprised with the satin goodie bag that I got with my package really happy about it. It was just for me to do my edges and a few Clips there for when I'm installing the hair, this satin bag is just giving me luxury Vibes. I love it, and so here is the hair, so I got a 20 inch. Jasmine wig comes with a side part with the scalp in the color cappuccino. Look at how that literally just disappears on my skin, I'm so excited to install this hair. The wig is definitely true to length. I love how the lace in the color cappuccino has a built-in cover there, so that it's it intensifies the natural look of the scalp when you're parting. It does come with a band built in for you to tighten it as well as a comb just wanted to try to tighten up the strap in the back so that it's as fitted as possible, so just gon na get this to kind of flatten out. I guess I normally do middle parts come really thinking if I should do a middle part. Okay, so I'm just going to use those handy dandy clips that came in the package there to clip the hair back and we're going to get started on cutting away the excess lace, I'm doing almost like mini triangles or like a zigzag so that it can lay Flat against my skin cutting off this flap is my biggest fear, because I do not know if the wig is going to stay in place, but I know I have to cut it because it's covering my entire air. So it's such a hard time to film the side, because I'm using the mirror to guide me, but I just um separated the hair um over my ear from the rest of the wig using a comb and I'm using the scissors there to cut off that excess. I normally do a lot of baby hair on my real hair, especially when I put it in a ponytail, so I thought to try it on this wig as well. But little did I know that that was going to be an epic fail. A really big epic fail. I tried to spray it down to make it look a little bit more natural before cutting it, and it just would not work okay guys. So it is the next day and as you can see, the wig is still not installed huh. What ended up happening was, I got so frustrated because I couldn't get the sides to lay flat and because I was pressed for time I ended up taking off the wig and just um, taking out my cornrows, and I put my hair in a ponytail. So, just in one wrapped up - and so I said you know what today, I'm gon na try it again, and so I just cornrowed my hair again and threw on this wig cap really quick, so that I can finish off this. I guess video. I was gon na say tutorial, but definitely like I said in the beginning. I am no professional, I'm just winging it here. So hopefully this actually works a little bit better. Today, um I'm hoping it works, because I really love the wig and I just wanted to look good so without further Ado. Let'S try it again, so I'm thinking I'm going to try this um as a middle part instead, so it's still a side. Part um, like I left it yesterday, so let's try that okay, so I'm gon na try to tighten this a little bit more in the back, and so what I'll do is I will spray the little corner I'll. Do then I'll do this side as well? Just the corner, Okay, so foreign so far, is that parting spaces. So much like I can go straight back, which is exactly what I want to do. I'M just gon na use a little bit of my hair wax. Honestly. Any wax stick would do to keep the hair separated okay, so where I want this to be super flat, I'm going to just put a little bit of this. So to make sure the wig is honestly as flat as possible. I'M just gon na go in with the wax and the hot comb piece by piece to make sure I don't miss any part. So this actually took a lot of time and you'll see me speeding through this um throughout the video. But I literally did this line by line the scalp. I know that some people use the scalp tape, but I am really debating if I want to put that in because it looks more natural to me right now without it like the part itself, because, naturally, your part isn't super super bright. So, okay guys so I'm just gon na speed through. I did the exact same thing on the opposite side. Okay, so after some careful time spent flattening out the top, I'm much more satisfied with the way it looks um. So I'm gon na go ahead and start to style, foreign okay. So now that I have the top all flat, I'm gon na try now to curl this with my Barrel curler, so to try um keep the hair soft. I use a little bit of the olive oil spray before going in with the curling iron for each piece that I do and honestly this took me a good bit of time, and so I'm not going to show both sides of me doing this. I'M going to speed through that as well, but you can see here, I'm just rolling it up waiting for it to get hot, curl it and let it go foreign. I was thoroughly impressed with what I had done so far like y'all. It actually looks like sense boom, all right guys, so here are the curls. Oh, I am loving it okay, so I just wanted some nice loose curls and I feel like if that works. So, let's see what it looks like with the clips removed foreign y'all. By this stage I had a completely new personality. I was no longer Kish, okay, I'm still thinking of what my new name is, but just know. I transformed in this moment - and I was gone for the day - knock knock who's there, everything but lace. What lays people, what lace foreign formation look at the softness, the curls, the flatness? Oh, I am in love guys. I am in love, okay, guys. So this is the finished. Look and honestly I am in love. The hair is so soft and it honest to God was not that difficult to style. I feel like um for the curls again um I'll, probably do tighter curls when I try to style it again for an event, but I try to style it for an event. But I love the hair. It is true to length, it was worth it and I feel like the, and I feel, like the frontal is just perfect. It looks so natural like. I have no baby hair and I prefer it without the baby hair, because it looks a little bit more natural to me. I wanted something that I did not have to glue down, because I don't know how to use the glue and I didn't know how my skin would react to it. Um, and I also wanted something that looks like my natural hair, flat ironed from The Roots. So maybe I might experiment and do some of the baby hair again um on another install, but for now I am happy with the way this is right now and I wanted a natural look and I think that's what I got. The hair is really true to length. It is completely worth it because the quality is high. The texture is good and honestly, I have zero complaints. Zero complaints, I'd only complain. I would help for myself is doing a better job or knowing how to do it quicker. The next time leave me a note in the comments, tell me what you think and if you guys have purchased from hair BB. Let me know what your experience was like. I would say that if you're someone, that's wondering if purchasing this hair is worth it, I 100 will agree that it is worth it and I am an unsponsored review. I purchased this with my own money and I've, as you can see, installed it on my own. So there was no professional help, no special treatment. Anything like that straight out. The package, the hair was true to length it smelled good. The lace was transparent and, as you can see, it looks natural, which is the look that I believe everyone wants at the end of the day. So if you end up purchasing this wake unit, leave a comment down below and let me know how it went for you and, in the meantime, I hope to see you guys on the next video foreign
Comments
Jelly Booz: This came out so beautiful. Well done. I went online to check out the wig & that wig is very expensive. I am a beginner when it comes to installing a wig & u make it look so easy. Great video
lucy shantel nakibuuka: Omg..its perfect! Love it!
Tamara T.: This is cute. I have never purchased from them but I will now. I have a very light complexion and scalp so I think I might try the tape. Good job
Cherylann Glass: That's fire. I love the curler