How To Make Your Own U-Part Wig 2017 Natural Look
- Posted on 25 January, 2017
- U Part Wig
- By Anonymous
Hi guys welcome , today i day 2 of my hair Series! I hope you are enjoying my videos do not forget to subscribe and give this video a thumbs up. Today we are going to be doing a natural U Part Wig. If you want to see how I braid my hair check out this video:
thanks for watching!
----------------------------------------------------------
come and follow me:
Instagram at Ashleysjoys
Snapchat ajw616
Facebook: Ashley DotJay Wilson
---------------------------------------------------------
Music by:
NCS No Copy Right Sounds
JJD
• https://soundcloud.com/jjdofficial
• https://www.facebook.com/jjdofficial
• https://www.youtube.com/user/JJDoffici...
NCS YouTube Playlists
NCS Trap http://bit.ly/NCStrap
I created this video with the YouTube Video Editor (http://www.youtube.com/editor)
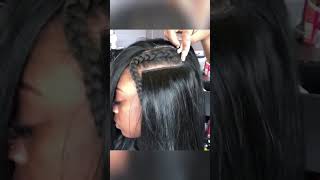
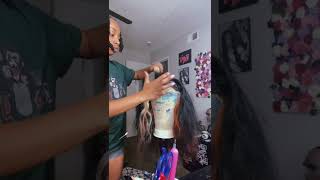
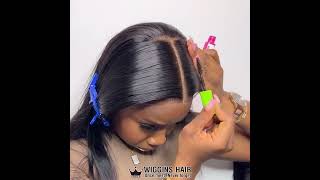
Hi guys welcome to my channel Ashley's Joy's. I hope you guys are enjoying my series so far today, I'm gon na be showing you how to make a u-part wig with a dome cap or you can use a lace cap either. One is fine. I tried to do something different today and I used a dome cap, but I usually would prefer the lace cap. So here are the items you will need a needle and thread a brush scissors concealer a wig cap of your choice. So now I'm going to simply place the wig on the styrofoam head. You can use whatever hair you have on hand. I actually don't prefer this one, but this is the one I had on hand today. So now you're simply going to thread your needle and you can use nylon thread or you can just use regular black thread from your local beauty supply store. So once it's done doing that, I'm going to measure out exactly where I want my hair to fall and lay so I kind of want to be able to put this in the middle or to the side. So I'm just gon na make a middle part. For now, I'm gon na take my concealer and I'm gon na use it as a device. I guess, to measure exactly where I want to sew the hair to oh. Why would want you know to cut for it to be open. This is not a full wig and it is not a lace closure. So so now I'm going to take the hair and when I first do the first track, I like to put it directly at the very Nate, the very end, the very circumference, whatever you want to call it around this part - and I like to do this. So if you flip your hair into a ponytail or anything like that, it doesn't really show the cap and it's gon na blend seamlessly with your hair. But I do want to mention when you're doing this, you want to be very sure very sure, want to be very careful not to sew through the actual band, because if you do that, it's going to make it very hard to stretch this cap onto your head And I do like to do my purse needle taking it through the weave a few times just to keep it very secure and if I say baby one more time now that I'm halfway through I basically in order for me to keep from sewing through the actual Band I like to pull up the material that is on the dome cap, just to make it a lot easier to sew it down without going through that elastic band, and so now we're just going to simply continue to make it to the other side. As you guys can see, I'm getting closer to the front, I'm really trying to show you guys in more detail how I do this part just because I know sometimes you have other questions about this particular part. It'S a lot easier to sew on the rest of the hair, because you're not necessarily going to go through that band. But now I like to take take the needle and I to go through this part a few times just to secure it, but not too many to where it's or not like a huge knot. So when you comb the hair down, you don't have that bit. Poke of an art so now that I'm done with the back now, I'm going to simply start slowing down the actual tracks. Now this part, you still have to be careful, because once again, whenever you're sewing on this elastic, then you want to be sure not to go through it. So I like, I said I support the thing, the actual material up just a little bit as I sew down, so that it is not going to go through that band and I'm stressing his a lot to you guys, because when I'm a this is the second Week, I've ever made with this type of cap, but I always used the actual knitted cap sword like the one that has holes in it and the first time considered. I went through the band and when I went to put it on my head, I was so mad because I did all of it any one thing, so I'm just trying to keep you guys from making that same mistake once we get past this point. Basically, I'm just gon na continue to sew the hair down. So, as you guys can see, I'm actually sawing this in the loop and pull method just to keep the hair and, I said, see Carrie you can put the stitching a little bit closer if you want, but I like mine's a nice medium length not too far, But not too close just because I don't sometimes I like to take the hair off of the wig and we do the wig or, if I really, if I'm not feeling it anymore, I might do that. I'M not just a tip to save money. If you guys are like me worth it, you know if you're thrifty like me, so that's why I like to make it to where it's secure. But yet, if I decide to take it off and redo it, I can. But if you know that you're not going to be redoing this week whatsoever, I would make the stitching a little bit closer, Oh another tip when you're folding the webs when I get to the front or closer to the ear part or anything towards the front. I support my webs, but if you do that, you're gon na be very careful and make sure that you tack that down a few times, so I'm not gon na really talk to the rest of this video. I'M going to. Let you guys watch me as I work my fingers through this hair um and I'll get back to you when I'm closer to the end of the video. But if you guys are enjoying this video, please give a thumbs up and write below if there's anything that you like to do when you're doing your wigs in that way. Hopefully all of us can help each other. If you want to make wigs and save some money and then hopefully this video was helping you guys and if it is just give it a thumbs up, write any comments below. If it's anything you guys see me doing that, I can do better. Let me know I really am enjoying making these series for you. This is the hair series once again parents series once again don't forget to subscribe to my channel. I didn't say none of this in the beginning of the video. So hopefully you guys made it to this point. If you did, you are the real MVP and I think you something but anyway, I'm gon na be quiet. Okay, so now we're getting closer to the very top of the wig and I'm so happy. So now what I'm going to do is I'm done with storing all of the hair down, but I like to take to try to just saw them again, see where I put my line just to make sure that it's nice and neat and it's nice and full. So we're just gon na cut off two trucks from the hair. You have just to make sure it lines up with this line. I'M just gon na sew that down to both sides and also just to mention when I do this part anything at the top. I like to double weft it like to double I'll double left it I'm sorry, I like to double slow it down, just to make sure that it's nice and intact, and it's not going to come loose or anything like that which, even if you did it once It shouldn't come of those, but I just personally like to do that from that on security, so we're just going to continue to tack this down almost done. You guys almost done just be about two hours to make this week. So if you are within the same time that I you know within the same time frame work speed that I did this, then it should take you approximately two to three hours to make the wig. Sometimes you could take a longer. No, I totally lie Ashley. Why you lie it's like me, three and a half hours to make this wig? Why did I just say two hours? I should smack myself, but I'm not pointing to it. So this is what it looks like done. I was simply going to cut this part, but if you guys can see the back that looks nice and neat like that stitching, oh Jesus is so great, so we're basically done yes, we're just going to take the cut piece. It will knock the cookies. Oh, my gosh we're going to take the part where it's cut and if you would like to this is optional, you can add some clips. I kind of don't like the clips there cuz it kind of made my head hurt, but it did make it a lot more secure, so I suggest having it there just in case, if you want, I added four clips two on each side, but this is basically Eight you guys, if you made it through this whole video woohoo. This is how you, how I make my? U part, wig, I'm very easy, not too bad. Like I said I took about three and a half hours hope you guys enjoyed this video. Don'T forget to subscribe, like comment and I'll see my next video
Comments
Tammy Lee: Great video! Very detailed and you did not speed it up like most tutorials! One of the best upart tutorials I've seen.