How To: Install & Blend My Kinky Curly V-Part Wig To Look Like My Natural Hair // Ft. Iseehair
- Posted on 18 June, 2022
- U Part Wig
- By Anonymous
Follow me on socials : @Itskendallfrfr
♡H A I R I N T O D A Y' S V I D E O:
Hot Summer SALE , Up To 32% OFF + Extra $10 OFF!!! Don’t Miss Out!!!
More Information On: https://www.iseehair.com/
♡Use My Special Code: ‘’Kendall ’’ Get $10 OFF !!!
The hair I'm wearing in this video is :https://bit.ly/3x72F0s
#ISEEPrincess
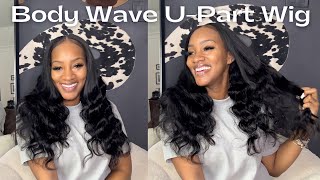
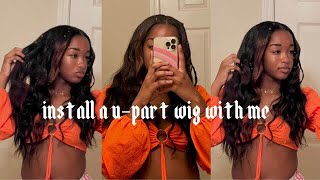
Texture: Mongolian Kinky Curly
Density: Natural Density
Length: 24inch
Cap Construction: Vpart Wig
♡Crown Series--High End Series just dropped: https://bit.ly/3NmJjMb
♡Life Need Colors: https://bit.ly/3uzOGie (Code: New20 Get $20 OFF!!!)
♡Suitable For ALL Skin Tones- HD Lace Wigs: https://bit.ly/3wACAs2
♡$73 Pixie Cut Curly Wig: https://bit.ly/3EMuNJS
♡OTHER DEALS:
Mongolian Kinky Curly Headband Wig: https://bit.ly/3x72OB2
Mongolian Kinky Curly Lace Closure Wig: https://bit.ly/3Q7Sxxa
♡C O N T A C T ♡
IG: @iseehairbeauty--http://bit.ly/2IyNNkJ
Email: [email protected]
Imessage/whatsapp: +8613271220951
PRODUCTS USED
FLEXI RODS
https://wessentials.com/products/flexi...
MIELLE
https://www.sallybeauty.com/hair-care/...
GREEN ECO STYLER
https://www.amazon.com/Eco-Styler-Oliv...
DENMAN BRUSH
https://denmanbrushus.com/products/d3-...
Hey: what's up you guys, let's get straight into it. My name is kendall hart and today we're going to be installing the v part. U part wig whatever you want to call it. This hair is from icy hair, it's part of their princess collection and it's a 24 inch mongolian kinky curly. You part wig shout out to them for sending me free hair, but i actually love their company. I buy from them all the time, so this is still going to be a really good, honest review. So here we go so this is what the hair looks like straight out of the package. As you can see, it's not a lot of volume, i'm just going to briefly go over the components, so i'm doing a middle part and it has two combs on each side of the part which is really secure, because i've seen some that only have one and Then it has a comb in the middle of the net and then one on either side like for your sideburns and a comb in the back, so immediately out of the pack. The curls are giving nothing very flat, but we're gon na fix that very soon. It also comes with a free bonnet, it's the same bonnet, i'm wearing right now and it's a really good bond and it has a drawstring and it comes with an edge brush, a band which is kind of weird, because it's not a frontal. But i guess that comes with every wig that they send you and some nails which are really really cute. They also include this drawstring bag, which i would recommend keeping up with, because i take my u-part wigs off every night. So it's easy to just put in the bag, keep it from getting tangled or messy, or anything like that and it's soaked. So it's good for the hair and lastly, wait not. Lastly, second to lastly, they give you lashes. There'S eight pairs in here they're, really natural, really cute, and i feel like that's a lot to come with that package, like that's a good little ordeal and then lastly, is just the wig cap, which i don't need it now, but i will later i promise you So i went ahead and slipped my hair off camera, just using regular, regular eco, styler, gel and brush um. My hair is really fine and thin and not thick at all. So it's not that hard for me to slick it back and since it is curly hair. I can get away with not doing braids and doing a bun in the back, because at the end the hair is so voluminous and full that you can't tell. I have a butt in my back of my head now for my thick hair girlies um y'all should probably do a little brighter too, but for me i'm fine! So when it comes to making the actual you i'm going to use my inner brows as a guide. So the corner of my inner brow for my left and then the corner of my inner brow from the right and just go all the way up making a part, i'm going to kind of estimate um, exactly where i put the where i stop it. I i guess just because it doesn't really matter, it's a! U part wig. So if i do too much hair, i can always just brush it back into my braid. If you have braids, you should probably care a little bit more and i'm just going to secure with the bobby pin and oh girl and then just take the rest out. And since i have it secure with the bobby pin. I know exactly what to not put in the bun and i'm just gon na put the bun back in my head after i take my hair out, so it should obviously emulate like a rectangle use shape and it's curly hair. So it's not going to matter that much you're not going to be able to see the parts that i just made. The only part that really needs to be straight is the part down the middle that i'm about to do so now, i'm about to part my hair and start putting my flexi rods in, but before that i literally only put water. So this is the as i am jamaican, castor oil spray water and i just use that like whenever i'm spraying water in my hair and just because jamaican casting oil helps your hair grow, i'm gon na brush it out and put eco styling gel on it. Literally. That'S all i do is water and eco styling gel. Sometimes i put mousse, but this is it like it doesn't take much at all. The main part is literally just making sure that your hair is tangle free and that it is wet enough and it has enough product. So i put about two fingers full of eco styler. Now i'm gon na take my flexi rod. Oh, my gosh, i'm looking a little scary, but i'm gon na take my flexi rod set and i always get mint green um. I'Ve never seen this size in a different color, but i don't know i will put the link in the description box just in case, but this is the size i always use. I get two packs. These packs came with seven in them, so i have 14 total and i'll usually use like four on each side. Now i'm gon na part, my hair, i use the end of the edge brush that came in the pack, and this is the part that i said needed to be straight. The other parts don't matter, but this one does because it's the only visible part, and after i prime my hair, i'm going to begin going in with my flexi rods. So i always start from the front and work my way back and i do want the sections to be small, but not tiny, so i'd say about half an inch three-fourths of an inch part um, and then i'm going to begin to spiral. So i want to go underneath first and i mean on top first instead of underneath, so that first curl is going to go on top of the flexi rod and then i'm going to kind of do this spiral not too tight together. So maybe like three fourths of an inch an inch space in between each curl. If that makes sense, because if you do it too tight, it's not going to match the curl pattern of the wig and whatnot. So i'm going to fold both the ends just to keep it secure and i'm going to move on to the next curl on this side. Same method. Make sure that the root part is tight and secure with your flexi rod. You can either bend it over or bend it behind and yeah i'm just kind of doing the same thing throughout my head, like i said i usually do four or five each side and i'm just going to proceed to doing this until i finish both sides. So now i am just going to go through and bend them all just to get them out of my face and just to be able to put them in a bonnet. If, normally, i would just put them in my bonnet and go to sleep, but for the sake of this video i actually am going to blow dry them instead of letting them air dry, but normally they will dry overnight. So just keep that in mind so, like i said, i'm going to use a blow dryer and i'm just going to switch back and forth between hot and cold and for about 10 minutes until they're all the way dry. I do have hair that dries really really fast, so it doesn't take me long at all and, like i said, i normally will keep these in overnight and when i take them out in the morning they are always 100 dry. So next i'm going to actually style the u-part wig itself and i'm going to put it on my head just to make it a little bit easier. There are two options you can do it like how i'm about to do it and put it on your head and style it or you can just style it with a wig head or just holding it and brushing through and styling and adding products with it off Of your head, so i'm going to section it i'm going to do the front sections first and just spraying it with my water bottle or my water. Whatever you call this spray bottle and i'm gon na spray not getting too close to the roots. Yet because i don't want to get my leave out, wet, i'm just gon na make sure it's damp enough to where i can go ahead and brush through and i'm going to start brushing from the ends up to the roots. Just like you would, with your natural curly hair, i'm going to add mousse and eco styler i'll, do the mousse first, and this mousse is just from neil. I will add this into the subscription box as well, and once i put the mousse and i'm going to comb through it again or brush through it again with my brush, and i forgot to mention this is just a deadman brush. I believe and i'll put the link to that in my description as well. Um you can use any brush since it's not your natural hair, it doesn't really matter as much. They have like pretty much any type of brush with wires and you know like the typical wig brush style from walmart. I used to use a really cheap one from walmart before i got this, so anything will do after that. I am going to add my eco styler gel again and just making sure that it's evenly coated i'll, rub it into my hands and then rub it into my hair. So you don't want to put too too much, but you just want to make sure that it's pretty even and spread throughout, because if you put too much it's going to be crunchy, so just try to put a good amount in each section and then i'm going To separate that, and do the same thing for each section of my hair, just spraying water brushing it adding mousse, brushing it again and then adding the eco styler gel once i've done my entire head just brushing through it, making sure that it's pretty damp and defined. I'M going to turn on my blow dryer at high heat and i'm going to start going from the bottom up like so just trying to diffuse the hair. You can also let this air dry but, like i said, for the sake of the video i'm going to do my hair as if i'm going somewhere. So it needs to be completely dry and then i'm going to kind of slightly press into my hair as well. Once my hair is about 80 percent dry on one side that i'm working on, i'm going to take my blow dryer and start kind of pressing into my hair. More like i said, instead of going upwards from the bottom, i'm going to press into it. Just kind of adding a little more volume and diffusing it more just making sure all sections of my hair are dry and i'm going to go up from the bottom and press into my hair until it is 100 dry. So my hair is dry um. You can just see how much volume it is just from that, and this is only day, one hair we're not even done creating volume, so that's just from diffusing it and i'm gon na try to dry the roots after the rest of the hair is dry. So i'm just gon na kind of hold the diffuser at the roots for about two minutes, just to make sure that it's dry and it's not getting the hair and the flexi rods wet. And then i'm gon na do the same exact thing to the other side. So the last step before i take out the flexi rods is just to make the shape even and i'm going to want it to go like that and just kind of emulate. You know like a natural curly cut, so i'm gon na just start cutting upwards and just making sure that it looks even on both sides and that it's a nice cute shape to it and, like i said i did cut it using a video before and i'm Going to link that in the description box, but i basically just cut off the ends when i first opened it so now, i'm kind of just shaping it, i'm not a hair size by any means. So this is probably not any type of good technique, but it works for me. So that's kind of what i do just cutting upwards at a diagonal so now is where we add volume, and literally all i do is pick up the top layer, because you don't want to get the top layer any type of frizz. We want it to be. Really defined and i'm just going to take my brush and brush, but don't brush all the way through to the end. So, just at the root creating volume - and i'm literally just going to do that all over my head until i feel like it's voluminous enough for me and now i am going to proceed to clamp it down, and the main important thing for this is just to Get it as close to that original part that you made as possible, because this is going to help it blend more and just making sure that it's as secure as you need it to be. If you need to add bobby pins, you can. I do that sometimes, but as long as it's secure, this one was pretty secure without adding them. So let's start taking the flexi rods out. So now we're going to begin taking the flexi rods out, there's no specific technique, literally just unravel them and here's the curl. It should make very spirally and perfect and just do the same thing all over your hair, just taking them out and being careful not to cause too much frizz when you initially take them out. If you want to put a little bit - and i mean a little bit of oil on your hands when you take them out - you can so the way that i blend from here is. I will take one curl starting from the top again and i will either split it or just go ahead and use that piece and kind of just intertwine it with a hair or a piece of hair from the unit. And this just kind of creates. More of an illusion that it's blended and make sure that it's not super super tight to where it looks like a big twist in the front of your head, make sure that it blends. You know just kind of use your eye and your judgment and just make sure that you're pulling the piece of hair directly underneath the leave out and just keep using that same method for your entire leave out. So yeah, that's pretty much it. This is the finished. Look add more product at your discretion. Whatever you want, i think that the top part would have blended even better. If i had let it sit overnight and really really dry fully, because there is some frizz, but it still looks good still, blended, seamlessly and yeah. That'S it. Thank you all. So much for watching everything, you'll need will be in the description box link to the hair. I also have a discount code, so if you want to get some money off and you buy this unit or any hair on icy hair, make sure that you check the description box for my code so yeah. That'S it bye!


Comments
Karamel Beauty 💋: Omg I need this wig! Perfect for everyday
Ashanté Harrell: Beautiful. You really didn’t need the flexi rods just conditioner gel and then denman brush your hair into the top layer of the weave. Your natural curls are perfect
That's So Bella: amazing video, this helped me so much!
J J: ❤️You make it look so easy
Kennedy Joubert: Wow! Going to buy this hair right now!
Raven Sturdivant: I know this is a wig and you don’t sleep in it. But, you could mix your hair with the wig and then put the flexirod in. The blend is flawless. I’ve done this method with my curly hair sewin.
Lexi Nkongchu: beautiful!!!
Pretty lady: Great video! I missed your content. Hair is bomb.your so pretty.
Joyce Hattin: The wig actually over whelmed me!! Lol it was so much hair right out of the box. Mine was 18 inches but exactly the same thing as yours when I tried to try it on to put the combs in place they were tangling up in my hair! The v part would not line up right even though I kept putting the combs in my hair which was coming out at this point...the hair was growing and growing. I took it off slowly (because of the combs that was catching onto everything in the bathroom at this point lol..an hour and a half later. It was on the floor looking like a poodle!
Tasia Lewis: yesss more content please!
ShugTV: Finally new content
Lexi Nkongchu: bomb