No More Lace Fronts! Most Realistic Kinky Straight Upart Wig | Omg Queen Hair
- Posted on 10 December, 2020
- U Part Wig
- By Anonymous
√ Easy Install √ Affordable √ Realistic √ Quality - Everything you Need!
►►►►SHOP HAIR PRODUCTS USED IN VIDEO:
▶ Website: http://www.omgqueen.com/ (OMG! You are the Queen!!)
Merry Christmas! $35 Off over $399, Coupon: X35; $20 Off over $259, Coupon: X20; $10 off over $159, Coupon: X10
▶ Direct Wig Link: https://www.omgqueen.com/affordable-ki...
▶Affordable Kinky Straight Human Hair U Part Wigs UPW02
√ Hair Color: Natural Color
√ Hair Type: Virgin Brazilian Hair
√Cap Size: Medium Size
√ Hair length & Density: 20in & 150% Density
√ Cap Construction: Glueless U Part Lace Wig Cap
√ Cap Color: Black
▶Head Wraps/Head Scarf
Head Wraps/Head Scarf for Natural Hair or Wigs CT38
Link: https://bit.ly/3dxaouH
▶New Arrival Headband Wig
Beginner & Lazy girl friendly headband wigs
Link: https://bit.ly/37iJlBU
▼▼▼
New Arrival U Part Lace Wig, pls check this link: https://bit.ly/2O1MgnZ
More Virgin Brazilian Lace Wig, Pls check below link: http://bit.ly/2AkUSOW
More Hot Sale 360 Lace Wig, Pls check below link:) http://bit.ly/2i1tjSr
More Hot Sale Bob Lace Wigs, Pls check below link: https://bit.ly/2nVKfzH
►►►►Follow OMGQueen Social Channels
Facebook: https://www.facebook.com/omgqueenhair/...
Instagram: @OMGQueen https://www.instagram.com/omgqueenhair...
Youtube: http://bit.ly/28Z8vqe
Pinterest: https://www.pinterest.com/omgqueenhair...
Let's be friends
I N S T A G R A M : @faithfully_asia https://www.instagram.com/faithfully_a...
Hair page: @fab.u.luxe
https://www.instagram.com/fab.u.luxe/
➤ Shop wigs reviewed on my channel at discounted price: www.shopfabuluxe.com
LIKE...COMMENT...SUBSCRIBE...It's FREE! :)
♡ ♡ ♡ ♡ ♡ ♡ ♡ ♡ ♡ ♡ ♡ ♡ ♡ ♡ ♡ ♡
▼▼SHOP PRODUCTS USED IN VIDEO:▼▼
►Flat iron: https://amzn.to/2Qyeskg
►Eyelashes: www.shopfabuluxe.com/collections/mink-...
Don't have Amazon Prime? Try it 30 days free: https://amzn.to/2Ve4Vyq
WATCH MY OTHER VIDEOS:
Invisible Swiss Ombre Bob Wig Install ft Myfirstwig | Beginner Friendly Lace Front Wig
No More Lace Fronts! Most Realistic Kinky Straight Upart Wig | OMG Queen Hair
Human Hair Lace Wig Secrets! Reverse Ombre Blonde Lace Front Wig Install | Hairvivi
Short & Sweet. I Tried a T-Part Closure Lace Wig For The First Time And...
Most Realistic Wig! **NEW** Clean Bleach PrePlucked Hairline | Hairvivi
Hair Rehab! Fix Your Balding Frontal Wig & Restore Tangled Matted Hair
This NEW invisi-scalp wig is a GAME CHANGER‼️
How to Revamp, Maintain & Reinstall your Lace Wig to Keep it Looking NEW! ft myfirstwig
Only $100! Most Realistic AFFORDABLE braided wig!| Knotless| Glueless
HIGHLY REQUESTED: MY TOP 5 Hair Companies/Vendors | Honest Review
Melt Your Lace with this $3 Spray!! ft Alipearl Loose Deep Wave Lace Front Wig | Beginner Friendly
Tricks to slaying your Glueless Wig Installs, No Bald Cap Needed ft My First Wig Bob
(Understanding Lace) All Wigs are NOT created equal! *DETAILED* HD Lace Wig Review
Realistic Beginner Friendly Glueless Lace Wig - My First Wig Bob
Most Realistic Beginner Friendly Glueless Full Lace Wig - No Baby Hair! Yaki Straight
VIDEO/RECORDING EQUIPMENT
►Camera (Canon EOS Rebel T7i): https://amzn.to/2BPa3AM
►Lighting (Fovitec Soft Box) : https://amzn.to/2CKMqLx
►Diva Ring Light: https://amzn.to/2SulhC4
►Alternative (Cheaper) Ring Light: https://amzn.to/2LGZq7K
This video is sponsored, however the views and opinions expressed in this video are my own.
The description may contain amazon affiliate links, which means that if you click on one of the product links and make a purchase, I may receive a small commission. This helps support the channel and allows us to continue to make videos like this.
---------------------------------------------------------------------------------------------------
B U S I N E S S I N Q U I R I E S
I do NOT need free wigs! For product review or serious business opportunities, please email → [email protected]
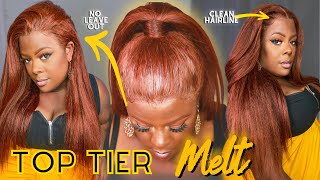
Hello, beautiful people welcome back to my channel, so today's video is an oldie but goodie, but with a slight twist today, i'm going to be reviewing a u-part unit from omg queen now, i'm no stranger to the u-part wig. That'S actually was like my initiation into the wig world back when tierra monet went by t's black pearl. However back then i used to make my u-part and i've never actually installed a store-bought u-part. So this is going to be the first time i'm reviewing a store-bought u-part. This is the kinky straight u-part unit from omg queen. This is in 20 inches. So i did try this unit on before i permed my hair, because i wanted to give you guys a look of what this hair would look like if you have a four type textured hair. So i'm going to insert clips for that video. So you could see what it looked like when i tried it on with my hair. Naturally, air dried, not straightened or anything else. So this is what the unit looks like when you receive it. There are two combs on the side and one in the middle and there's also these wig clips on both sides, as well as a wig comb in the back. Now it does have this a little um elastic band in the middle. So the first thing you want to do is go ahead and cut that off. I'M going to take this cone, i'm going to slide that in right there i didn't put it exactly at the front because it does have a little extra space right there. So you want to leave space for that and that's going to allow that to blend in better right. There take the comb in the back slide that under that braid and take the last comb and slide that in right there. Next, i'm going to take my leave out out so when doing the leave out, you want to be sure and leave out enough hair to cover on top of the tracks at the top of the u-part. As you can see, this is a very full unit. It is in 150 density, but you guys know when you come to kinky straight here. The hair is very thick, so even 150 density is very big, so this is an install in this basic sense of the word. This is how you can wear if you're, just looking for a protective style, and you don't really want to add any heat to your hair. However, i'm going to go ahead and i'm going to flat iron this unit just to tame it a little bit as well as add some layers in it to at least its true potential. So when straightening this hair, initially, i was straightening the hair using the flat iron at the normal temperature that i usually straighten here, which is about 375 to 400. However, i noticed that the hair was becoming just a little bit too straight, and it kind of doesn't make sense to have the hair that straight. If you have kinky straight hair and i'm going to, let you see what it looks like after i finish: straightening the entire unit at its normal temperature, the hair loss all of its natural kinks. So i then decided to only straighten the bottom of the hair. Pretty straight, and the reason why i put i straightened it straight - was just to kind of decrease some of that volume in this unit, because, as you guys saw, this unit does get very big and when i got towards the top, i just lightly glossed over it With the flat iron - and this is what the final results look like - i put up a split screen, so you can see the comparison between straightening, the entire unit straight and only straightening half of the unit straight. So this time i opted to go for a middle part, so i'm just going to put a straight part down the middle and i kind of underestimated the amount of hair i needed to leave out to cover the back. So in turn that ended up with me. Having to just kind of take some of that hair, that initially was intended to be for the part in space and use that to cover the back tracks. Next, i decided to go ahead and add some baby hairs and, as always, i like to use my extreme gel from wet line that really helps lick, my kinky roots down without turning it white, and this is what it ended up. Looking like once, i was finished. Lastly, i decided to just go ahead and cut some layers in it just to give it a little bit more dimension just so it didn't lay so flat. So i cut a couple of layers into the unit and then i went ahead and tried to add some curls. Now this is kinky straight here. You guys know. Kiki straight hair is very resistant to curling. The best way to curl kinky straight hair is to just go ahead and flexi rod it. So i would suggest planning in advance now you can curl it with a curling iron. However, they're not going to last you too long and to just kind of finish this up, i decided to tie my hair down and that's mainly just to lay those edges that i slicked down. I'M gon na leave it on for about five minutes and i'll be right back, and this is what the final results look like now. This is the hair straightened, but still unpermed, as you can see, it's still a natural texture and i'm just showing you how i was playing around with the part in space. It'S the same leave out that i had. However, it does allow some versatility to change the part in space ever so slightly. If you choose okay, so now i'm gon na, let you guys see what this you pot will look like. If you have permed here, i'm going to go for a middle part and my nails are too long. So i'm not going to be able to braid my hair, so i'm going to have my daughter, braid, my hair for me, okay. So since my hair is really short, i know most people like to put their hair in a lot of cornrows, but my hair is short, and i change up my hair too often to actually do that. I asked her to do one braid going straight to the back and then the second braid was going straight to the back, but it had a slight curve on it and the reason i suggest adding a curve is because it helps the hair blend in a lot Better without showing your leave out, okay, now i'm gon na try this on. I have to be really conscious to blending the hair on top and also because it's short, in my opinion, the less leave out the better - and here i'm lightly gliding over the leave out here with the unit underneath just to ensure that seamless blend - and this is What the final results look like, i think it looks pretty natural. What do you think be sure, and let me know in the comment section down below okay, so my daughter just came by and she said it looks natural. I don't know what it's looking like on. The camera, but that's a good thing - that's pretty much all i'm going to do with this unit, so i gave you three different scenarios, so you can see if any of your hair textures fit within them. So you can get a better idea on how this unit would look. One good thing about this unit is that it comes in different colors, so you can get this in natural black off black jet black and i believe, there's like a brown color as well. But that's a really good bonus, because you don't really see that many options for units nowadays, so i'm really happy to see that that's offered. Another thing is that this unit actually comes with a right side, part a left side, part and a middle part. Had i known, i would have just ordered a left or right side part because you guys know i'm not really a fan of the middle part, but, as you can see, the middle part is pretty versatile and you can actually swipe it around and wear it as A side part as well now the starting price for this unit is around 160 dollars and i believe that's for a 16 inch. So that's pretty good pricing. In my opinion, this is a 20 i'm going to stand up really quick just so you can see where it lands on me and, as you can see it's pretty long, so a 16 inch in my opinion would be like a very perfect natural lamp, not that 20 is not natural as well um, but i think 16 inch would be perfect for me for every day. So if you guys are interested in purchasing this unit, as always, i will have all the links provided in the description box down below and if they do have any coupon codes. I'Ll also have that in the description box as well, but before we get out of here guys, i'm gon na need your help, naming this wig. What are we gon na call her go ahead and leave your name suggestions in the comment section down below, and i did pick a name for the unit i reviewed last week, the new name as well as the person who submitted that name will be listed across The screen and if you're, not part of the faithful fam, go ahead and hit that subscribe button and join the family, and it's always important until next time you guys stay blessed and if it be god's, will i'll see you in my next video take care now.

Comments
theeBerry's: It’s so bomb! I love how full it is and how it looked both ways when you straightened it. This is a vibe sis.
amoryll36: Stunning as always. I love the versatility of this Your lip had me hypnotised
Downtown on 7th Avenue Handbag Adventures: I love full units like this. It looks so natural. Great video as always.
Kita the Explorer: It does look pretty natural! I love the look. It blends very well and it’s versatility. And the pricing is decent.
PYT24K: You always give a thorough review. We appreciate you. And yes this looks very natural on you.
Faithfully Asia: Hey beauties It was refreshing to wear a wig w/o lace and still have parting. Let me know state you’d prefer to wear this wig. Comment down below and let me know.
Paige: Gorgeous!! Very natural!!❤️
Riana Anaïs: This is gorgeous and so natural looking!
Bri Babie: Love how you were so versatile with the wig I love it
Black Diamond29: Thank you for showing so many looks with this wig! You killed each look
Trashawn Harris: Yes it looks extremely natural!
Love Yourself: This hair looks so natural and Beautiful. I Love it in the kinky texture but it looks really pretty straightened Have a Blessed Day and Stay Safe
Ugonnwa Otti: This is so neat and you’re so beautiful ♥️♥️
J Allen: This was a great look. It looks natural
Pam V: Excellent, you go girl!!!!!✌️
Tina Branch: Love it
patrice moore: If I didn't know you wear wigs, I would have thought this was your hair. This is so natural and pretty
Robin Perryman: Yep. Looks natural. I always wondered what a u part was. Interesting.
Alecia Lennox: This might be a silly question but do kinky straight wigs get matted easily? I wanna try one but I’m not sure how to store it without ruining it. Also do these units revert after you straighten it?
Arion Zhane's World: I’ve really been wanting to try a u part wiggggggg
Eulita Watts: Really look natural, very nice unit❤
PrissieB: Very natural looking, I was wondering how these actually look
Fun Art Creations: Beautiful!
Melissa Charles: Tbh the middle part looks best with ur face shape. You’re gorgeous
Mariel Linda: I mean, excellent. I am relaxed and my ks-upart is in the mail.... can't wait.
Theresa Purnell: Blessings and Peace!
unknown _______: Can you wear it as middle and side part??
Dana Hudson: U part wig look very natural & the middle part look good on U.
Sabrina Jenkins: How does it look when wet? Can you wear it in a curly wet state?
jackie craft: I'm in Colorado and I need some clip-ins don't need none of that straight straight I have a blowout on my hair so is straight and Nappy if anyone see this let me know
McKenzie Smith: Name her Jhoni
Kaysexy: It look good on you but I don't want to go back to that I thank God for lace wig.
Janisha Black: Ooohhh she thick thick